¶ About Sermoon X1
1. What are the standout features of the Sermoon X1 compared to previous scanners?
(1) Higher volumetric accuracy of 0.02mm + 0.04mm/m.
(2) Deep-hole scanning, continuing the performance of S1, the measured depth/diameter ratio can reach up to 6;
(3) Larger single-frame field of view (FOV): Under the same unit area, less number of marker points will be required for X1 compared to S1(minimum 4 markers per frame need to be recognized);
(4) Higher frame rate (7-line/single-line can reach up to 90fps; the cross-line is 85fps, 70% improvement over Raptor X);
(5) The X1 features a CNC-machined all-metal unibody optoelectronic mount and lens holder, providing stable accuracy performance, ensuring low impact of ambient temperature changes on accuracy.
In summary, Compared to RaptorX, the S1 and X1, the Sermoon series have the additional feature of deep hole scanning, and the scanning speed of the single-line scanning mode in the deep hole is very fast, reaching up to 90 fps.
The single frame FOV is larger - fewer marker points are used (X1 > S1 > RaptorX).
The volume accuracy of X1 is higher (X1 > RaptorX > S1).
X1 and RaptorX are equipped with ScanBridge, while S1 is not.
2. How much faster is the Sermoon X1 for scanning same-sized models?
Parallel and single-line modes: 90 fps.
Cross-line mode: 85 fps.
Measurement points per second: 1.734 million (70% improvement over Raptor X).
Infrared mode: 30 fps.
3. Is Sermoon X1 user-friendly and wireless?
1) The new software continues the long-standing simple human-machine interaction design and guided functionality;
2) Upgraded industrial-grade function photogrammetry, which can further improve scanning accuracy;
3) The scanning range, efficiency, and environmental adaptability have also been further enhanced.
4) Come with ScanBridge standard, no need to purchase separately.
4. Recommended applications for the Sermoon X1?
X1 excels in various scenarios, especially for high-precision requirements and large-size industrial applications. When scanning with the photogrammetry function, it can further improve the overall accuracy, thereby meeting the requirements of fields such as industrial design, reverse engineering, and quality inspection. It supports scanning surfaces of black, shiny, and metallic materials. For transparent or highly reflective objects, it is recommended to spray a developer to enhance the scanning effect. The built-in deep hole scanning mode can easily capture details of complex structures such as slits, grooves, and deep holes.
5. What's the Photogrammetry function? How does it work? What's the benefit?
The principle is to place the pre-calibrated scale bars on or near the surface of the object before scanning. Through the built-in photogrammetry algorithm, the dimensions of the scale bars and its nearby positions are calculated according to the pre-calibrated dimension values, thereby the scanning accuracy further improved. For detailed usage instructions, please refer to the Sermoon X1 Photogrammetry Tutorial.
6. Can the X1 wireless bridge work with the Otter and Raptor?
Yes, Scan Bridge compatible with Raptor series and Otter.
7. How long is the X1 cable?
4.5m, designed for stable connection on Sermoon X1, compatible with Raptor series and Sermoon series.
8. What are the computer configuration requirements for Sermoon X1?
The recommended configuration is i7-Gen10 CPU + Nvidia graphics card (8GB VRAM) + 32GB RAM + Windows 10/11 (64-bit) or higher, or for the Mac with M1/M2/M3/M4 CPU+16GB RAM.
However, better configurations will result in more stable frame rates and faster processing speeds.
Taking the author's actual usage as an example: Intel i9-13950HX + NVIDIA RTX4000 Ada (20GB VRAM) + 64GB RAM + Windows 11 Pro (64-bit), with an average frame rate of 70fps+ when scanning with crossing line.
¶ About Software
1. Does the software support dimensional inspection?
Not currently. The software provides dimensional data after scanning. Export the mesh as STL and use third-party softwares (e.g., Geomagic Control X, Polyworks, QuickSurface) for inspection.
2. Can scanned data be directly converted to STP? Answer?
The scanning software does not support direct export to STP format (quad-mesh data). Use third-party software (e.g., Geomagic Wrap, Geomagic Design X, or QuickSurface) for conversion. Note: Direct conversion may cause surface structure issues; reverse engineering is recommended for standardized models.
3. Are our scanned data compatible with other reverse engineering software?
Yes. Export data as STL and import it into software like UG, QuickSurface, or Geomagic Design X.
4. My scanner is connected to the computer, but it is not being recognized. What could be the issue?
The Sermoon X1 uses industrial-grade components. To ensure accuracy and stable scanning results, the software has also been optimized. With normal wiring, the scanner can usually connect in about 60 seconds. If the waiting time far exceeds this and the scanner still cannot be connected, please refer to the following guide:
1) Ensure that the interfaces in the hardware devices are securely connected.
-Check that the power adapter is firmly plugged into the power source.
-Ensure the power cable and data cable are securely connected.
-The USB interface is stably connected to the computer.
-The data cable is securely connected to the scanner. (If USB 3.0 is incorrectly recognized as USB 2.0 by the software, quickly unplug and reconnect the USB cable from the computer.)
2) Pay attention to selecting the appropriate USB port on the computer.
The Sermoon series only support USB 3.0 and above ports.If the computer has a Type-C interface, such as a Mac, try using the included USB-A to Type-C adapter to connect the scanner. Please avoid using non-officially provided adapters and docking stations.
3) If the scanner still shows as disconnected, check whether the camera and firewall permissions are enabled.
If all the above steps have been completed but the connection is still lost, check the status of the three scanner cameras in the Device Manager. If they are displayed normally, verify whether the camera and firewall permissions are enabled.
4) What i f the connection issue persists after checking the above scenarios,
You can contact customer service for one-on-one consultation. It could be a cable issue—try replacing the cable. Alternatively, test with another computer to determine whether the problem lies with the computer's USB port. You can also try updating the USB drivers or performing further analysis.
5. Why does the software get stuck on the loading screen?
The computer configuration may be too low which is insufficient to support the efficient operation of the scanner. Check the official Wiki https://wiki.creality.com/en/3d-scanner/tutorials/general/performance
¶ About Scanning Technique
1. Why is calibration slow or unsuccessful?
Our calibration function is already optimized. If issues persist, ensure the setup follows the instruction diagram. You can refer to: https://wiki.creality.com/en/3d-scanner/crealityscan/calibration
2. Why is there blue light but no laser line during scanning?
Blue laser mode requires markers. If blue light is on but no laser line appears, the scanner may not detect markers, you can try adjusting the distance between the scanner and the markers, or check whether the current exposure is in an underexposed/overexposed state. Notes: Do not use the calibration board for scanning — its points are not markers. Store the calibration board properly as it is a precision instrument.
3. When to use markers? How to apply them correctly?
Markers are mandatory in blue laser mode. In infrared mode, use markers if the object lacks geometric/textural features for tracking. Apply markers on flat or low-curvature surfaces: larger markers with wider spacing for large planes, smaller markers with tighter spacing for complex details. Avoid covering features like holes or engravings. Ensure irregular distribution. For details, see: https://wiki.creality.com//3d-scanner/tutorials/general/marker
4. Why are there holes or orange surfaces after meshing?
(1) Dead corner structures on the object may cause data loss, you can consider spraying in these dead corners to obtain more details.
(2) If the noise removal percentage is too high, low-density areas may be deleted.
¶ Sermoon X1-Photogrammetry Tutorial
Scale Bar: Enable virtual 3D models to obtain reality dimension proportions.
Scale calibration When performing 3D scanning and reconstruction of a model, only the "shape" can be restored, but the "size" is unknown. The scale bar provides a reference of known length (e.g., 40 cm), based on which the software converts the relative model to real-world scale.
Accuracy improvement The scale bar can correct the deviation caused by lens errors or shooting angles, ensuring the reliability of the dimensions of the generated model.
Measurement reference Once correctly calibrated, users will be able to measure distances, areas, or volumes consistent with reality when reconstructing the 3D model.
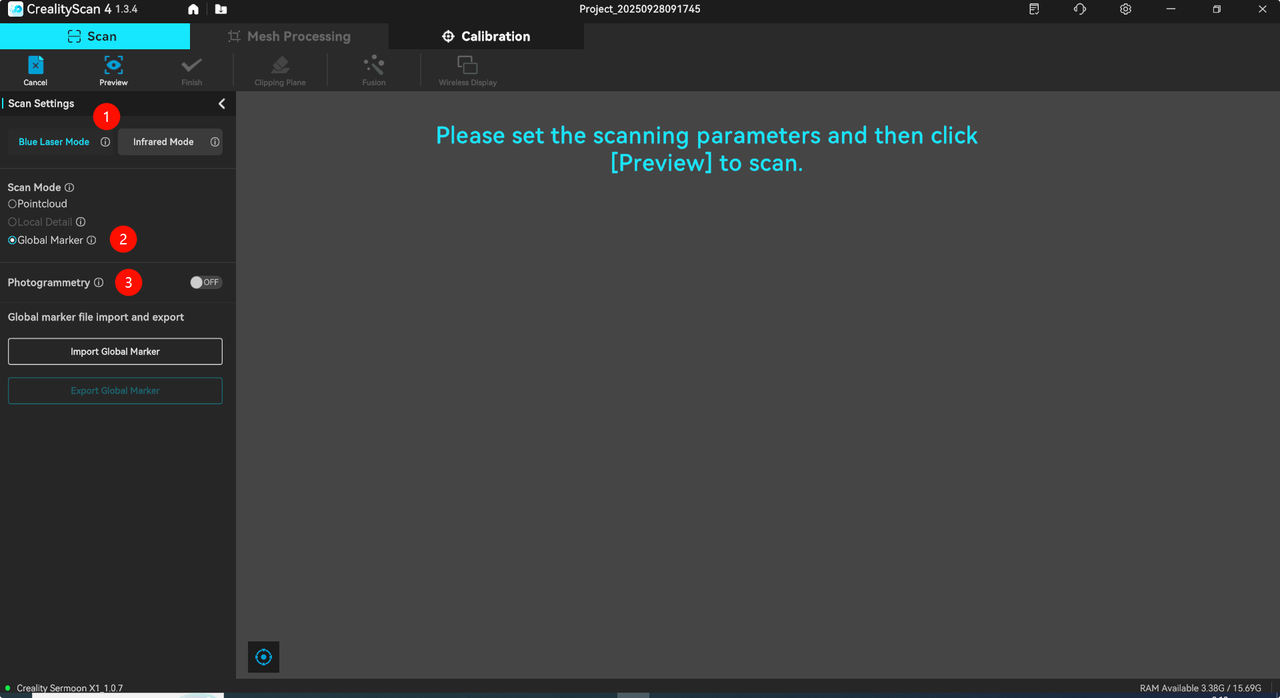
How to use it?
1) Blue Laser Mode - Scan Mode - Global Marker
2) Photogrammetry - turn on (default: off)
3) Turn on the Photogrammetry, add Scale Bar - Scan the QR code on the ruler included with the X1 device (temporarily supporting up to 2 rulers)
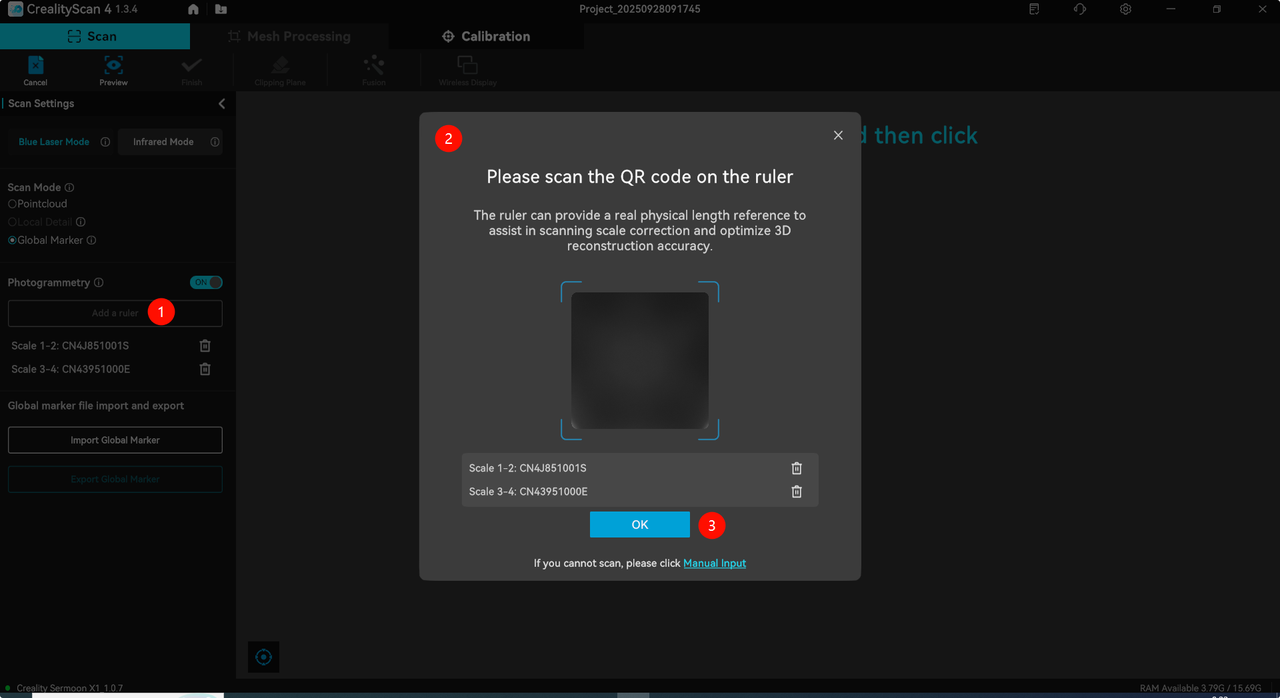
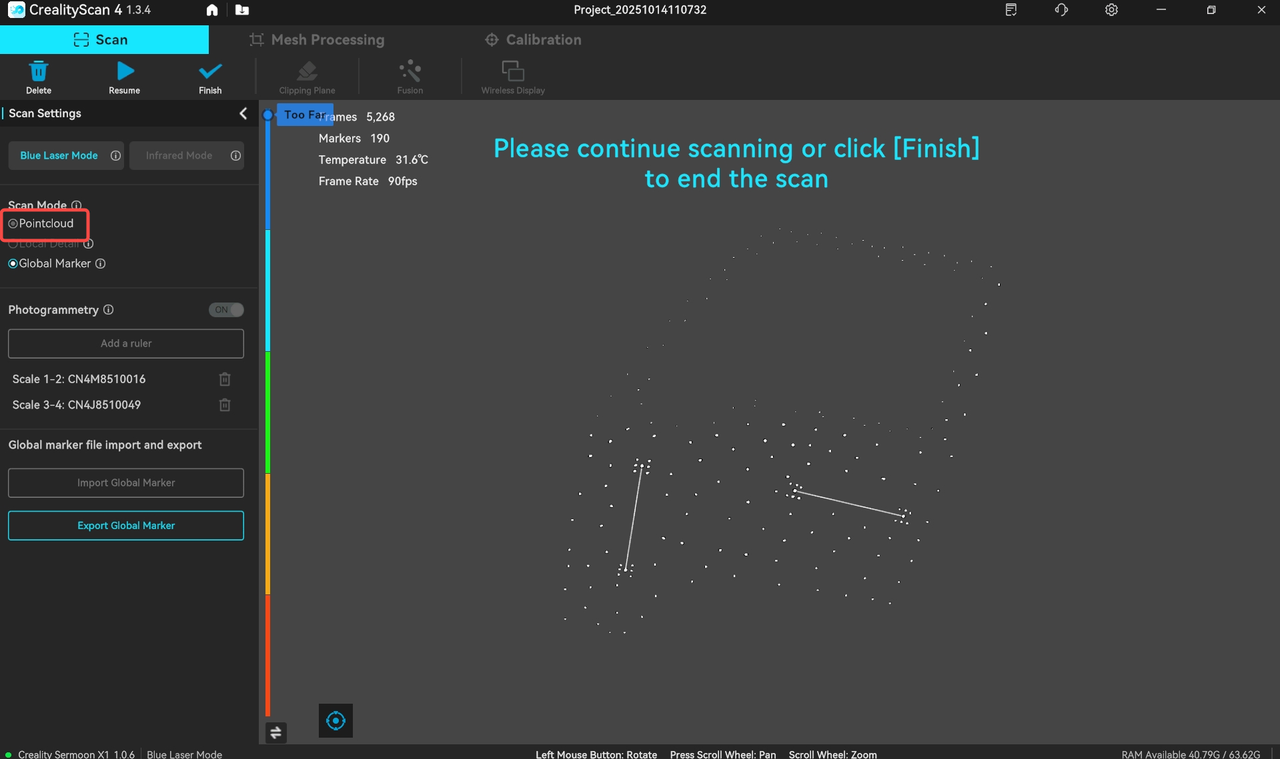
4) After add the scale bar, when you scan the global markers, the scale bars which you added also can be identified, it will display scale bar numbers 1-2, 3-4, and shown with they are connected by lines, indicating that the scale bars have been identified and is in effect.
5) After completing the golbal marker scan, click on Pointcloud - OK
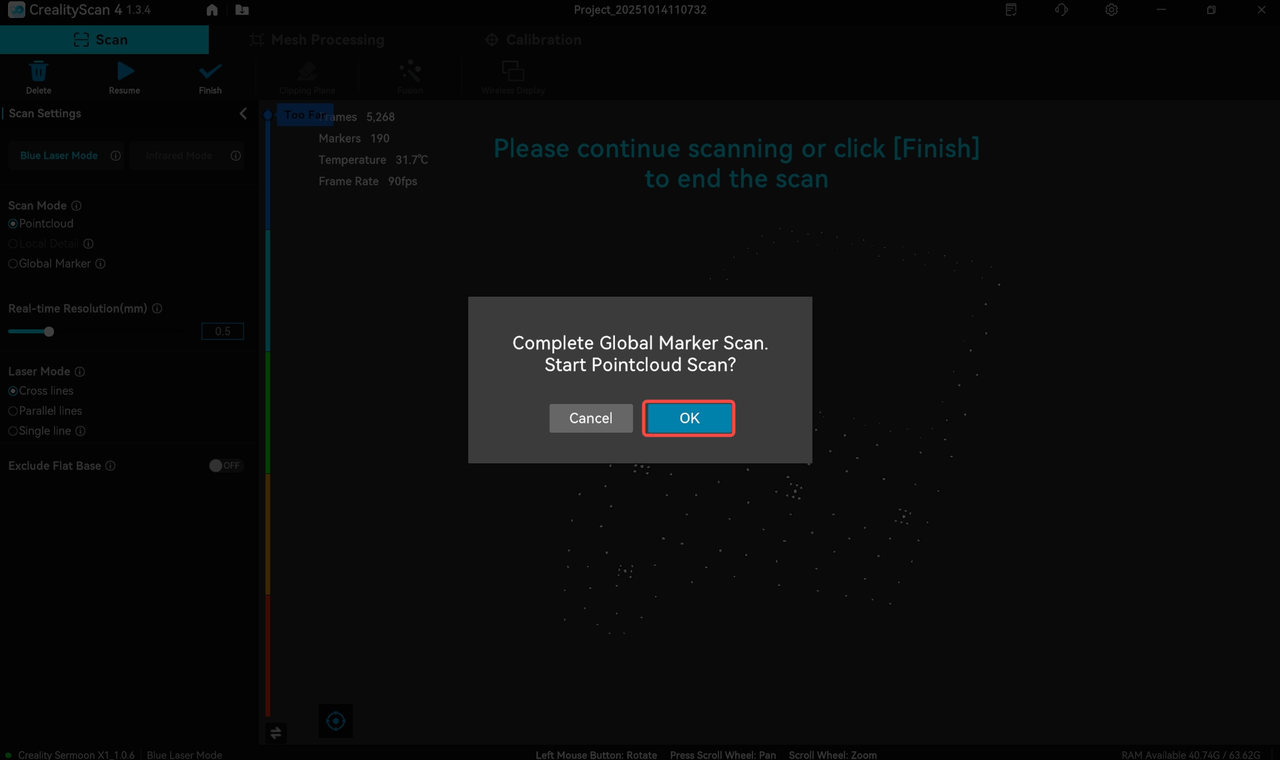
6) After entering Pointcloud mode, remove the scale bars from the object surface, ensure that the position and number of markers during scanning remain unchanged, then you can start scanning.
7) If the scale bars are placed outside the object while golbal marker scanning, you can directly perform the scanning without removing the sclae bars, as shown in the figure below:
8) The accuracy obtained at this time will be higher than that of scanning without scale bars, and subsequent operations can be carried out according to normal processing steps.