¶ 1. Scan Mode Overview
¶ Infrared Mode
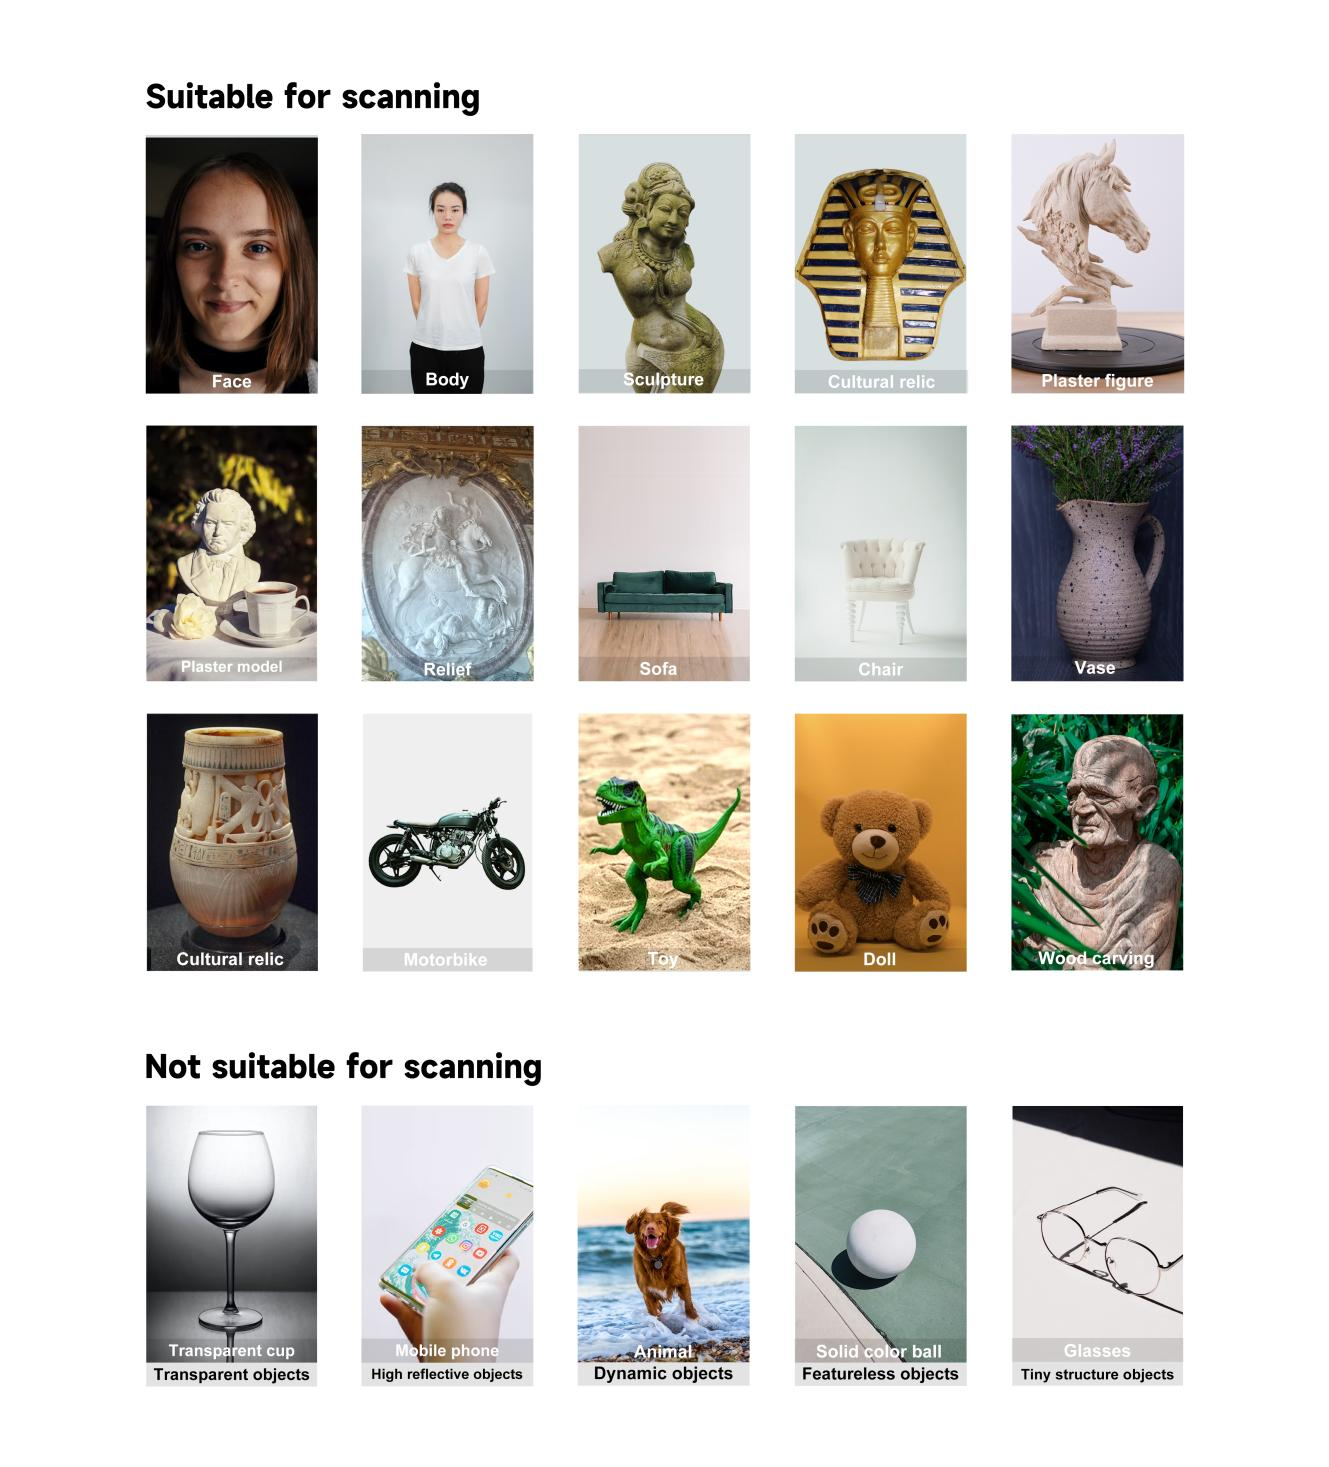
Suitable for fast scanning of human bodies, faces, sculptures, cultural relics, and similar targets. Supports geometry tracking, texture tracking, and marker tracking. This mode performs particularly well in scenarios such as full‑body scanning (infrared light is safe for the eyes), medical rehabilitation, and cultural heritage digitization.
¶ Tracking Mode Selection:
- Geometry Mode: Suitable for objects with rich, irregular geometric features (e.g., sculptures, figurines, faces).
- Texture Mode: Suitable for objects with rich textures but limited geometric features (e.g., painted vases, ceramics, printed figurines).
- Marker Mode: Suitable for objects with neither obvious geometric nor textural features. Markers can be attached to the object surface or its surroundings for tracking assistance (e.g., plain mugs, spheres, cardboard boxes — limited geometry, texture‑poor surfaces).
¶ Blue Laser Mode
Blue laser scanning delivers high precision and rich detail, clearly reproducing edges and fine structures. It is especially suitable for industrial parts, mechanical components, and other scenarios requiring high accuracy. In this mode, the scanner reconstructs contours by capturing the deformation of laser lines on the object surface. However, since there is insufficient surface feature overlap between consecutive frames, markers must be used for alignment. Missing or occluded markers may result in tracking failure.
¶ Laser Mode Selection (Note: Different devices support different laser modes.)
- Cross‑lines: Suitable for fast scanning of medium‑to‑large objects with high efficiency.
- Parallel lines: Suitable for fine scanning, delivering more complete detail reproduction.
- Single line: Suitable for hard‑to‑reach areas such as narrow gaps and deep holes.
.png)
¶ Blue Laser Marker-Free Mode
Scanning without markers is supported only on Sermoon P1, Sermoon S1, and Pika. This mode eliminates the need to attach and remove markers, significantly improving scanning efficiency.
- Supports cross‑line mode scanning, suitable for medium‑to‑large objects or objects with distinct surface textures.
- In markerless mode, it is recommended to move the scanner at a slower speed.
.png)
¶ 2. Pre‑Scanning Preparation
¶ 2.1 Which Objects Should You Start With?
First, check the minimum scan size supported by your scanner:
- Ferret series: Minimum 50 × 50 × 50 mm.
- Otter series & Pika: Minimum 10 × 10 × 10 mm.
- Raptor & Sermoon series: Minimum 5 × 5 × 5 mm.
.png)
.png)
¶ 2.2 Scan Preview and Distance Adjustment
After setting the scan mode, click Preview and observe the preview window:
- Aim the scanner at the object and ensure it is fully visible in the center area of the window (occupying at least 60%), with most of its surface being detected.
- At the same time, keep an eye on the distance indicator bar – maintain the optimal distance.
.png)
¶ For Blue Laser Mode:
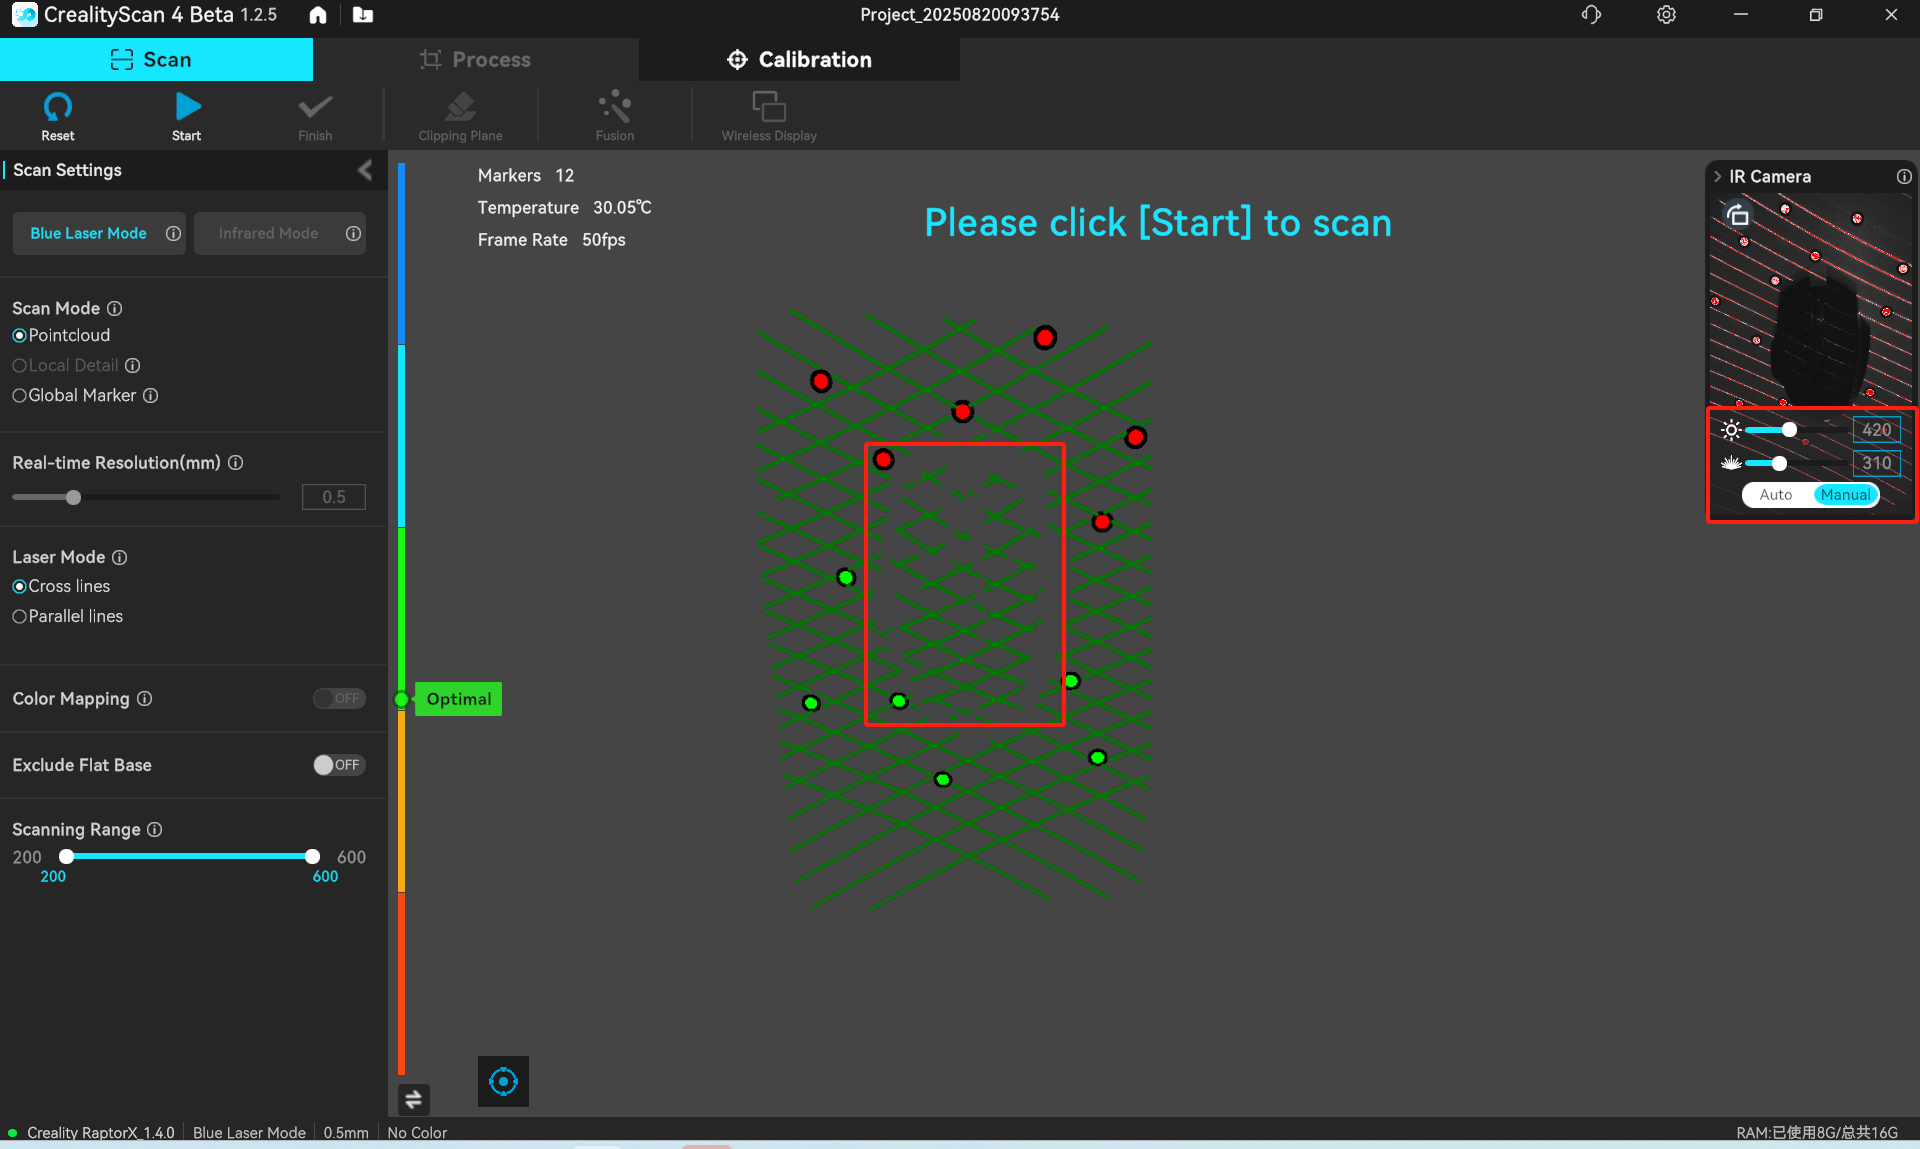
This mode requires markers. The IR camera window must detect 4 or more markers before the scanner starts emitting laser lines for data acquisition. The following issues may also prevent laser emission:
- The scanner is too close to or too far from the object.
- The environment is too dark or too bright, causing abnormal marker detection.
- The markers used are not Creality official markers.
¶ 2.3 Exposure Check
Check the IR camera window in the upper‑right corner of the software to verify the camera exposure status.
For Infrared Mode, from left to right: underexposed, ideal exposure, overexposed.
.png)
For Blue Laser Mode, from left to right: underexposed, ideal exposure, overexposed.
.png)
¶ 3. Scanning Process
During scanning, the real‑time frame rate is displayed in the upper‑left corner. If the frame rate consistently drops below 10 fps, it may indicate insufficient computer performance, which can cause lagging or even tracking loss. In this case, please refer to the Performance requirements of the devices instruction and consider upgrading your hardware.
.png)
Try scanning the object from different angles to capture more complete data. When scanning, you can first move the scanner slightly farther away; once tracking is stable, move it closer to the optimal distance for fine‑detail acquisition.
.png)
¶ Infrared Mode
During the first 3–5 seconds after starting a scan, be sure to move the scanner slowly (or briefly hold it still). Moving too fast may result in insufficient data, leading to subsequent alignment failures.
¶ Blue Laser Mode
This mode only captures data along the laser lines. Therefore, you must keep the scanner moving or rotate the object to progressively finish data acquisition.
Comparison of scanning results with the scanner stationary and continuously moving.
¶ How to scan the bottom of an object?
For Infrared Mode, when using geometry or texture tracking, you can flip the object directly. Aim the scanner at an already scanned area, then click the Start button to begin scanning. After tracking becomes stable, gradually move the scanner toward the unscanned area.
For Marker Mode, both Infrared Mode and Blue Laser Mode allow direct flipping only when markers are attached directly to the object itself. Aim the scanner at the already scanned markers, then click the Start button to begin scanning.
If markers are placed on the surrounding environment, do not flip the object.
.png)
¶ 4. Common Scanning Issues and Solutions
¶ 4.1 The scan data appears stretched, keeps rotating, or shows tracking misalignment. How to Prevent Tracking Loss?
Issue Example 1: "Scan data appears stretched" occurs when scanning objects with large flat surfaces.
Issue Example 2: "Scan data keeps rotating" occurs when scanning spherical, circular, or symmetrical objects.
Issue Example 3: Tracking failure and misalignment occur on small objects.
Possible Causes:
- Scanning movement too fast.
- Insufficient surface features/geometry.
- Improper scanning distance leading to tracking loss.
- Object size falls below the scanner's minimum scan range, or incorrect scan parameters (tracking mode, object size setting, exposure too high/low, improper resolution setting).
Solutions:
- Slow down the scanning speed – ensure the scanner can stably track the object surface.
- Switch to marker tracking mode – attach markers to or around the object.
.png)
- In Geometry Mode, place other objects with rich geometric features nearby (without occluding the target) to enhance geometric feature detection.
.png)
- Confirm the object size is within the scanner's scan range, and select the correct mode and parameters in the scan settings.
¶ 4.2 Ghosting or Duplicate Point Clouds
.png)
.png)
Possible Causes:
- Insufficient object features – alignment errors occur after tracking recovery.
- Object placed on the calibration board during scanning (the board's pattern interferes with tracking).
- Markers arranged too regularly (e.g., straight lines, triangles, circles), causing abnormal recognition by the scanner.
Solutions:
- If misalignment has already occurred, check if insufficient features are the cause. Add more features, or use markers with marker tracking mode and rescan.
- Do not place the object on the calibration board.
.png)
.png)
¶ 4.3 Scanner Does Not Capture Object Data
Possible Causes:
- Poor lighting conditions – sunlight (outdoors or through windows) interferes with the sensor's ability to detect the object.
- Improper scanning distance – resulting in data acquisition failure.
- Special material properties – the object surface is pure black, highly reflective, or transparent.
- Incorrect scan parameters – exposure too high/low, or resolution set too large.
Solutions:
- Avoid scanning in environments with strong lighting. If you need to scan outdoors, it is best to do so at dusk or on an overcast day. At dusk, there is still enough ambient light for scanning, while direct sunlight is less likely to shine on the object being scanned.
- Keep the scanning distance within the optimal range.
- For highly reflective or transparent objects, apply scanning spray first. For detailed instructions, refer to: How to Scan Black/Reflective/Transparent Objects.
- Adjust exposure settings to suit different materials. Example with a black mouse:
Infrared Mode: Adjust IR exposure until the preview point cloud is clear and complete.
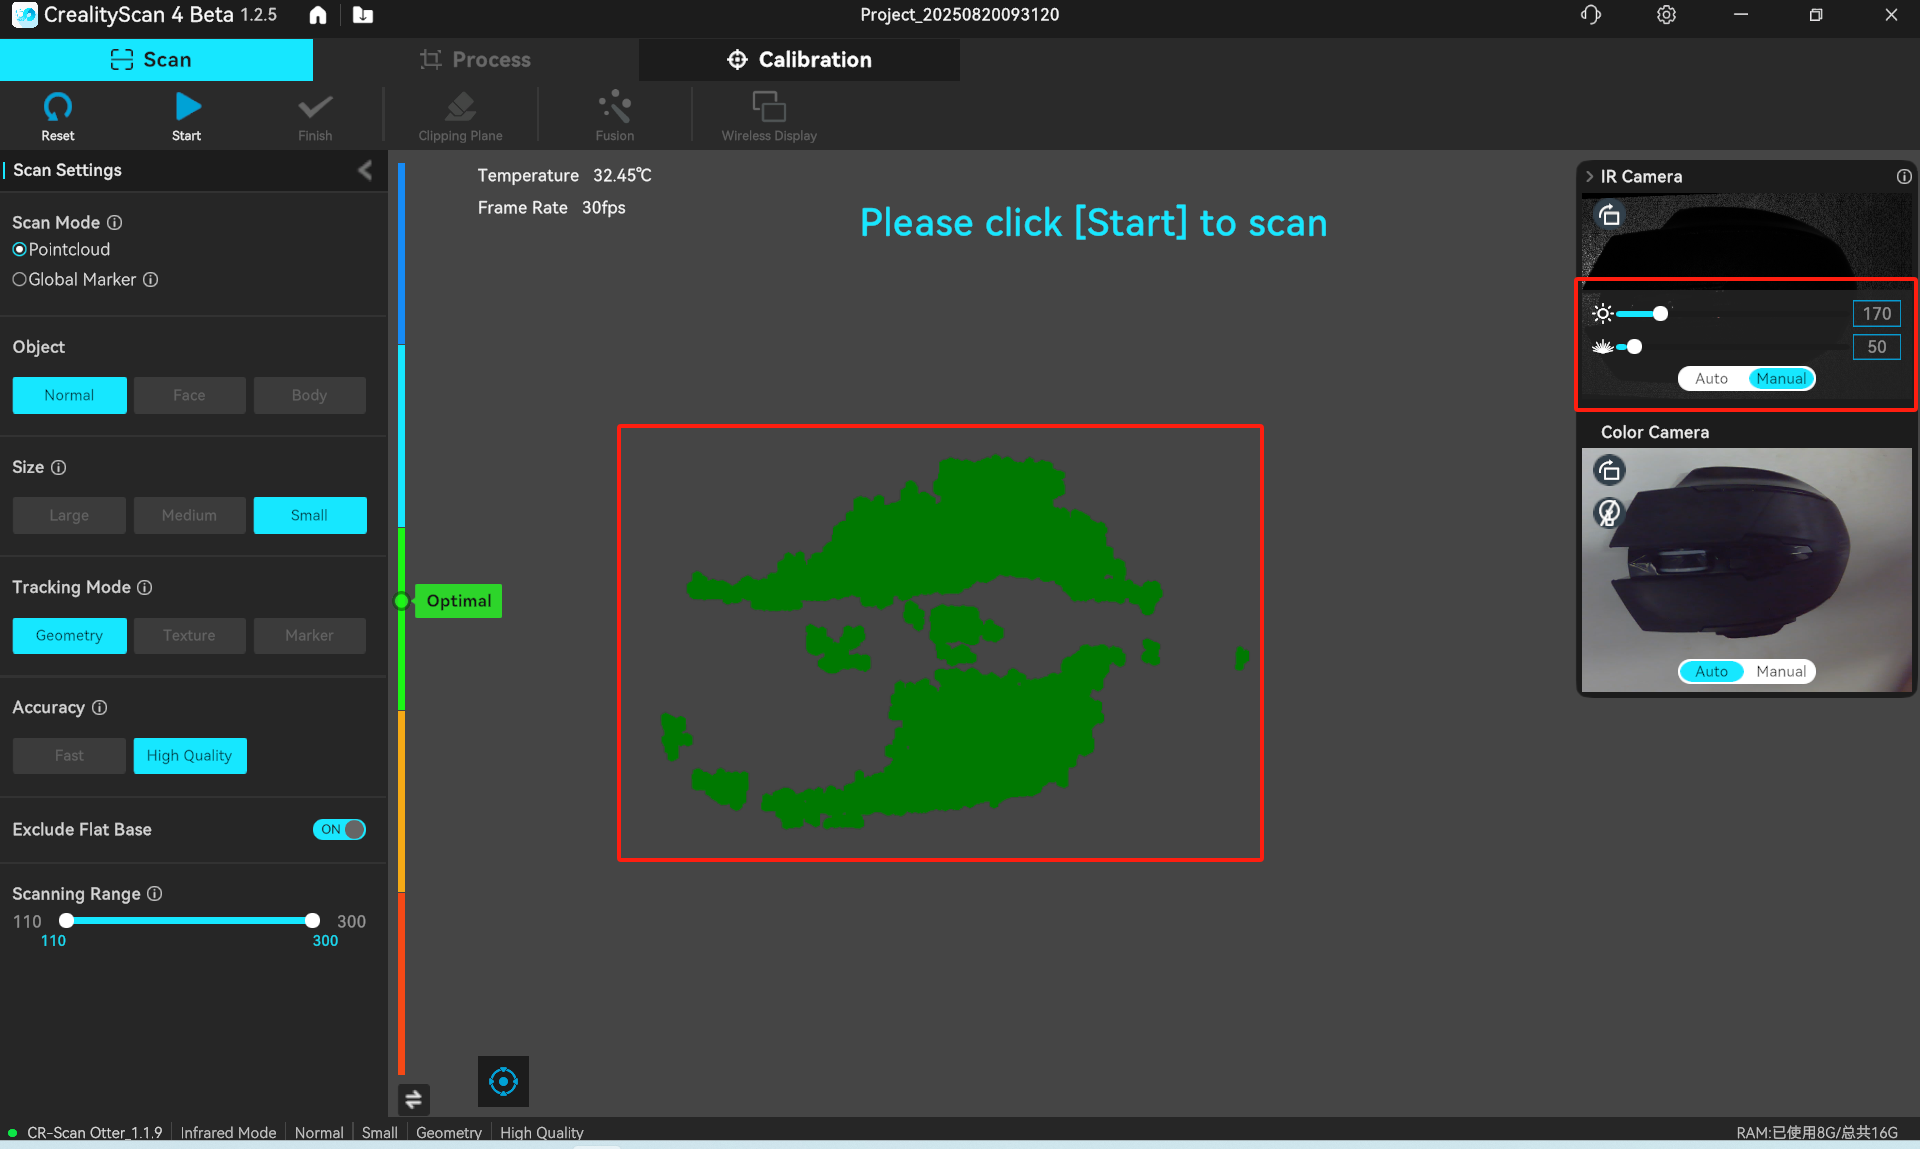
Before adjustment
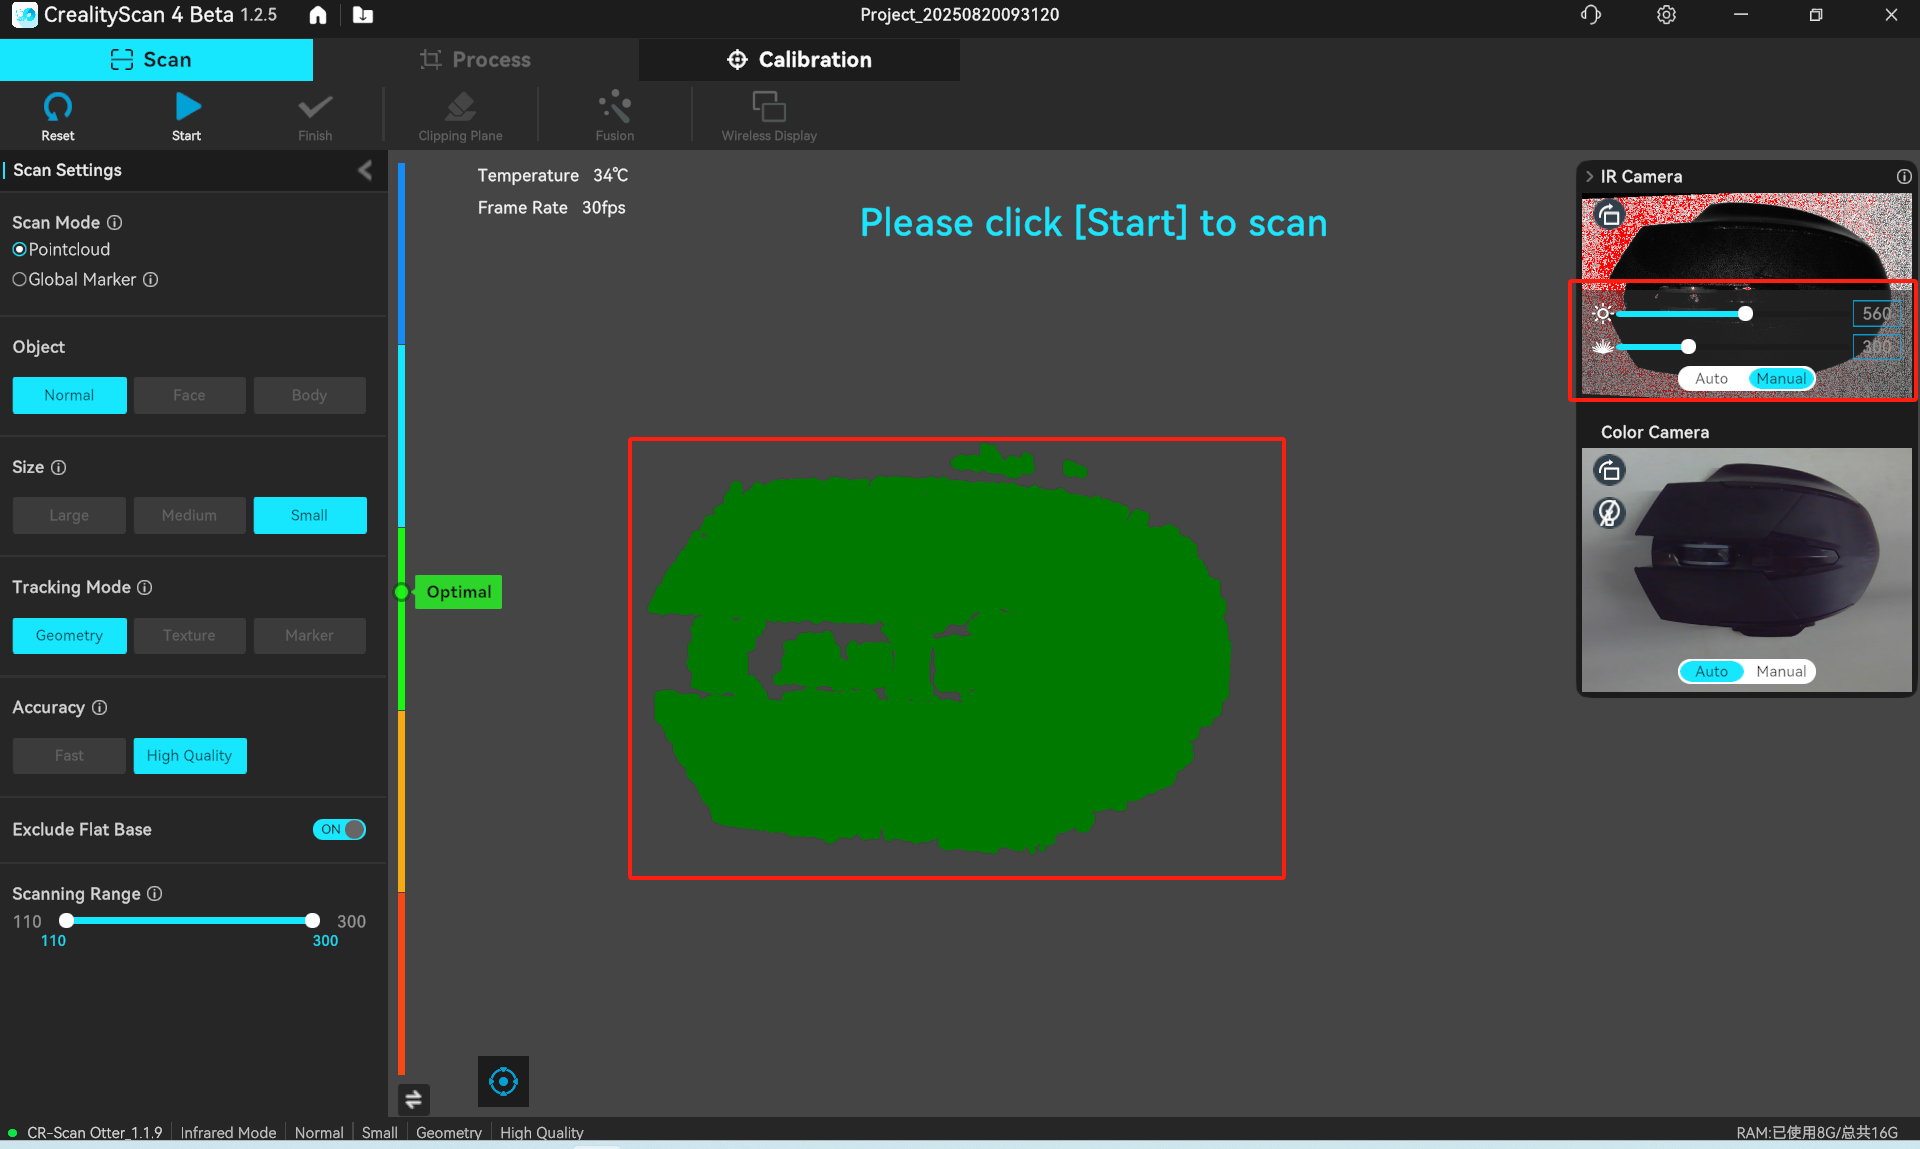
After adjustment
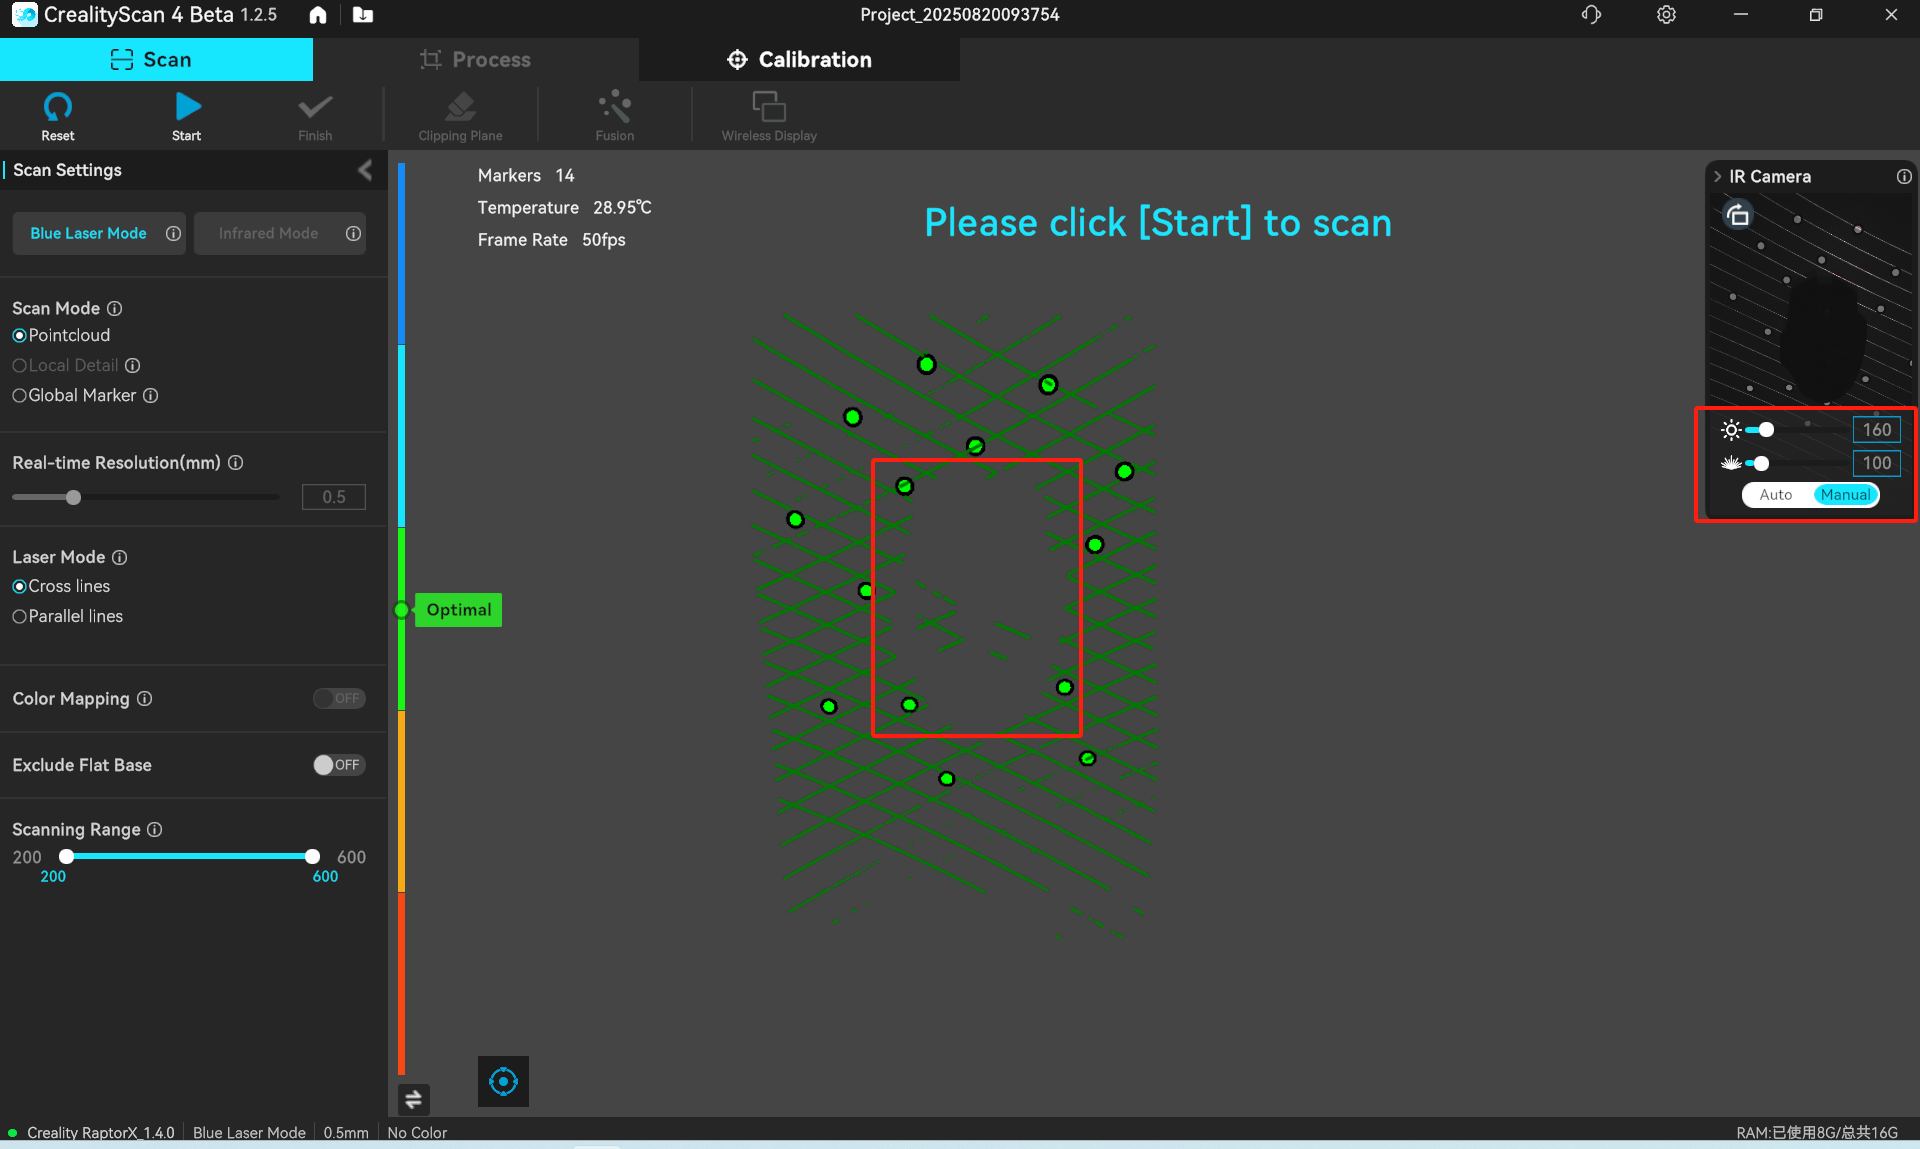
Before adjustment
After adjustment
¶ 4.4 Holes or Missing Data in the Scan
Solutions:
- Scan missing areas from different angles. Change the relative position and angle between the scanner and the object to capture more viewing angles.
.png)
- Deep holes/slits – the scanner can only capture surface data and cannot reach internal structures. For deep holes, grooves, or slits, use a model equipped with single-line scanning mode (e.g., Sermoon series, capable of up to 1:6 depth‑to‑diameter ratio).
- If data cannot be captured due to occlusion and angle adjustments do not help, the missing parts can be repaired through software hole‑filling or re-modeling.
¶ 5. Post‑Processing
¶ Remove Unwanted Point Cloud Data
If scanning has captured unwanted planar data (e.g., desk surfaces, turntable), it is recommended to use the Clipping Plane feature to trim it away. For detailed instructions, refer to: Clipping Plane.
.png)
For auxiliary objects used for feature tracking, or noise data generated during scanning, use the Connected Components tool → Invert Selection to quickly select and delete them.
.png)
¶ Repair Holes and Missing Data on the Scanned Object
-
Use the software's built‑in Hole Filling feature to intelligently fill gaps.
Tip: For best results with hole-filling, ensure the model surface is as smooth as possible before applying the function. For detailed instructions, refer to: Hole Filling. -
For gaps that cannot be automatically repaired by the software or recovered by rescanning, use professional 3D modeling software (e.g., Geomagic, QuickSurface, ZBrush) to manually create geometry to fill the missing portions.
¶ 6. Additional Tips
¶ When to Use Markers?
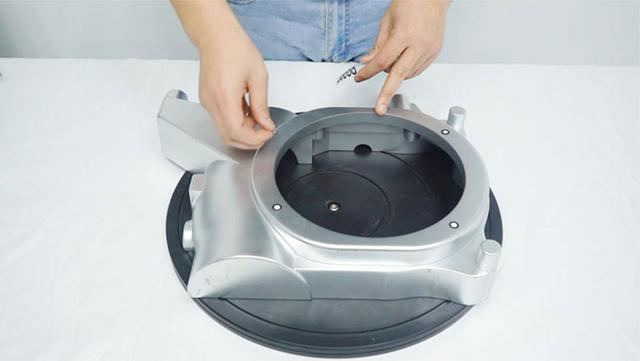
When using Blue Laser Mode, markers must be used for tracking assistance.
In Infrared Mode, if the scanned object has limited geometric or textural features, geometry or texture tracking may easily lose tracking – in this case, marker tracking mode is recommended.
Therefore, both laser mode and infrared marker mode require markers to be attached to the object surface or its surroundings before scanning.
¶ Difference Between Placing Markers on the Object vs. on the Surrounding Environment
The 3D scanner determines coordinate information by identifying the circular reflective areas of markers, enabling spatial localization.
- Markers on the object
-
Markers are attached directly to the object surface. The scanner establishes a coordinate reference system based on the markers on the object.
-
The scanner "recognizes" the markers on the object. Therefore, if the object moves during scanning (e.g., flipping it over), as long as the relative positions of the markers remain unchanged, the scanner will adapt accordingly and tracking will not fail.
- Markers on the surrounding environment
- Markers are placed in fixed positions around the object (e.g., around the turntable or on the desktop). The scanner establishes its coordinate reference using these environmental markers and calculates the object's spatial position accordingly.
- If the object's position or orientation changes during scanning, the scanner continues to rely on the fixed environmental marker coordinates to calculate the new position.
¶ Avoid Over‑Scanning
When performing 3D scanning, you don't always need to scan the entire object perfectly. "Localized precision scanning" based on actual needs often yields better efficiency:
- Product modification: When upgrading a robot vacuum accessory, you only need to scan the clips and the bottom mating surface – not the entire unit.
- Custom accessories: For creating replacement parts for figurines, focus on capturing the socket structure at the connection point; other non‑contact surfaces can be skipped.