¶ USB connection
¶ 1) Windows system computer cannot connect to the scanner?
- If using a desktop computer, it is recommended to connect to the USB 3.0 port on the back of the main unit (USB 3.0 and above ports ar usually blue or red).
- Confirm that the system used is Windows 10/11 64-bit.
- The entire installation path for the scanner software Creality Scan must be in English.
- If you are using a USB adapter or USB hub to connect the scanner, try connecting the scanner directly to a USB port on your computer using the original cable.
¶ 2) What to do if the preview video stream is not visible in the application on the Windows system?
- Check whether the computer configuration meets the minimum configuration requirements of the scanner;
- Please make sure to use the provided power adapter and make sure it is connected properly;
- Open the Windows Device Manager and check if there is a "CR-Scan Otter (or Raptor).." under "Cameras".
- Open windows Settings-Privacy-Camera, confirm whether the system camera permission is enabled, and ensure that desktop applications have permission to access the camera.
¶ 3) What to do if the preview video is not visible in the application on the Mac system?
- Check whether the computer configuration meets the minimum configuration requirements of the scanner,
- Please make sure to use the provided power adapter and make sure it is connected properly;
- Update the scanner to the latest firmware version
- Use a separate USB Type A to Thunderbolt or USB3 adapter, Avoid using multi-functional, multi-device USB-C adapter.
- lnstall CrealityScan directly in the App directory, Do not install it in a sub-directory under the App directory.
¶ 4) How to deal with USB 3.0 interface being recognized as USB 2.0 in the Windows system?
You can try to quickly re-insert the USB cable, or first connect the USB cable to the USB 3.0 interface on the PC, and then connect it to the USB-C interface of the scanner.
¶ 5) A ⚠️ warning icon appears in Device Manager when Raptor is connected to a Windows PC via USB.
If a warning icon appears in Windows Device Manager after connecting your Raptor scanner via USB, please refer to solution to the connection problem of Raptor series after Windows system updates to diagnose the issue and update the Raptor firmware.
¶ Wireless Connection
¶ 6)Computer Cannot Find or Connect to the Scanner's Wi‑Fi Hotspot
-
Check whether the wireless adapter supports Wi‑Fi 6
Make sure your computer's wireless adapter supports Wi‑Fi 6 and that wireless connectivity is enabled. -
Check firewall settings. Go to Settings → Privacy & Security → Firewall & Network Protection and make sure CrealityScan is allowed through the firewall.
-
If a VPN is active on your computer, turn it off.
-
If any virtual network adapter is enabled, temporarily disable it to avoid network conflicts.
-
If your computer is connected to both a wired network and the scanner hotspot, the system may prioritize the wired network's IP address, preventing communication with the scanner. Disconnect the wired network or switch the network connection to the scanner hotspot.
After completing these checks, search for and connect to the scanner hotspot again. If the issue persists, restart the scanner and computer, or contact after‑sales support(cs@creality.com).
¶ 7) My phone is connected to Wi-Fi, but the app says the device is not connected. What should I do?
- Make sure mobile data is turned off. Reconnect the device by following these steps: Turn on Airplane Mode → Turn on Wi-Fi → Connect to the Wi-Fi network broadcast by the scanner's wireless bridge or the scanner itself (e.g., Creality Pika) → Open the CrealityScan app.
- If the issue persists, uninstall and reinstall CrealityScan. When the app requests permissions for the first time, tap "Allow" to grant all required permissions.
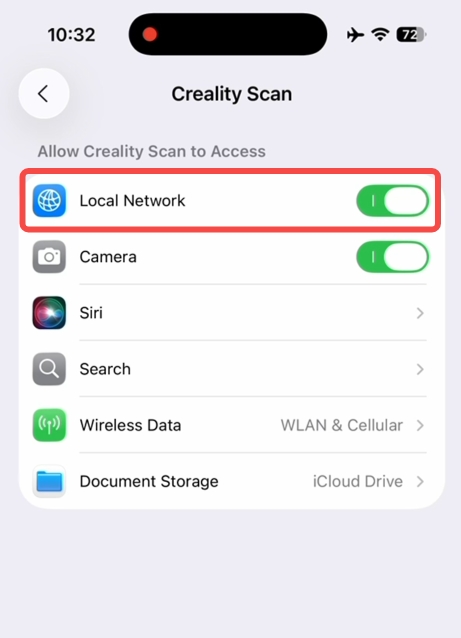
- Check the Local Network permission on your iPhone (iOS only). Go to Settings → Privacy & Security → Local Network → CrealityScan, and make sure Local Network access is enabled. Otherwise, the app will not be able to detect the scanner.
- Check whether a VPN is enabled. If it is, disable the VPN and try connecting again.
¶ 8)How do I change the Wi-Fi password of the wireless handle?
Please refer to Set or Reset Password for Wireless Handles Guide to change or reset the Wi-Fi password.