The screen of Creality Falcon T1 is divided into a total of 5 modules: 1. Workspace 2. Files 3. Settings 4. Assistant 5. Logs. Switching can be done by clicking the corresponding tab on the left side of the screen.
¶ 1. Workspace
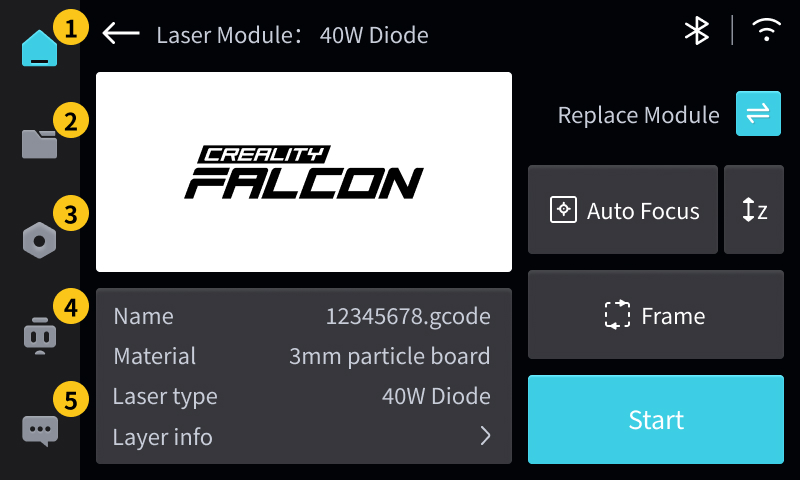
"Workspace" can preview file information, switch modules, and perform processing, etc.
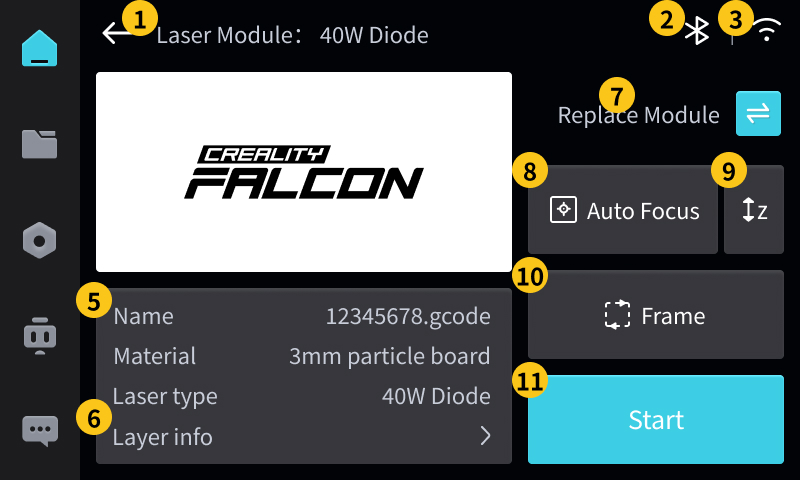
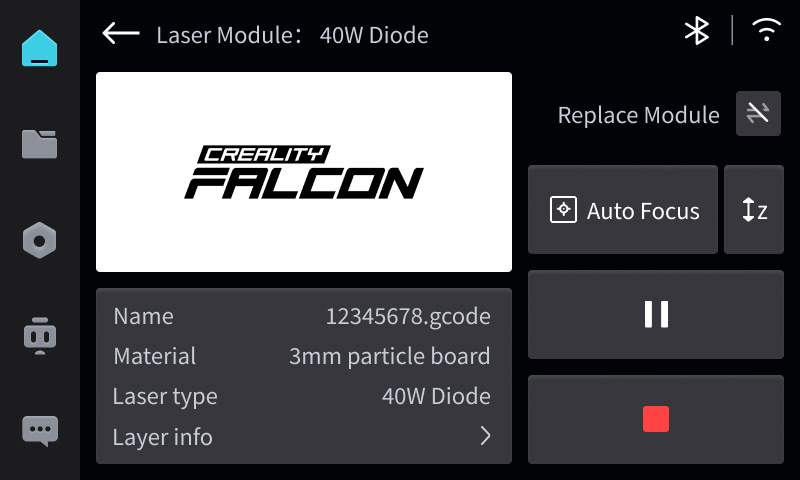
1. Laser Module: T1 has a total of 5 light sources: 20W Diode (blue light), 40W Diode (blue light), 20W Fiber (red light), 60W Mopa (red light), 5W UV (violet light).
- When module identification fails, the module is not installed successfully, or the module is not powered on, it is displayed as: unknown
2. Bluetooth: Displays whether Bluetooth is on or off.
3. Wi-Fi: Displays whether Wi-Fi is on or off.
4. File preview: Only gcode files generated by Falcon Design Space can be previewed; others cannot.
5. File Information: Displays the name, material, and recommended light source provided by the gcode file.
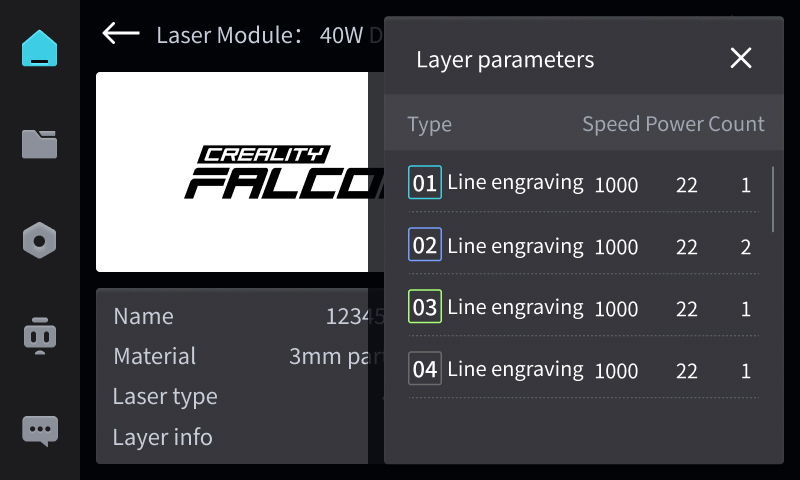
6. Layer Parameters: Click to open the layer parameter window, where you can view the layer information contained in the current file: processing type, speed, power, and number of times.
7. Replace Module: After clicking, enter the process of replacing the laser module.
8. Auto Focus: After placing the carving material, click "Auto Focus" → Wait for the device's Z-axis to complete the focusing process (approximately 5 seconds).
- It is recommended to refocus after each material change.
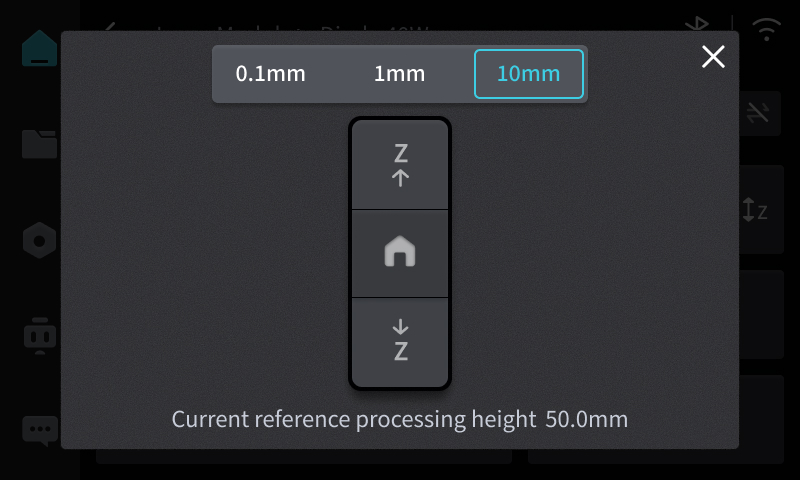
9. Manual Z-axis adjustment: After clicking, the manual Z-axis adjustment panel will open, allowing you to reset the Z-axis with one click; fine-tune the Z-axis height by 0.1mm/1mm/10mm.
- Real-time display of the current reference machining height and auxiliary prompt height.
10. Frame: Preview the corresponding position of the engraved pattern. After clicking, please observe the position where the device traces the border to ensure that the processing area meets expectations.
- If the border trajectory exceeds the material edge, please move the material and then run the border again.
- After the border traversal is completed, you must first stop the border traversal before you can click "Start Processing".
11. Start: After confirming that focusing and border tracing are correct, click "Start".
- Before processing, please confirm that the light source power is correct.
- During processing, if any abnormality is found, immediately press the emergency stop switch of the equipment.
- During processing, you can click ⏸️ to pause processing; you can click 🟥 to stop processing.
¶ 2. Files
"Files" can browse, select, and manage processed files.
Divided into four tabs: local files, USB drive, cloud files, and processing history. You can switch by clicking on the corresponding tab.
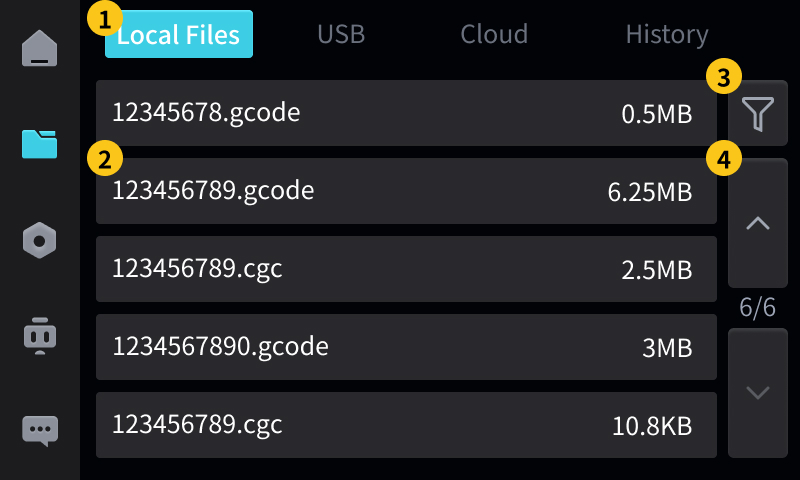
1. Local Files: Click to switch to "Local Files", which are processed files saved in the device's internal storage.
2. File Information: After clicking, load the file to "Workspace"; after long pressing, a menu appears, providing functions such as copy and delete.
3. Sorting: After clicking, a sorting window will open, providing sorting by size, by time, and by name.
4. Paginator: Click the up arrow to turn up one page; click the down arrow to turn down one page.
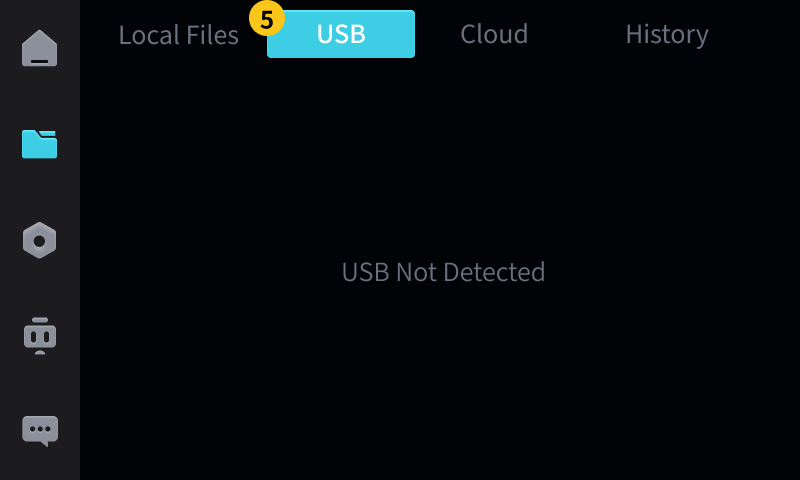
5. USB: Click to switch to "USB Flash Drive". After inserting the USB flash drive, you can view the processing files inside it.
- Supports
.gcode,.cgcand other formats
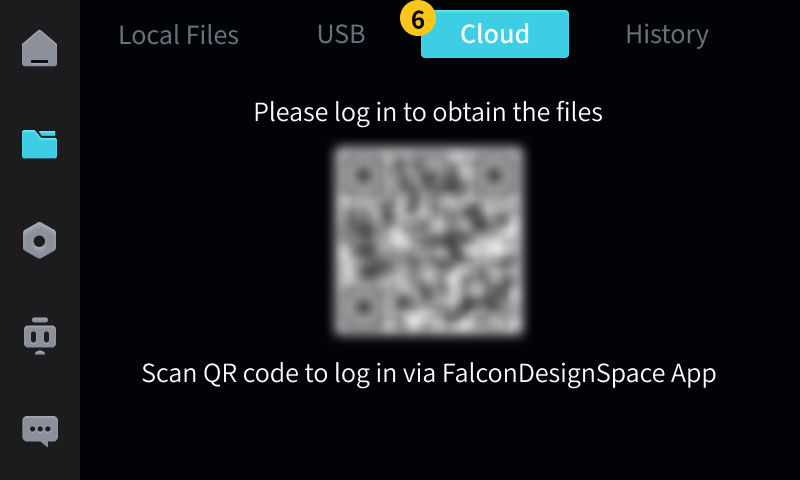
6. Cloud Files: Click to switch to "Cloud Files", and after scanning the QR code to log in using the Falcon Design Space APP, you can view the cloud files of your account.
- Cloud files require the device to be connected to Wi-Fi to synchronize.
- Cloud files cannot be directly loaded. You must long press "File Information" and select "Copy to Local". After the file is downloaded to the "Local Files" list, you can then perform processing operations.
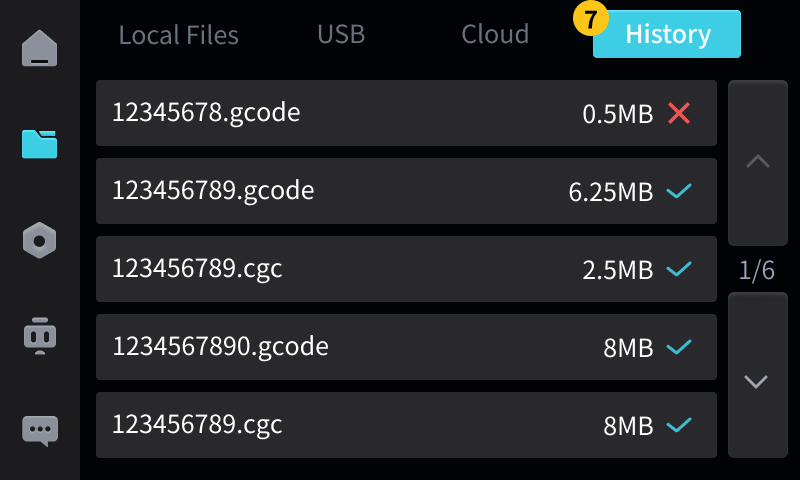
7. Processing History: Click to switch to "Processing History", which records information about historical processed files and whether processing was successful or failed.
¶ 3. Settings
"Settings" allows you to view and adjust various system parameters and functional preferences, as well as perform laser module calibration, autofocus calibration, and field lens calibration.
Divided into 4 tabs: General, System, Network, and Calibration. You can switch between them by clicking on the corresponding tab.
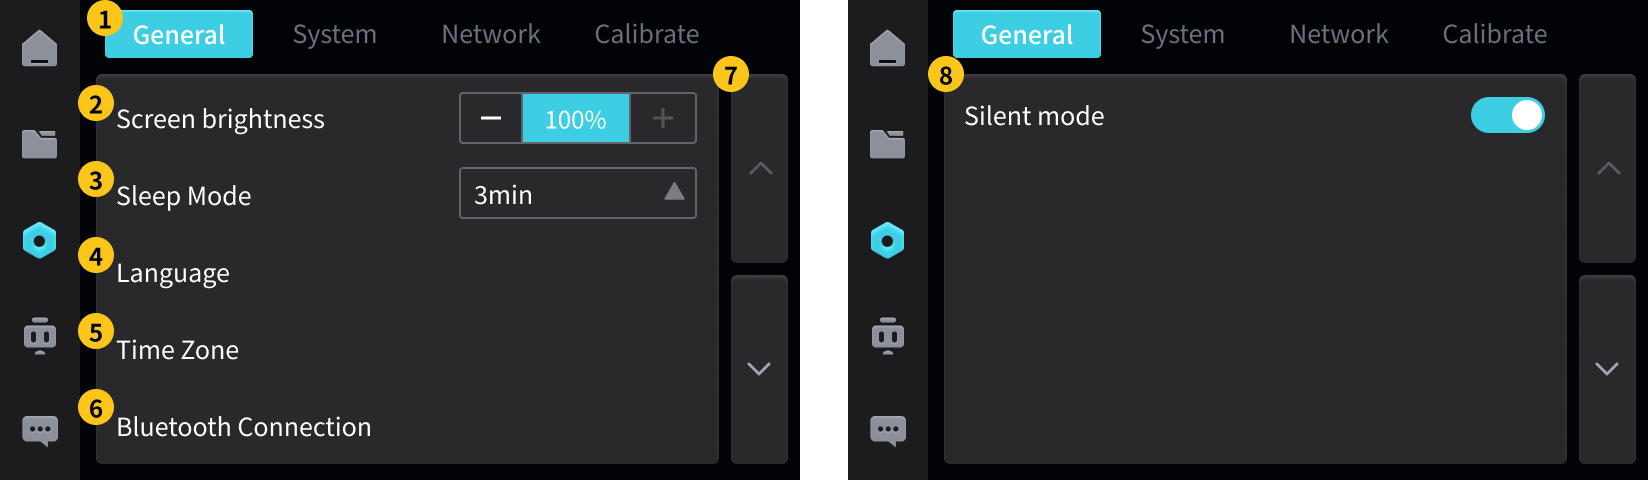
1. General: Click to switch to "General", where you can adjust screen brightness, screen timeout, language selection, time zone settings, Bluetooth connection, and silent mode.
2. Screen Brightness: Adjust the brightness level of the screen backlight.
3. Screen Off: Set the time for the screen to automatically turn off after no operation.
4. Language Selection: Switch the system language of the engraver screen.
5. Time Zone Setting: Set the time zone where the device is located to correctly record file time.
6. Bluetooth Connection: Turn on/off Bluetooth to connect to devices, mobile phones, and other peripherals.
7. Paginator: Click the up arrow to turn up one page; click the down arrow to turn down one page.
8. Silent Mode: Turns off the device's notification sounds, keypad tones, and alarm sounds. After turning it off, a relevant icon will appear in the upper right corner of the "Workspace".
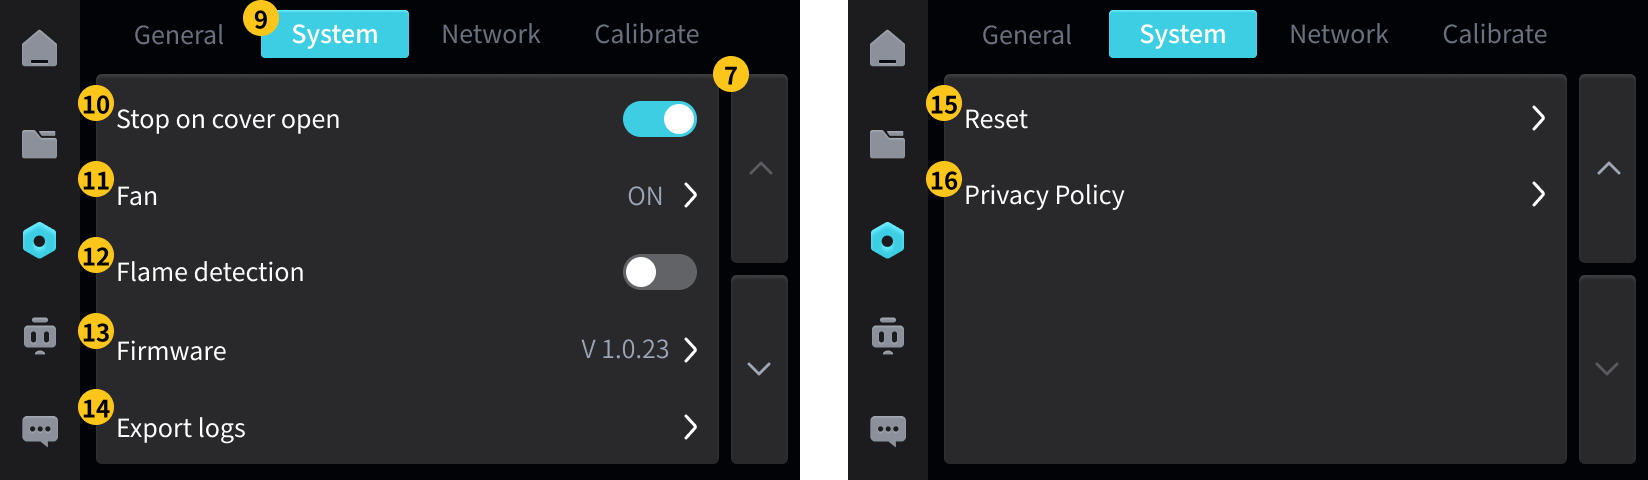
9. System: Click to switch to "System", where you can adjust functions such as lid opening stop, exhaust fan, flame detection, firmware version, export logs, restore to factory settings, and privacy policy.
10. Stop on cover open: Enabled by default, when the protective cover (lid) is opened during processing, the laser operation automatically stops.
- If you need to open the cover to preview the effect during border processing or the machining process: this function needs to be turned off.
- Please note the risk of laser burns, and you must wear protective glasses to avoid laser glare.
11. Fan: Controls the operating mode of the smoke exhaust fan to promptly expel the fumes generated during processing.
- Normally Open: The exhaust fan runs continuously (suitable for poorly ventilated environments)
- Intelligent: Automatically turns on only during processing, and turns off with a delay after processing is completed (more energy-efficient), with the ability to set the delay time for turning off.
12. Flame Detection: Enabled by default, monitors whether there is an open flame in the processing area, and triggers an alarm and shuts down immediately upon detection.
- It is not recommended to turn off.
13. Firmware: Check the current version of the device. If there is a new version of the firmware, a red dot will appear on the right side as a reminder.
14. Export Logs: Export the log to external storage (USB drive) for troubleshooting.
15. Reset: Restore the device to its factory default settings. Data cannot be recovered after restoration.
- You can check to clear local files, processing history, and fault logs as needed.
- After clicking "Restore", the device will pop up a confirmation window, where you need to select the restart method:
- Automatic Restart: Indicates that after the restoration is completed, the device will automatically restart, the Z-axis of the device will automatically lift, the screen will light up again and enter the startup interface, without any manual operation.
- Manual restart: Indicates that the device will not automatically power on after the restoration is completed. The restoration process takes approximately 1-2 minutes, during which the screen will display "Restoring to factory settings, please wait...". When the screen content no longer changes, dims, or shows a no-signal state, it indicates that the restoration is complete. At this time, you need to manually press the power button to turn the device back on.
16. Privacy Policy: Use your phone to scan the QR code to view the device's privacy terms.
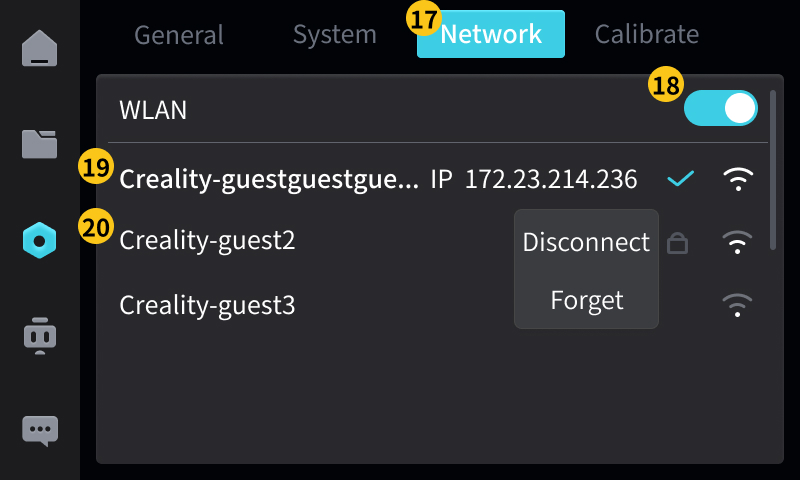
17. Network: Click to switch to "Network" to adjust network settings.
18. WLAN On/Off
19. Connected Network: For successfully connected networks, the IP Address will be displayed on the right side.
- If there are issues such as network permissions with the connection, you can try connecting using an IP Address.
- After long pressing, a menu will appear, allowing you to disconnect from the network.
20. Unconnected network: After clicking, enter the correct password to connect/switch to this network.
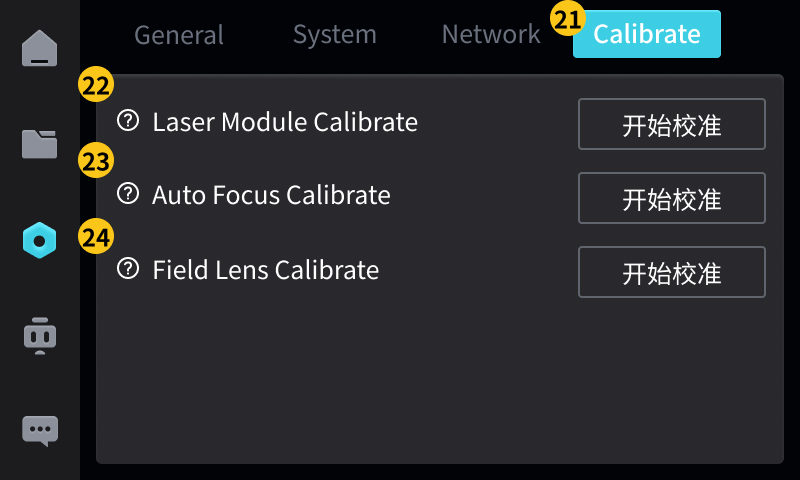
21. Calibrate: Click to switch to "Calibration" to calibrate the laser module, autofocus, and field lens.
- Laser will appear during the calibration process. Before performing calibration, please:
- Wear compliant safety glasses; do not look directly at the laser; ensure that unauthorized personnel stay away from the equipment
- For detailed tutorials Calibration Operation Guide
22. Laser Module Calibrate: Click to enter the laser module calibration process
- Use when using the laser for the first time, when the engraving depth varies, when the focus is shifted, and when autofocus is ineffective
23. Autofocus Calibrate: Click to enter the autofocus calibration process
- Used when the baseplate height measurement is inaccurate or the engraving depth is inconsistent
24. Field Lens Calibrate: Click to enter the field lens calibration process
- Replace field lens / Pattern distortion / Dimension deviation / Use after completing laser module calibration
¶ 4. Assistant
"Assistant" can manage accounts, understand devices, provide maintenance guidance and assistance, and is the auxiliary center for using devices.
Divided into four tabs: Account, About, Maintenance, Help. You can switch by clicking on the corresponding tab.
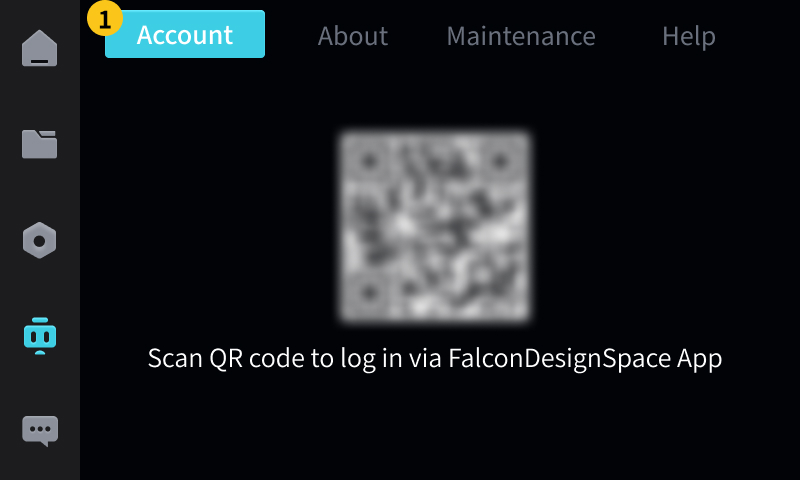
1. Account: Click to switch to "Account", use the Falcon Design Space App to scan the QR code, and you can log in to your account.
- After logging in, the APP will automatically bind to the device, and during processing, the processing monitoring video can be viewed on the APP side.
- After logging in, you can view account information and choose to log out of the account.
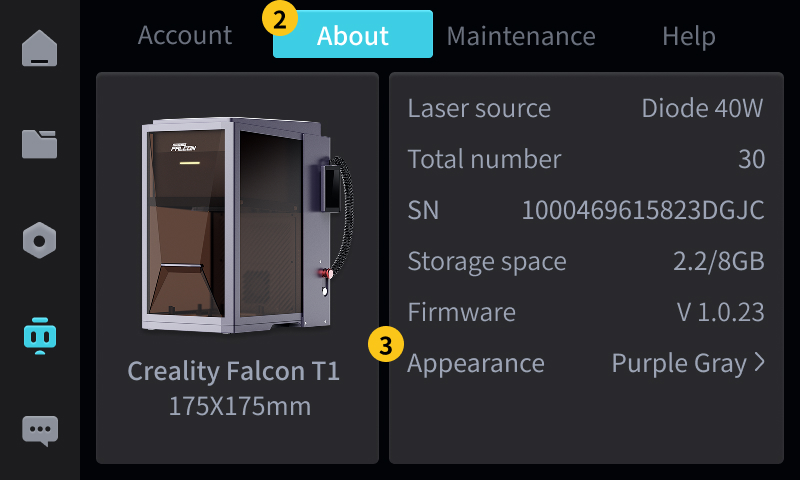
2. About: Click to switch to "This Device" to view the device's basic information, hardware configuration, and usage statistics.
3. Appearance: Can change the appearance of the machine displayed on the device screen.
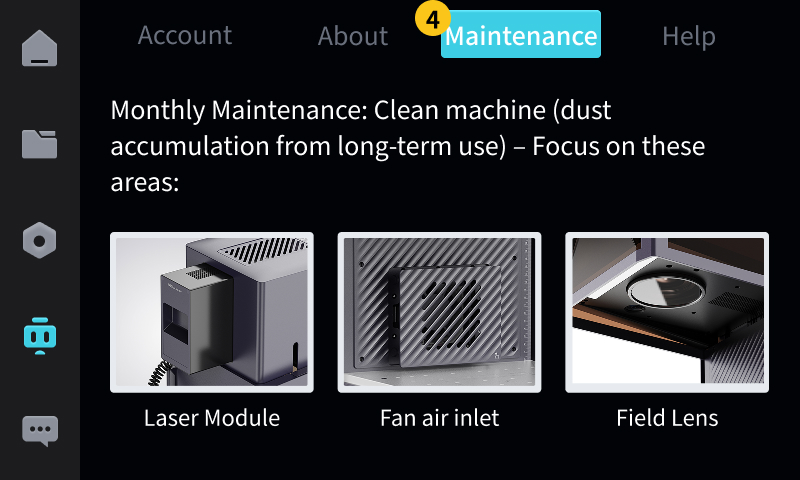
4. Maintenance: Click to switch to "Maintenance", which provides daily maintenance guidelines for equipment, such as laser modules, fan air inlets, field lenses, etc.
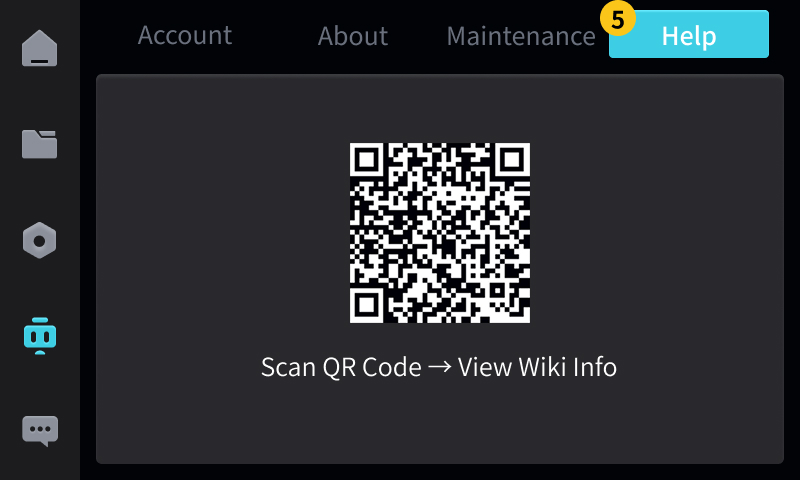
5. Help: Click to switch to "Help" to view the entry for frequently asked questions, operation videos, and troubleshooting guides.
¶ 5. Logs
"Logs" records the faults or prompt messages generated during device operation, facilitating problem tracing and log export.
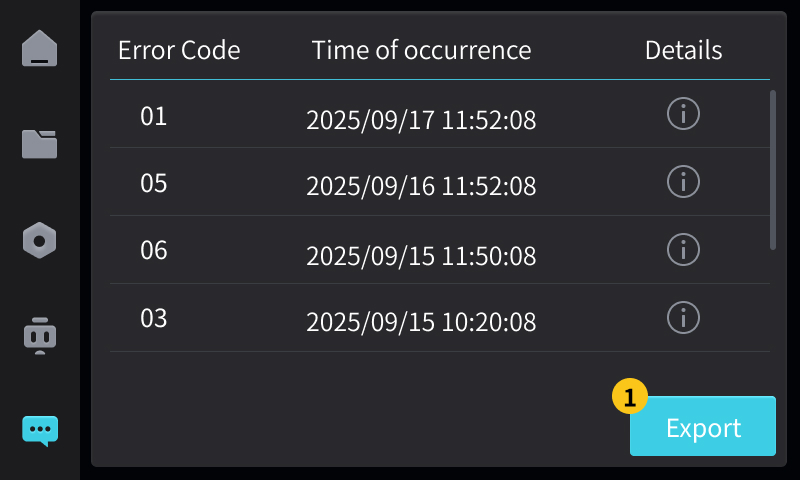
1. Export: Export all log records to a USB drive for technicians to analyze or review.