¶ Falcon A1 Pro Fault Code - TroubleshootingMethod
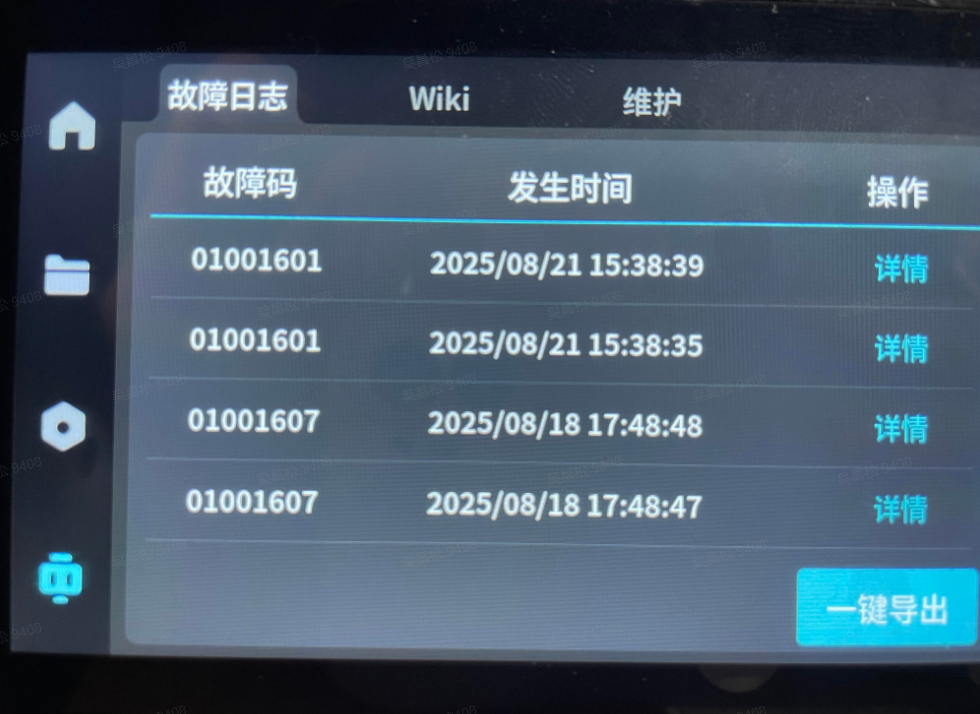
¶ Where can I view historical error codes?
Click the Help Icon - Error History on the machine screen to view the specific error code
The causes and troubleshooting solutions for each fault code module's text and graphics are as follows
¶ 100 Processing Services:
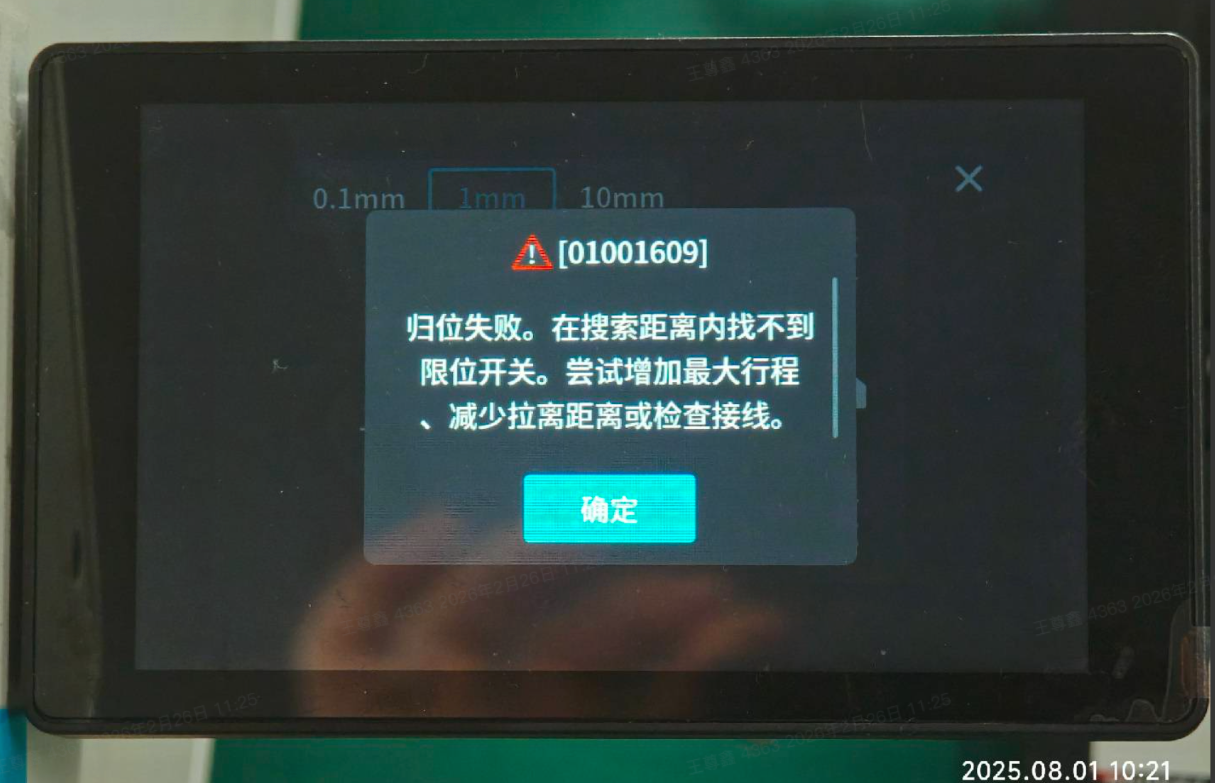
¶ 01001609: Home return failed. Limit switch not found within the search distance. Try increasing the maximum travel, reducing the pull-off distance, or checking the wiring.
¶ Cause analysis: Zero return failed, retry zero return
¶ Possible cause: Limit switch not found during homing search phase
¶ Troubleshooting and Solutions:
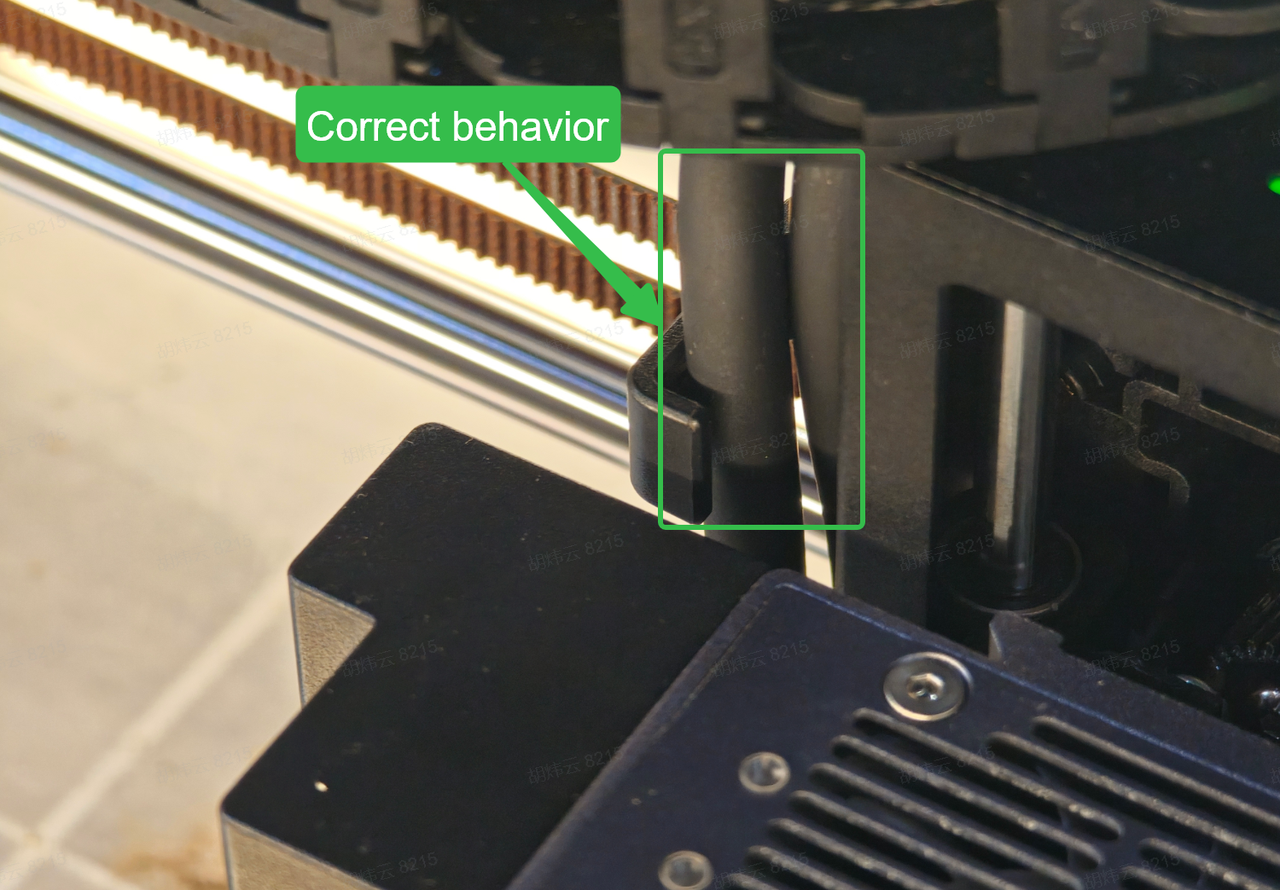
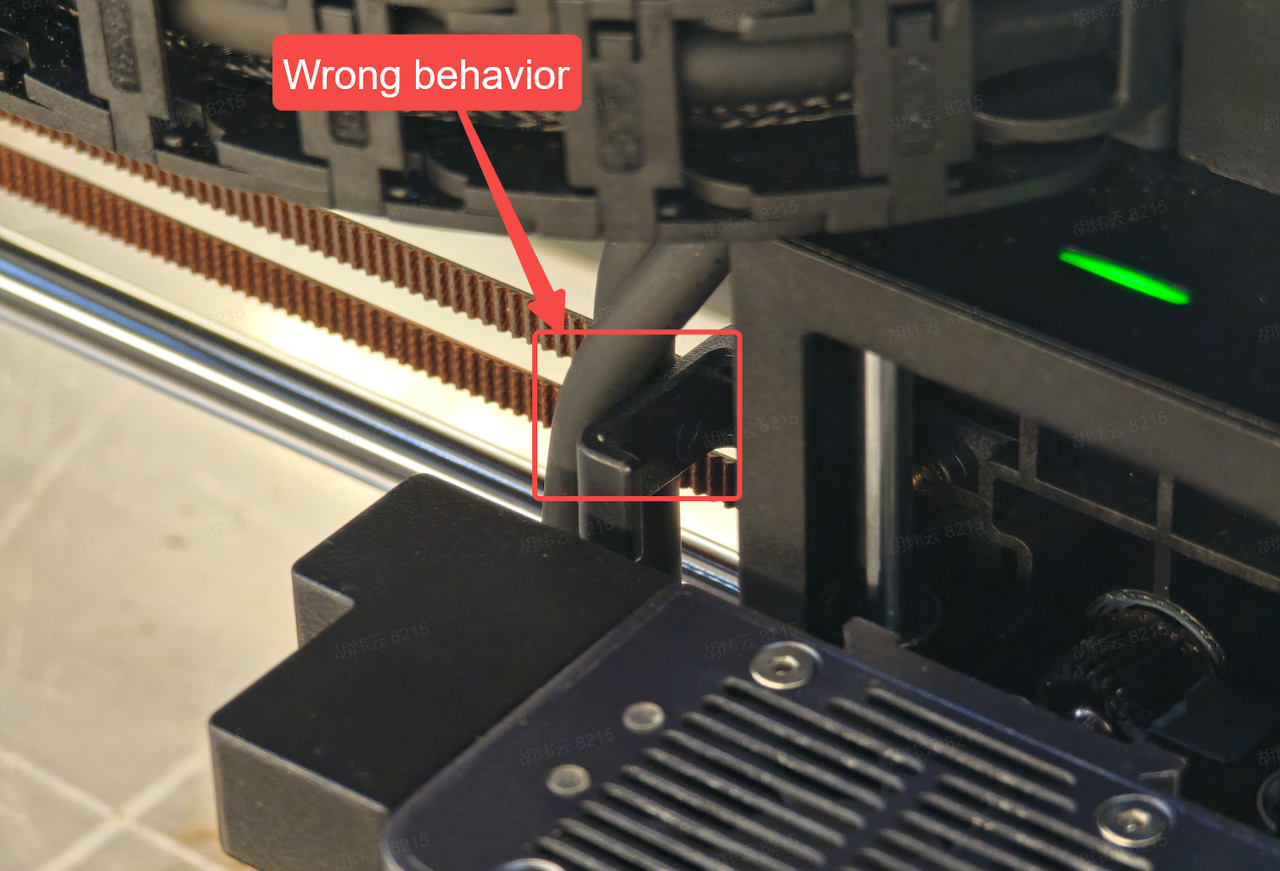
1. Check if the machine limit switches are damaged: After checking the left, right, up, and down limit switches as shown below, see if they emit a beeping sound.
2. Check if the tracheal wiring harness of the laser module is on the outside as shown in the figure below, and re-route the wiring harness to place it inside the card slot.
¶ 01001039:Value out of range.
¶ Cause Analysis: Check if the Gcode is correct
¶ 01001041: The spindle does not run when commanded to move in CSS or Spindle Synchronization Mode.
¶ Cause Analysis: Check if the Gcode is correct
¶ 01001043:Maximum feed rate exceeded.
¶ Cause Analysis: Check whether the Gcode is correct, especially the F feed
¶ 01001044:RPM out of range.
¶ Cause Analysis: The value of the Gcode S keyword is too large
¶ 01001046:Zero the machine to proceed to the next step.
¶ Troubleshooting and Solutions: Re-zero the machine
¶ 01001048:Value conflict in Gcode keyword.
¶ Cause Analysis: Check if the Gcode is correct
¶ 01001051:Motor failure.
¶ Cause Analysis: Motor drive initialization failed
¶ Possible Cause: Motor drive initialization failed, usually reported during power-on
¶ Troubleshooting and Solution: Power cycle
¶ 01003304:Alarm service interface timeout
¶ Troubleshooting and Solution: Power cycle
¶ 01003305: Did not move to the target position when using the log command
¶ Cause Analysis: Limit not released
¶ Troubleshooting and Solutions: It is recommended to release and check whether xyz touches the limit
¶ 01003306:Failed to control camera exposure
¶ Cause Analysis: Is the camera wiring normal?
¶ Troubleshooting and Solutions: Check if the camera wiring is normal, and then power cycle it.
¶ 01003307:Focus indicator light spot not detected
¶ Cause Analysis: Check if the equipment protective cover is closed; the focus indicator light will turn off when it is open
¶ Troubleshooting and Solutions: Check if the equipment protective cover is closed, then try again
¶ 01003308:Abnormal photo capture by camera
¶ Cause analysis: Check if the camera wiring is normal
¶ Troubleshooting and Solutions: Check if the camera wiring is normal, and then power cycle it.
¶ 01003309:Auto Focus Unknown Exception
¶ Cause Analysis: The interface provided by the algorithm is abnormal
¶ Possible cause: The interface provided by the algorithm is abnormal
¶ Troubleshooting and Solutions: Refocus
¶ 01003310:Autofocus shield not closed
¶ Cause Analysis: Whether the safety door is properly closed
¶ Troubleshooting and Solution: Close the safety door and try again
¶ 200 Upgrade Management:
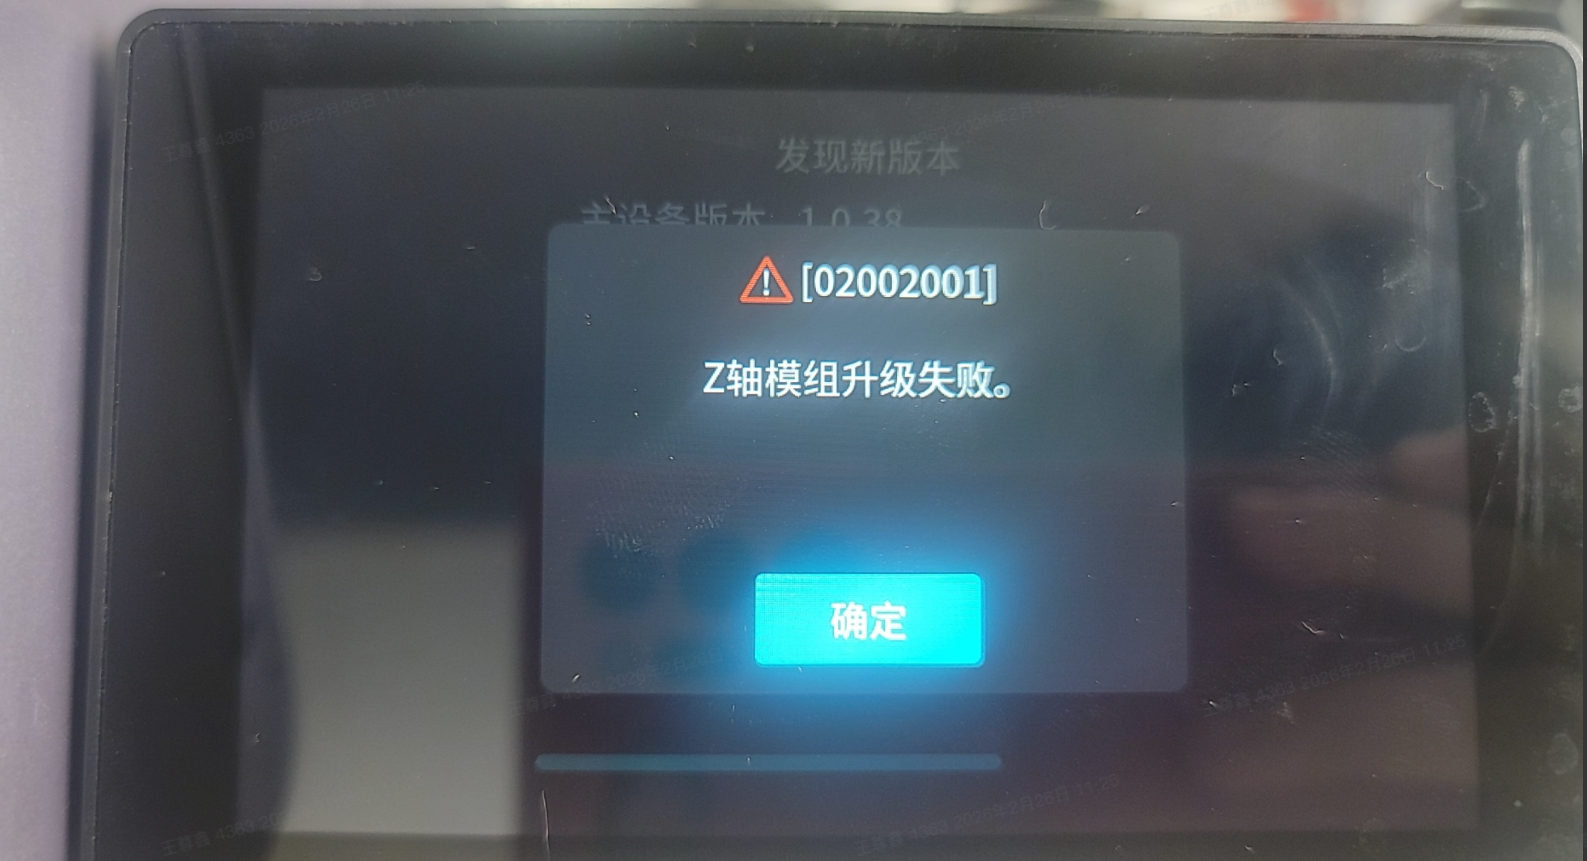
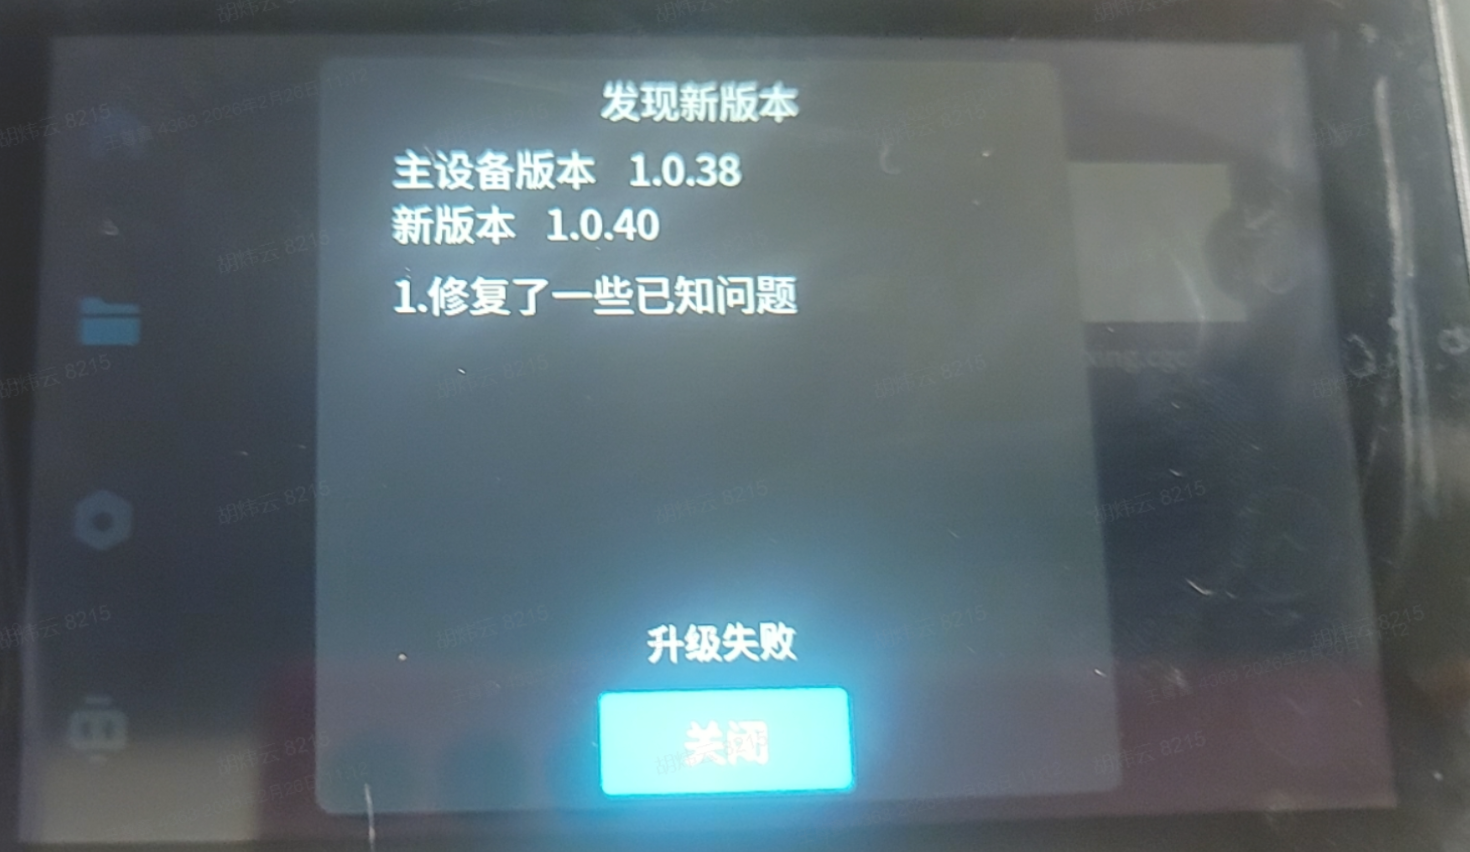
¶ 02002201:Module upgrade failed
¶ Root Cause Analysis: Update to the latest firmware
¶ Possible cause: Old firmware is incompatible
¶ Troubleshooting and Solutions: Contact after-sales service, and development will provide solutions
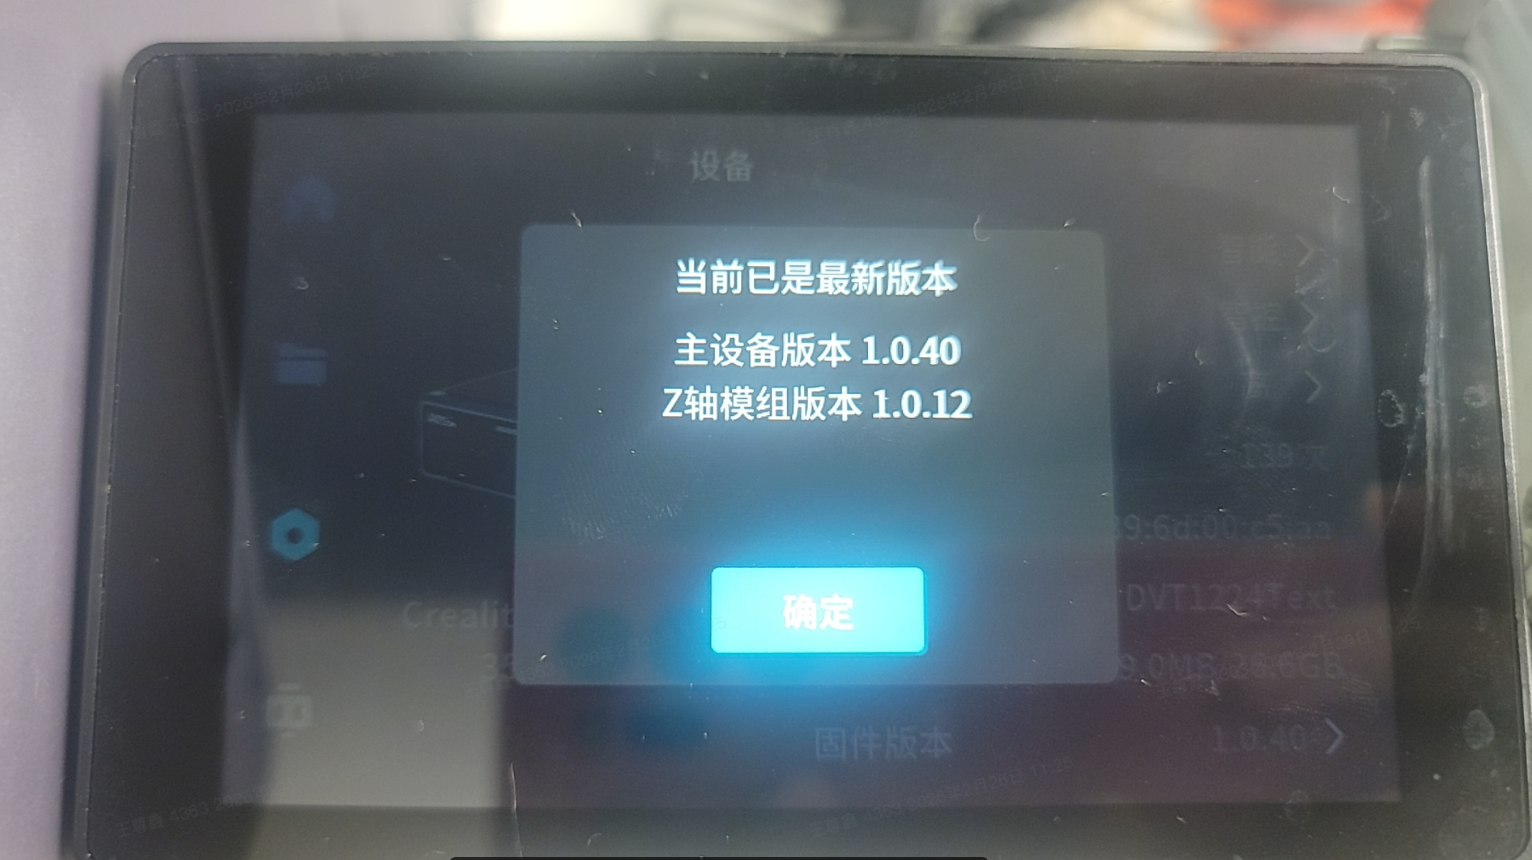
Upgrade using the temporary 27 OTA version. After the upgrade is completed, the device will automatically restart, perform Z-axis judgment, and then carry out a silent upgrade (while on the logo screen, the upgrade process takes more than 70 seconds). After entering the UI screen, restart the device. If it gets stuck on the logo screen, it means it is upgrading again, and the previous upgrade may have been unsuccessful.
Use version 41 (version 40 does not turn off the motor lock) to supplement the motor lock turn-off during Z-axis upgrade
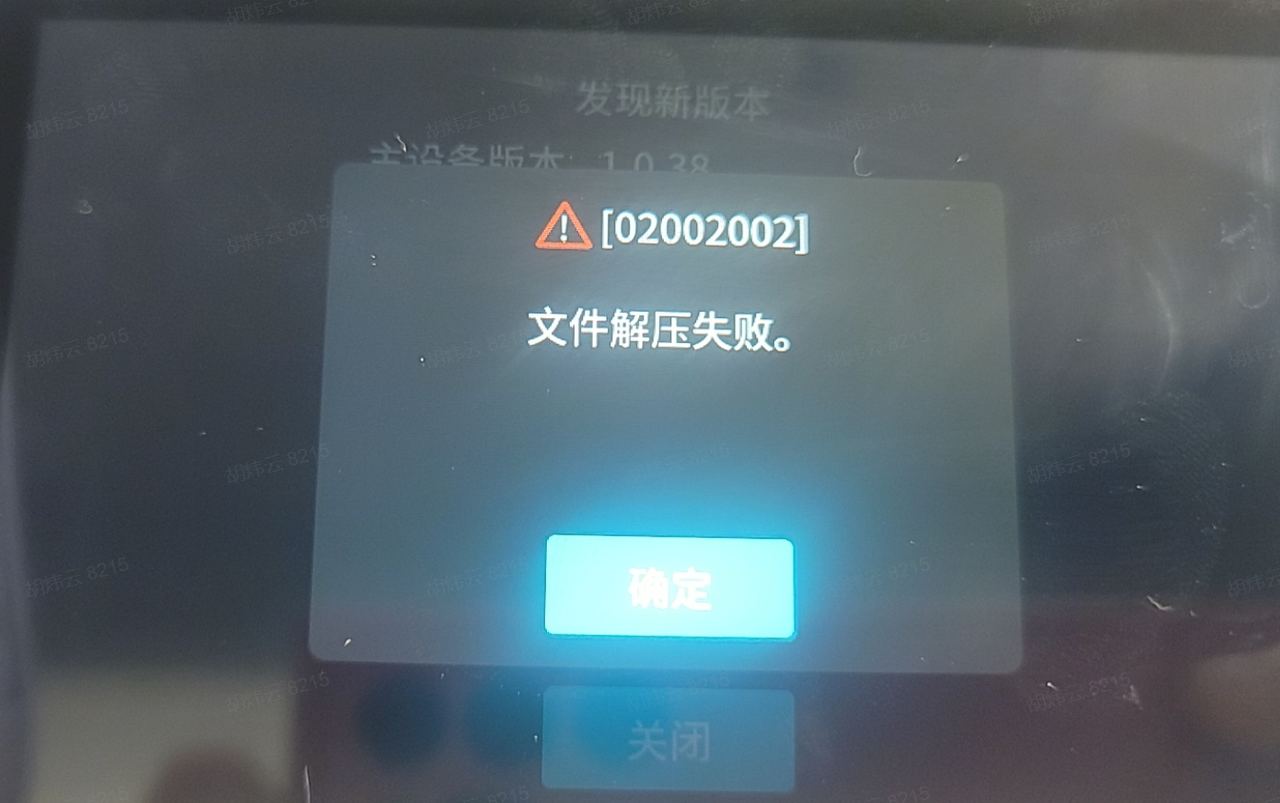
¶ 02002201:File decompression failed
¶ Cause analysis: The name or format of the downloaded file package is incorrect
¶ Possible causes: The suffix of the download package name contains additional symbols, numbers, spaces, etc., for example: CV40-Pro-MASTER-Release_V1_0_40_202509041650 (1).tar.gz
¶ Troubleshooting and Solutions: Refer to the upgrade package downloaded from the official website, with the standard format reference being CV40-Pro-MASTER-Release_V1_0_40_202509041650.tar.gz
¶ 400 Device Management Service and Peripheral Access:
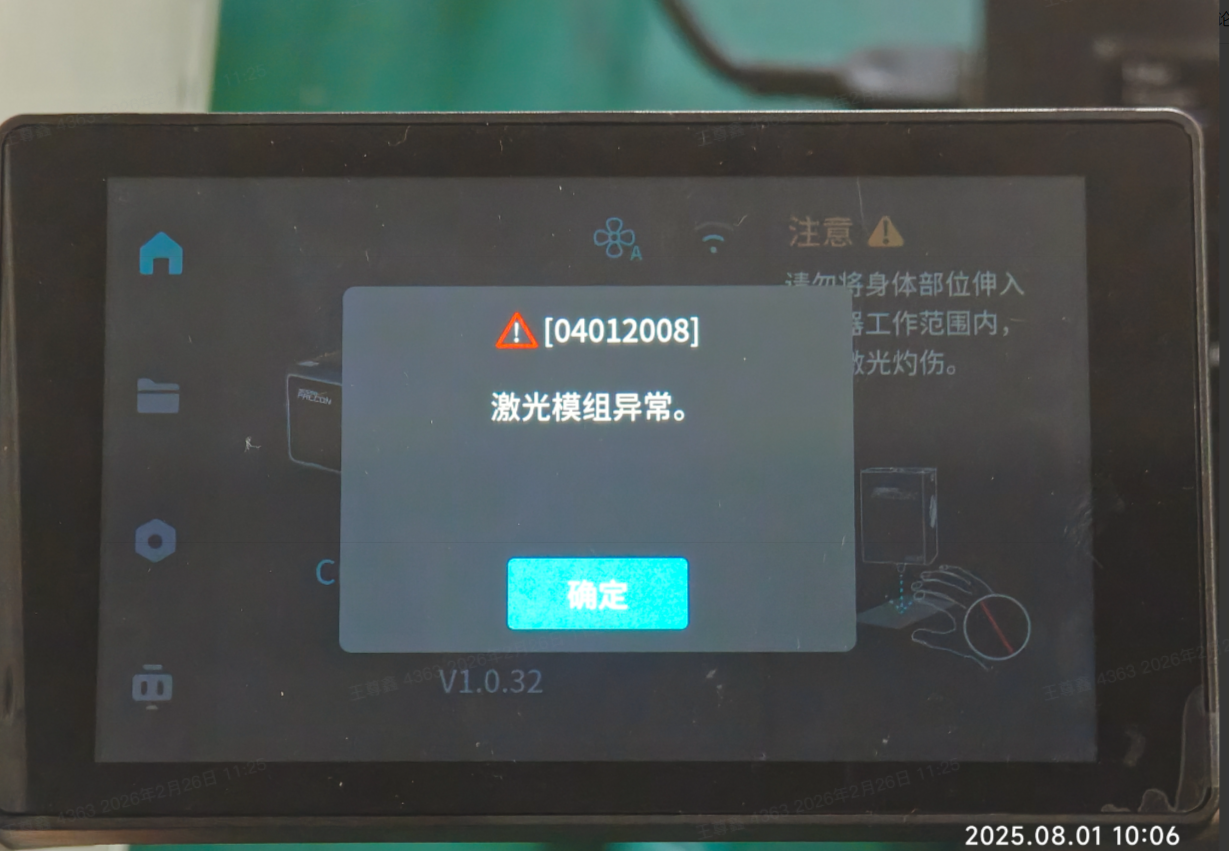
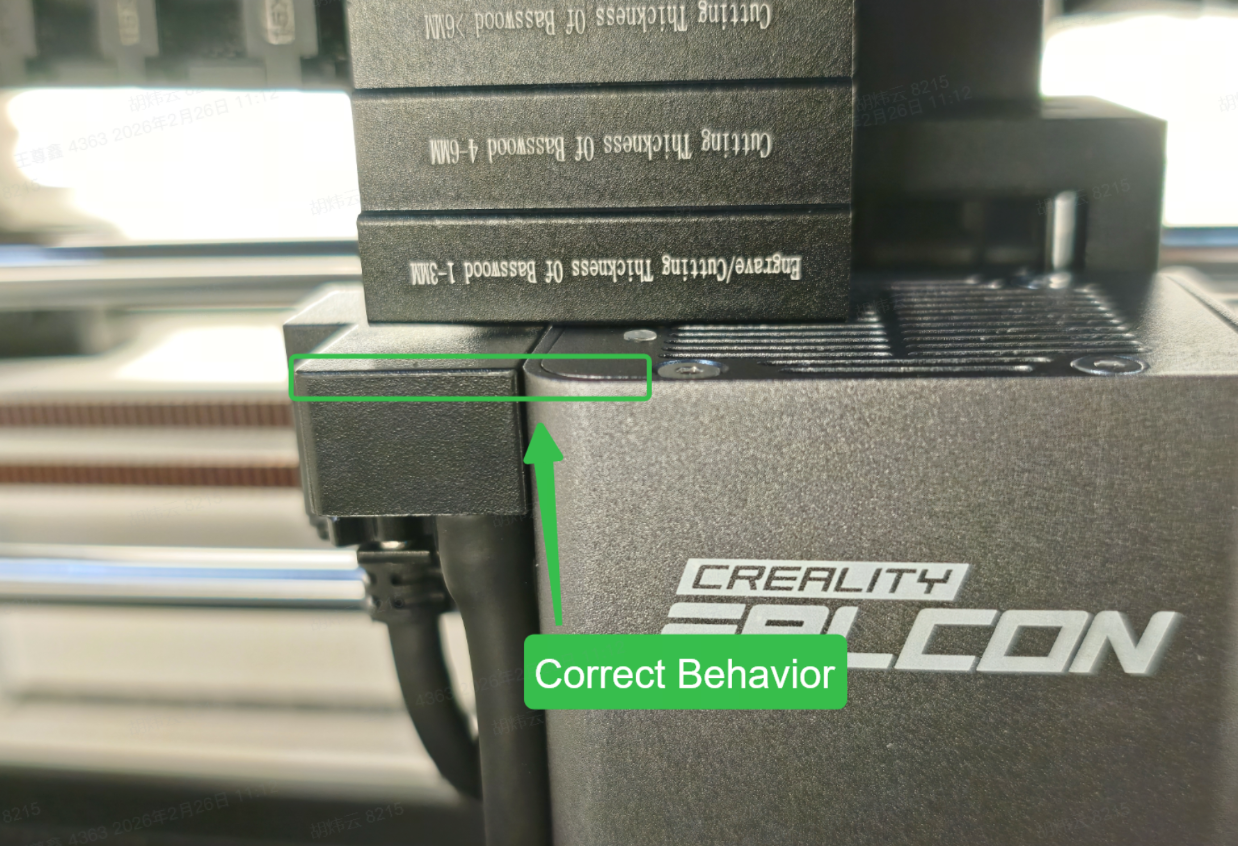
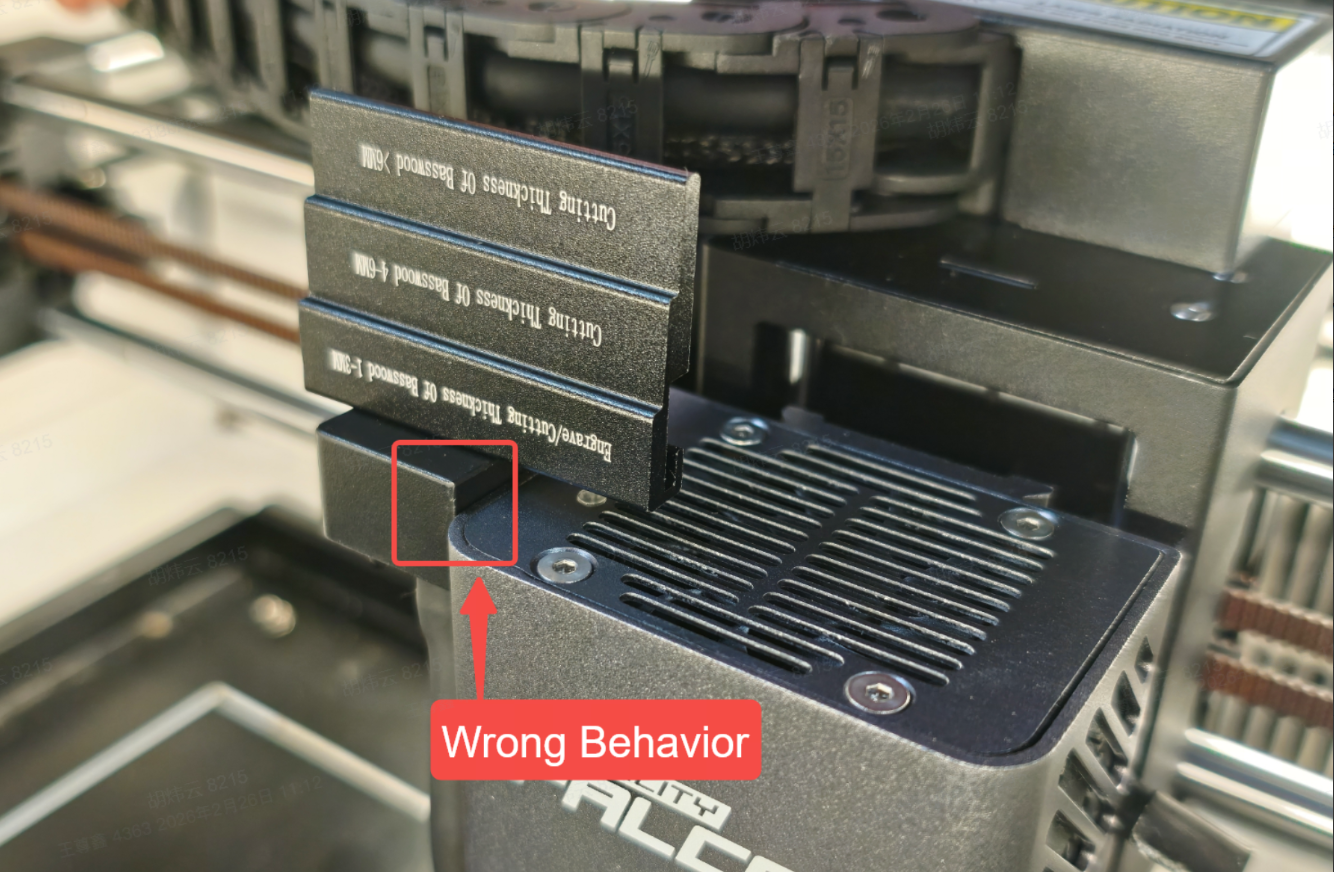
¶ 04012008: Laser module has no NTC sensor
¶ Cause analysis: Abnormal connection of the laser module or abnormal temperature of the laser module sensor
¶ Possible cause: Poor contact of the laser module
¶ Troubleshooting and Solutions: Poor contact of the laser module will cause the loss of Z-axis communication
1. Place the connector and the laser module flush to ensure that the module is properly connected to the Z-axis
¶ 04011001: Lens dirty
¶ Cause analysis: Lens is dirty
¶ Troubleshooting and Solutions: Clean the lens
¶ 04012002: Z-axis Flame Alarm
¶ Possible causes: actual fire or false alarms due to environmental factors such as sunlight
¶ Troubleshooting and Solutions: 1. Move the fire source away 2. Move to a cool place
¶ 04011003: Z-axis air pressure alarm
¶ Cause Analysis: 50pro standby alarm is normal, 40pro air pressure is abnormal
¶ Possible causes: Abnormal air pressure of the air pump, please check if the air pump pipeline is leaking.
¶ Troubleshooting and Solutions: Install the gas pump pipeline
¶ 04011004: Z-axis die temperature too high (temperature read by NTC)
¶ Cause analysis: The laser module is overheating. Please pause use and continue after the temperature drops.
¶ Possible cause: The temperature sensor has exceeded the threshold.
¶ Troubleshooting and Solutions: Pause printing, Beeper loops in alarm. It is recommended to engrave at room temperature.
¶ 04011020: Z-axis infrared module high temperature alarm (red light)
¶ Cause Analysis: The laser module is overheating. Please pause use and continue after the temperature drops.
¶ Possible cause: The temperature sensor has exceeded the threshold.
¶ Troubleshooting and Solutions: Pause printing, Beeper loops in alarm. Room temperature carving is recommended
¶ 04031001:Tilt Alarm
¶ Troubleshooting and Solutions: Place the machine flat
¶ 600WiFi Module:
¶ 06002007: Incorrect password.
¶ Cause Analysis: Incorrect Wi-Fi password entered
¶ Possible reasons: The Wi-Fi password length should be within 32 characters, and the password should not be set too long.
¶ Troubleshooting and Solutions: Enter the correct password or restart the router
¶ 06002010: Connection timed out.
Simulation method: When not connected to the network, unplug the network cable from the WAN port of the router that connects to the network
¶ Cause analysis: When establishing communication with the network, no response was received even after exceeding the preset waiting time
¶ Possible causes: Local network link or carrier network failure or strong electromagnetic interference
¶ Troubleshooting and Solution: Restart the device
¶ 06002012: DHCP connection timed out.
Simulation Method: DHCP timeout, turn off the DHCP of the router
¶ Cause Analysis: Poor contact of network cable RJ45 connector or Client device issue
¶ Possible causes: Router issues such as DHCP function being disabled (manually set a static IP ) or host computer client check
¶ Troubleshooting and Solutions:
¶ 1. Restart the router or re-plug the network cable (both ends), and confirm that the network cable's RJ45 connector is free from oxidation and damage.
¶ 2. Client Troubleshooting
¶ (1) Windows System Devices
Right-click the "Network Icon" in the lower right corner of the desktop → Select "Open Network and Sharing Center" → Click "Change adapter settings" on the left side.
Find the currently used network (such as "Ethernet", "WiFi Name"), right-click and select "Properties".
In the pop-up window, find "Internet Protocol Version 4 (TCP/IPv4)" and double-click to open it.
Confirm that "Obtain an IP address automatically" and "Obtain DNS server address automatically" are checked (if they were previously manually entered, change them back to automatic), then click "OK" to save.
Reset Client DHCP Request: Press Win+R, enter cmd to open the Command Prompt, and then enter the following commands in sequence (press Enter after each command to resolve IP cache conflicts):
bash
ipconfig /release  # 释放当前旧IP
ipconfig /renew # 重新向DHCP服务器请求IP¶ (2) macOS System Devices
Click the "Apple icon" in the top-left corner of the screen → "System Settings" → "Network".
Select the current network (wired / wireless) and click "Details" on the right.
Switch to the "TCP/IP" tab, confirm that "Configure IPv4" is set to "Use DHCP", and click "Apply".
If it still times out: Click "Renew DHCP Lease" (Reacquire DHCP Lease) to force the device to send a new DHCP request
¶ 06002022:SSID temporarily disabled, access point configuration issue.
Simulation method: The superior blacklists the device