¶ 1. Document Description
This guide explains how to manually remove and reinstall the nozzle under specific circumstances.
Based on the current position of the nozzle, the following two scenarios apply:
¶ 2. Precautions Before Operation
- The device has stopped printing;
- The printhead is in a safe operating condition;
- Avoid bumping the nozzle, printhead, or backsheet structure during operation;
- Follow the steps in this document; do not forcibly move the printhead or nozzle;
- When handling the nozzle, pay attention to the nozzle temperature and confirm that it has cooled to a safe operating temperature.
Note
If the printhead cannot move normally, do not apply force directly.
Use the device interface to perform the [Release] operation to unlock the printhead before attempting to move it.
¶ Scenario 1: Removing and Installing the Nozzle via the Printhead
¶ 3.1 Removing the Nozzle Using the Printhead
When the nozzle is located at the backsheet nozzle station and needs to be removed using the printhead, follow the steps below.
¶ Step 1: Check Whether the Printhead Can Move
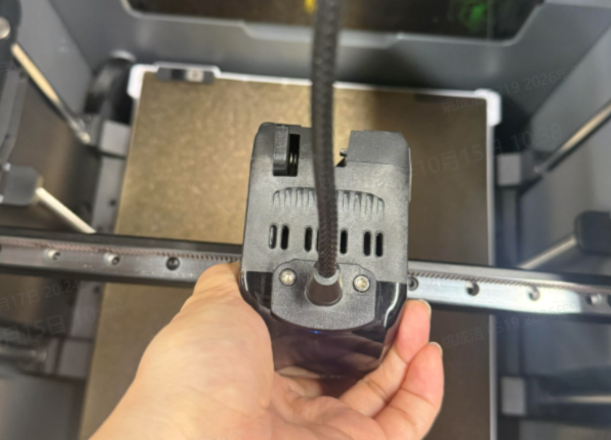
Gently try to move the printhead left and right to confirm whether it is currently in a movable state.
If the printhead can move normally, proceed to the next step.
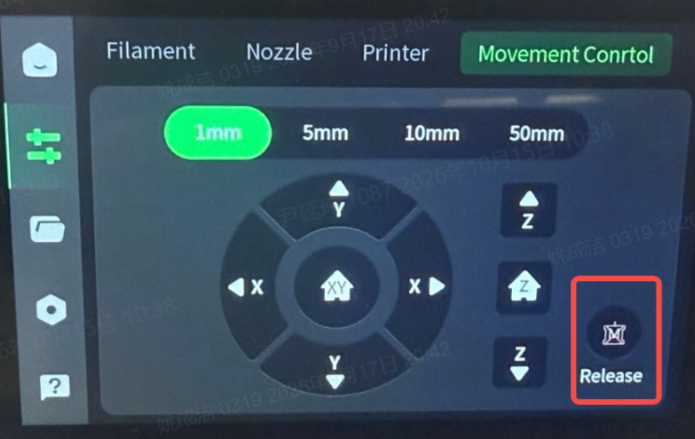
If the printhead cannot move, tap on the device screen:
[Release]
Wait for the printhead to be unlocked, then try moving it again.
 |
 |
¶ Step 2: Check the Printhead Latch Status
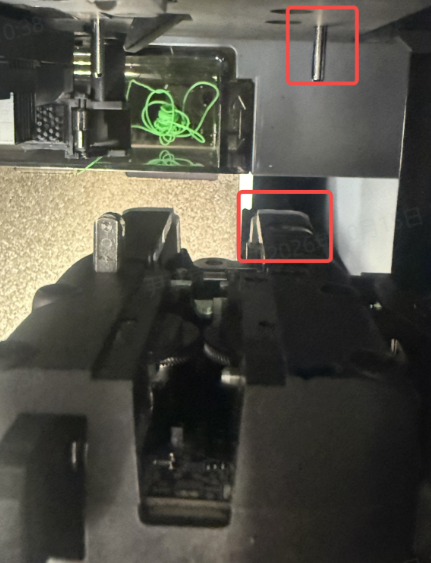
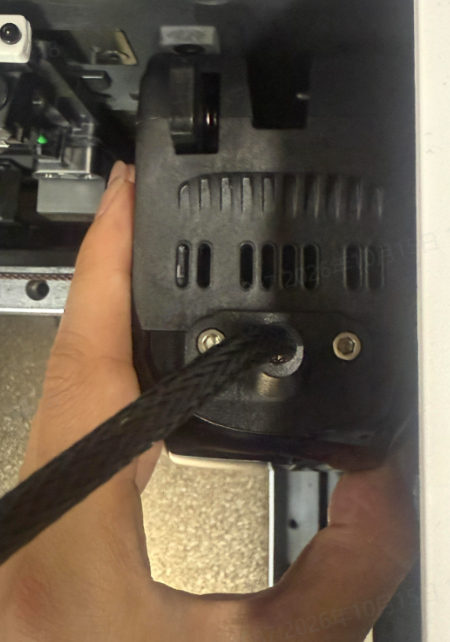
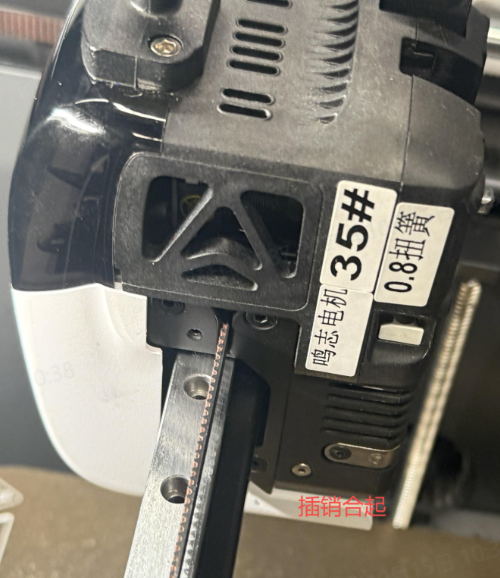
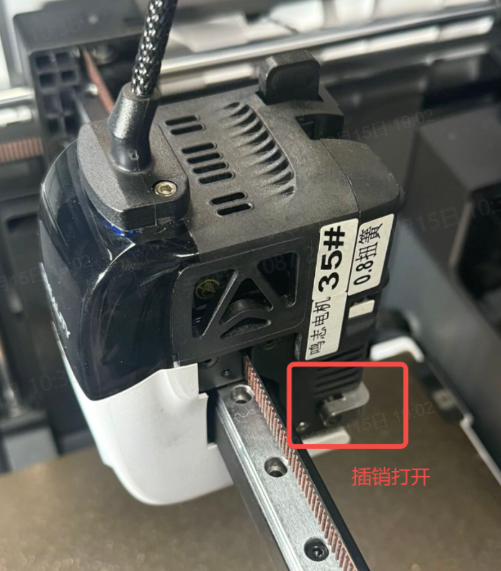
Before moving the printhead, check the status of the latch on the side of the printhead.
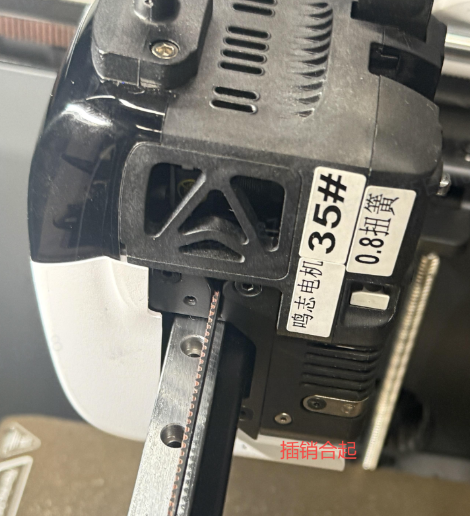
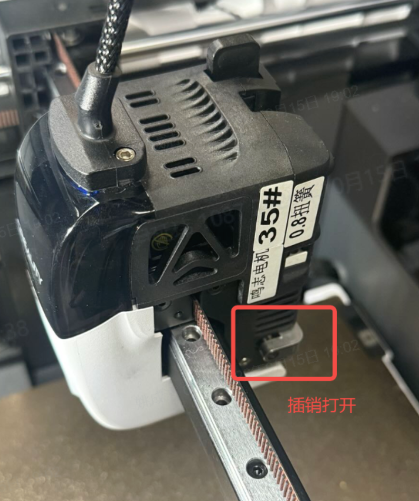
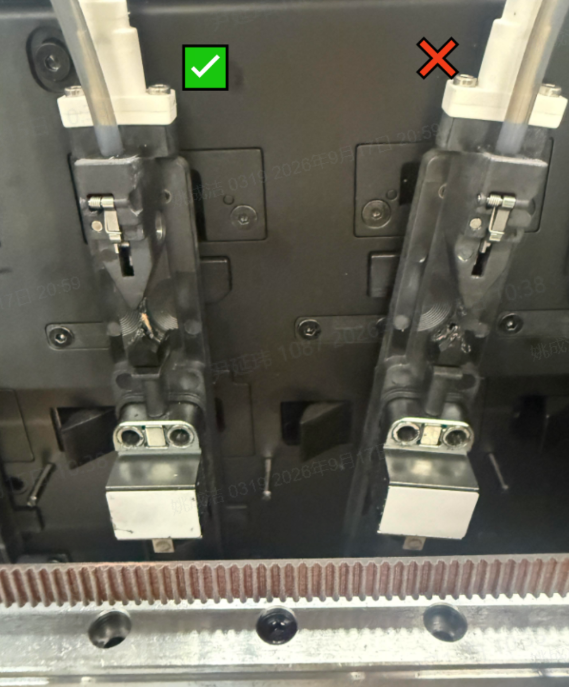
The latch has two states:
|
|
¶ If the latch is already open
Proceed to the next step.
¶ If the latch is in the closed position
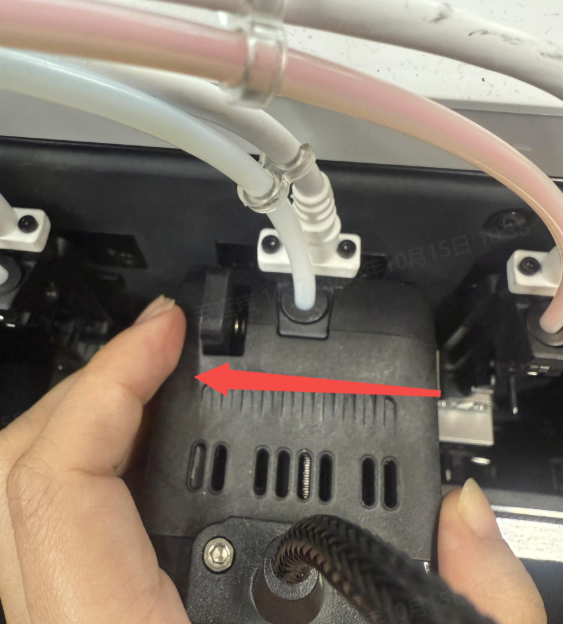
Align the printhead latch with the 5th pin on the backsheet, then slide the printhead to the left.
When you hear the sound of the latch opening, stop moving, and confirm again that the latch is fully open.
Note
Confirm that the latch is fully open before proceeding.
Do not forcibly connect the printhead to the nozzle if the latch is not fully open.
 |
 |
¶ Step 3: Move the Printhead to the Target Nozzle Position
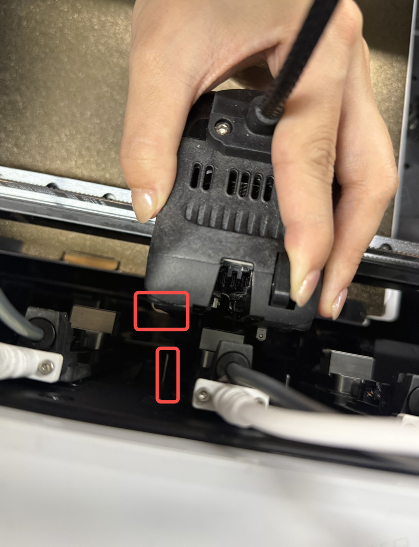
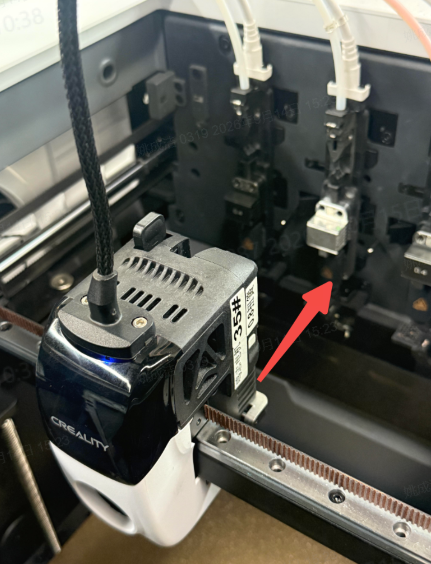
- Press and hold the open/close structure on top of the printhead;
- Maintain the press;
- Slowly move the printhead;
- Move the printhead to the position of the target nozzle to be removed.
Note
Keep the printhead stable during movement; avoid tilting it up or down or bumping the nozzle.
 |
 |
¶ Step 4: Align the Printhead with the Nozzle
After moving the printhead in front of the target nozzle, confirm that the printhead and nozzle are aligned.
Pay particular attention to confirming that the latch and corresponding pin/connection point are correctly aligned.
Then keep the printhead level and move slowly to complete the connection between the printhead and the nozzle.
Note
If there is a noticeable misalignment, readjust the printhead position. Do not force the connection by pushing hard.
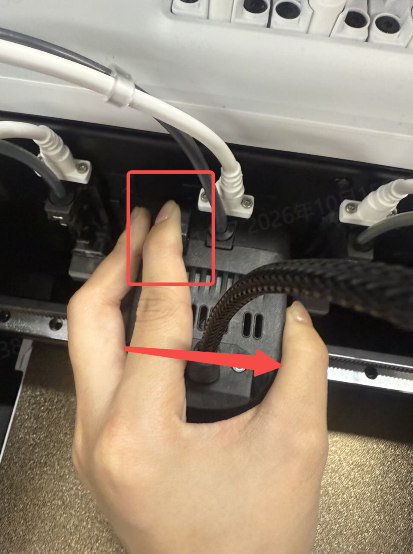
¶ Step 5: Move the Nozzle Out of the Nozzle Station
After confirming that the nozzle is correctly connected to the printhead, move the:
Printhead + Nozzle
as a single unit slowly out of the nozzle station.
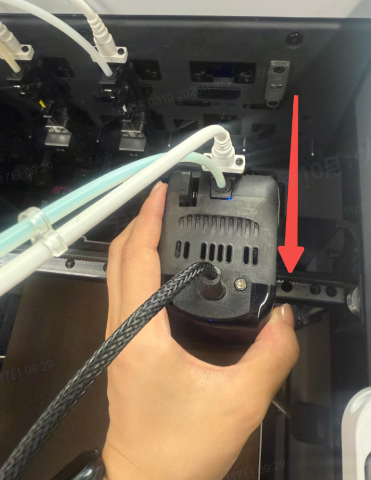
¶ Step 6: Move the Printhead to the Center of the Hot Bed
Slowly move the printhead with the attached nozzle to the center area of the hot bed.
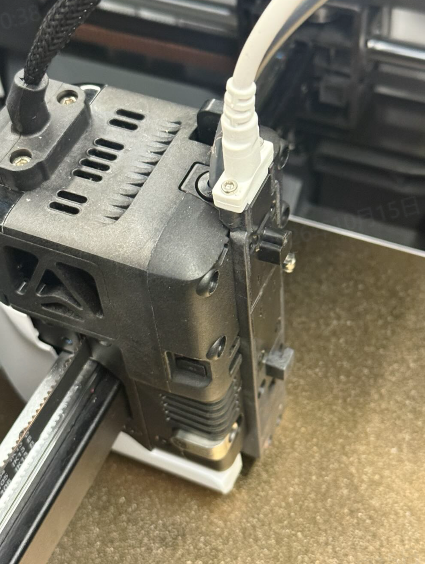
¶ Step 7: Check the Nozzle Connection Status
After removal, check:
- Whether the nozzle is fully installed on the printhead;
- Whether there is a noticeable gap between the nozzle and the printhead;
- Whether the nozzle is loose;
- Whether the nozzle maintains a normal orientation.
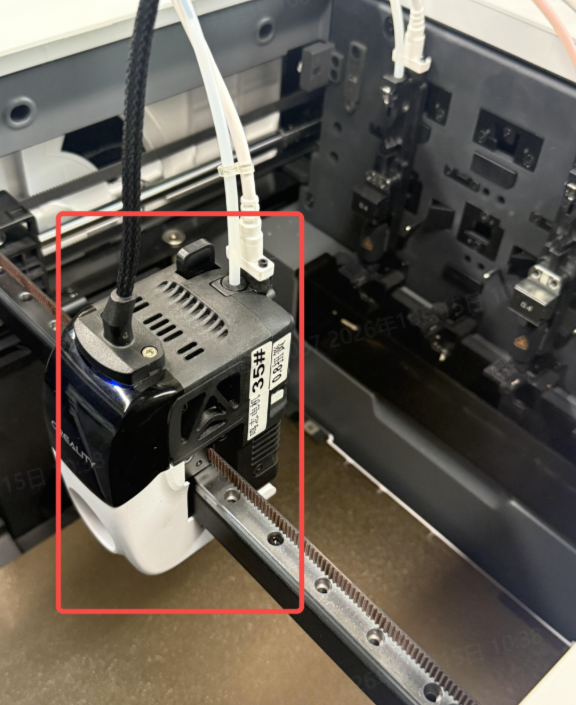
¶ 3.2 Returning the Nozzle Using the Printhead
When the nozzle on the printhead needs to be returned to the backsheet nozzle station, follow the steps below.
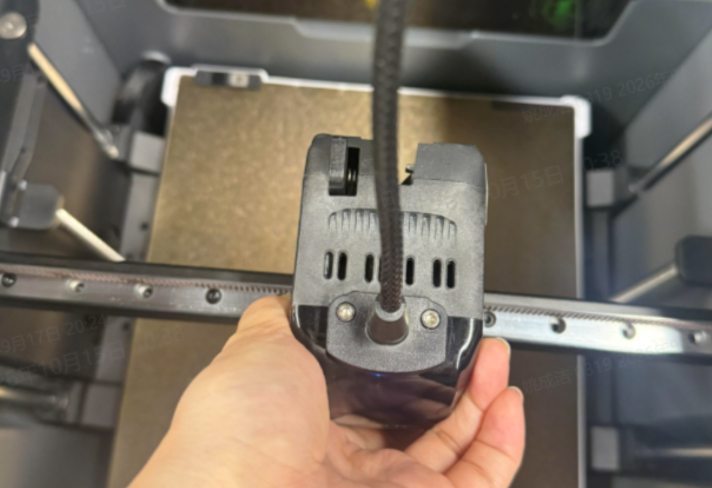
¶ Step 1: Confirm the Printhead Can Move
Gently try to move the printhead.
If the printhead cannot move, tap on the device interface: [Release]
Unlock the printhead before continuing.
This requirement is the same as when removing the nozzle.
 |
|
¶ Step 2: Confirm the Printhead Latch Is in the Open Position
Check the printhead latch.
|
|
If the latch is already open, proceed to the next step.
If the latch is in the closed position:
- Align the latch with the 5th pin on the backsheet and insert the latch opening onto the pin;
- Slide the printhead to the left;
- Listen for the sound of the latch opening;
- Then check from the side to confirm the latch is fully open.
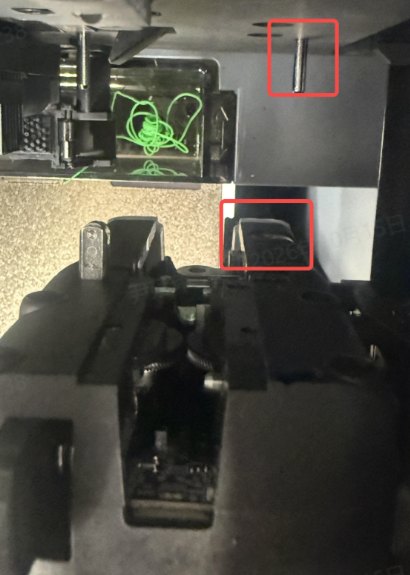
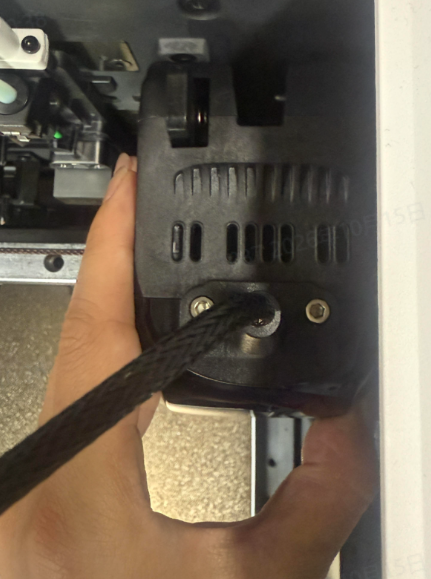
¶ Step 3: Move the Nozzle to the Corresponding Nozzle Station
Move the nozzle on the printhead to the nozzle installation position where it needs to be returned.
Keep the printhead level and slowly approach the nozzle station.
 |
 |
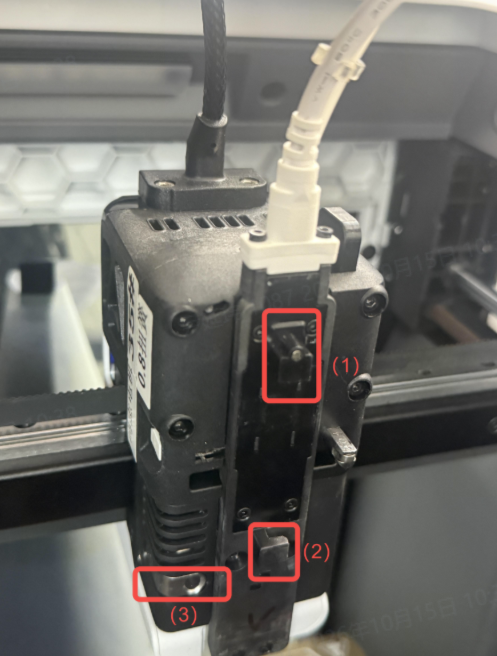
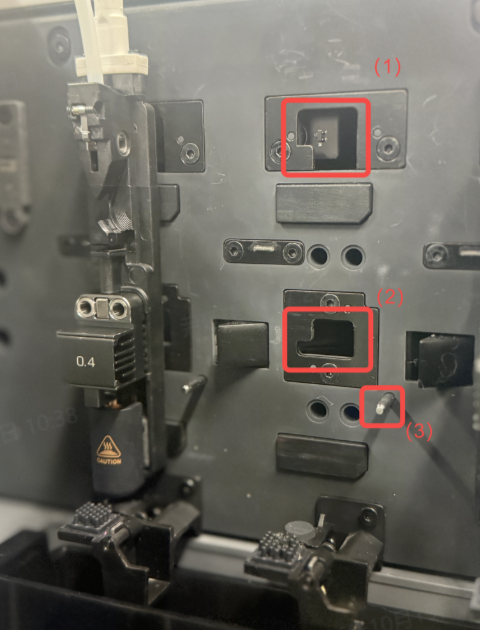
¶ Step 4: Align the Reference Points
Before returning the nozzle, confirm that the alignment structures on the printhead and backsheet are correctly lined up.
Align the:
Reference points 1, 2, and 3 on the printhead
with the corresponding:
Reference points 1, 2, and 3 on the backsheet
one by one.
Note
Do not continue pushing the nozzle in until the reference points are fully aligned.
 |
 |
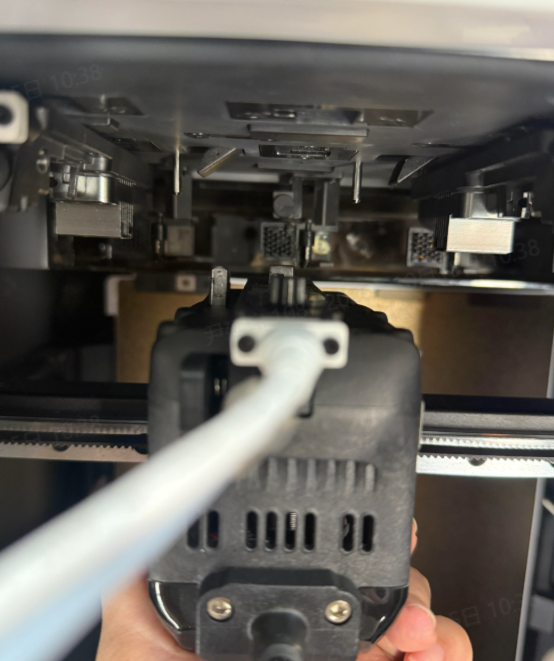 |
¶ Step 5: Insert the Nozzle into the Nozzle Station
Once the reference points are fully aligned, keep the printhead moving horizontally and insert the nozzle into the corresponding nozzle station.
Note
Maintain horizontal movement throughout the entire process.
If you encounter significant resistance, stop and recheck the reference points.
¶ Step 6: Confirm the Latch Is Fully Open
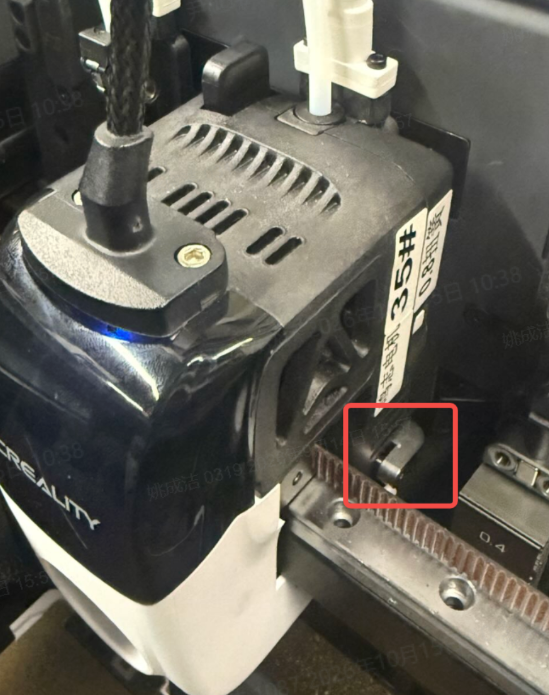
During the operation, if you hear the sound of the latch opening, check the latch status again from the side of the printhead.
Confirm the latch is fully open before continuing to move the printhead.
¶ Step 7: Move the Printhead Back to the Center of the Hot Bed
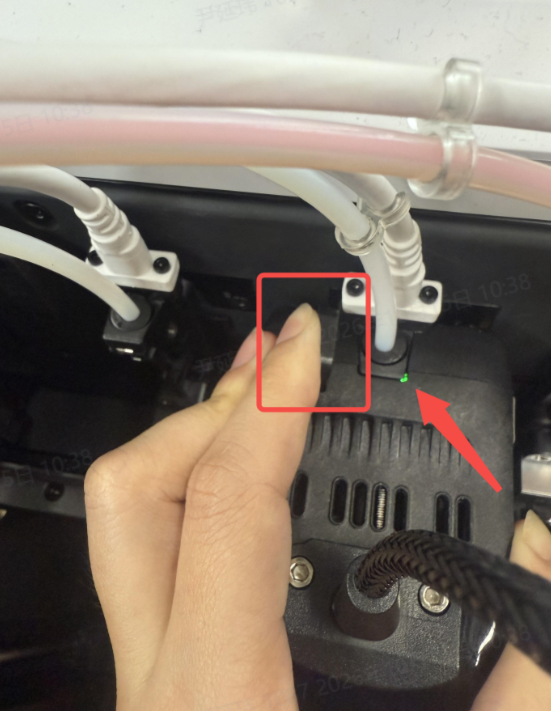
Continue pressing and holding the open/close structure on top of the printhead.
After confirming that the green indicator light on the printhead is lit, slowly move the printhead back to the center of the hot bed.
Note
It is recommended to use "green indicator light is lit" as a key success indicator, as this makes it easier for users to confirm whether the operation was completed correctly compared to simply stating "operation complete."
¶ Step 8: Check Whether the Nozzle Is Correctly Mounted
Check the nozzle status:
- The nozzle is firmly mounted on the backsheet;
- The left end of the nozzle is flush against the corresponding position;
- The nozzle has no noticeable tilt;
- The nozzle is not loose;
- The nozzle does not fall off on its own.
¶ Scenario 2: Nozzle Mounted on the Backsheet
If the nozzle is currently mounted on the backsheet and does not need to be removed or installed via the printhead, it can be manually removed or reinstalled directly as described below.
¶ 4.1 Manually Removing the Nozzle
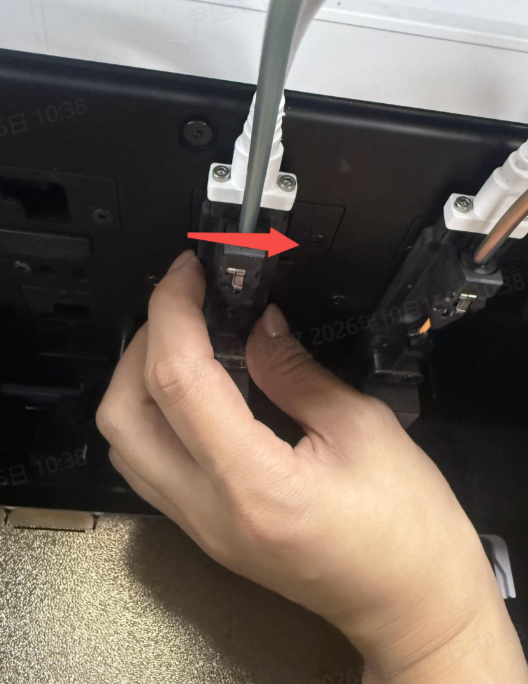
¶ Step 1: Hold the Middle of the Nozzle
Use your thumb to press against the middle of the nozzle.
At the same time, use your index finger to gently push the upper half of the nozzle to the right.
Note
Keep the nozzle stable during the operation. Do not pull the entire nozzle directly outward with force.
¶ Step 2: Release the Upper Slot
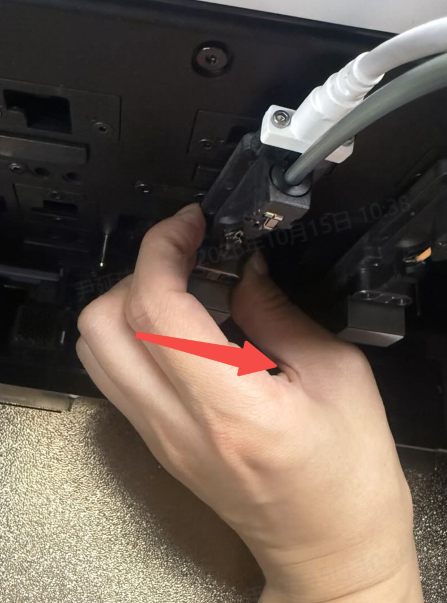
Continue gently pushing the upper half of the nozzle to the right. Once the upper part of the nozzle has disengaged from the slot:
- Use your middle and ring fingers to brace the lower half of the nozzle;
- Slowly pull the entire nozzle outward and out of the slot.
¶ Step 3: Fully Remove the Nozzle
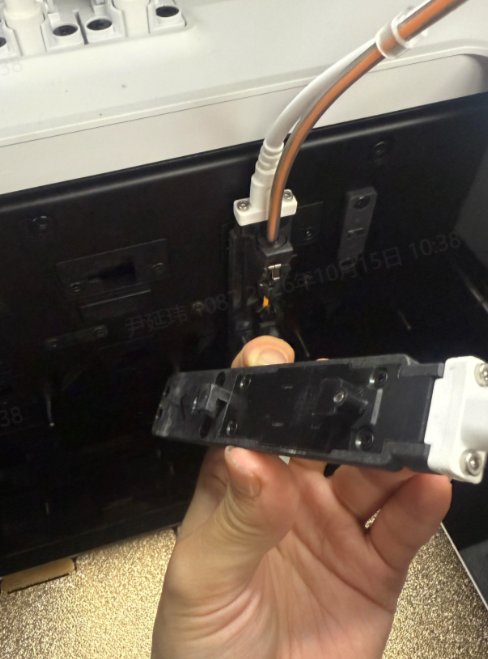
After confirming that both the upper and lower sections of the nozzle have disengaged from the backsheet, fully remove the nozzle.
After removal, place the nozzle in a safe location to avoid dropping or bumping it.
¶ 4.2 Manually Reinstalling the Nozzle
¶ Step 1: Align the Upper and Lower Slots of the Nozzle
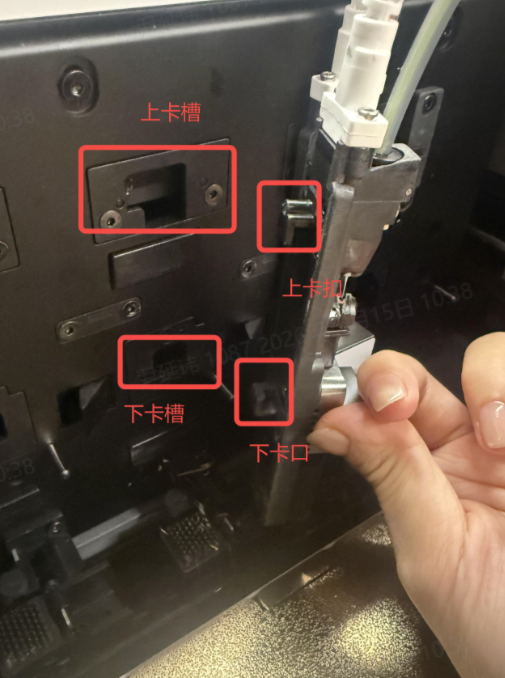
Before reinstalling the nozzle, confirm:
- The upper slot of the nozzle is aligned with the upper clasp on the backsheet;
- The lower slot of the nozzle is aligned with the lower clasp on the backsheet.
¶ Step 2: Install the Upper Clasp First
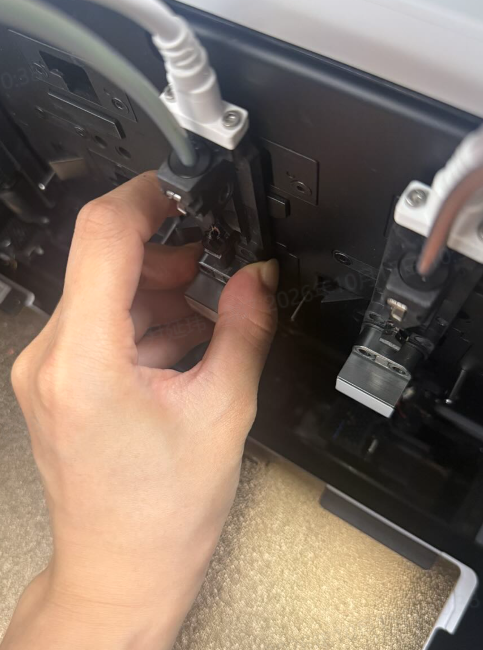
Use your thumb to brace the middle of the nozzle.
First, engage the upper clasp on the backsheet into the upper slot of the nozzle.
Confirm that the upper section has correctly entered the slot before proceeding to the next step.
¶ Step 3: Install the Lower Clasp
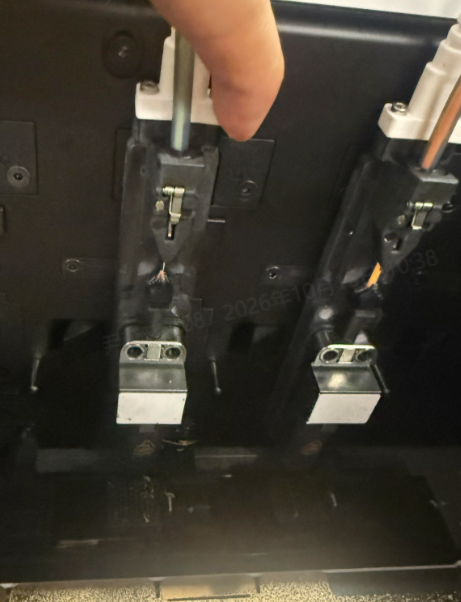
Keep the nozzle in a stable position.
Continue pushing in the natural installation direction of the nozzle to engage the lower clasp on the backsheet into the lower slot of the nozzle.
Note
Do not force both the upper and lower clasps in simultaneously.
It is recommended to follow this order:
Upper clasp first → then lower clasp.
¶ Step 4: Check the Nozzle Installation Status
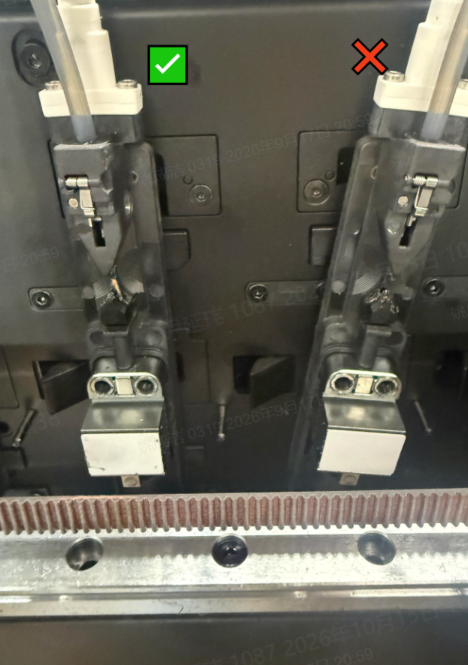
After installation, gently shake or touch the nozzle to check.
Confirm:
- The nozzle is securely locked onto the backsheet;
- The nozzle has no noticeable looseness;
- The nozzle will not fall off;
- The nozzle has no noticeable tilt overall.
¶ Post-Operation Check
Regardless of the method used to remove or install the nozzle, it is recommended to check the following after the operation:
| Inspection Items | Normal Status |
| Print head | Moves normally without obvious stalling |
| Latch | Status is normal, can be opened properly |
| Nozzle | Properly installed |
| Nozzle orientation | No obvious tilt |
| Nozzle fixation | No obvious looseness |
| Nozzle station | Nozzle is correctly mounted |
| Related cables/tubing | No abnormal pulling or bending |
| Indicator light | Status is normal when it should be lit according to the procedure |
If the nozzle is found to not be fully installed, do not continue printing. Re-perform the corresponding removal or installation steps.
¶ Frequently Asked Questions
¶ 6.1 The Printhead Cannot Be Moved Manually
Do not forcibly push the printhead.
Tap [Release] on the device interface.
Unlock the printhead before attempting to move it. Your existing operation guide already includes this action as a prerequisite step for removing and installing the nozzle via the printhead.
¶ 6.2 The Latch Cannot Open Properly
Please check:
- Whether the latch is actually in the closed state;
- Whether the printhead latch is correctly aligned with the 5th pin on the backsheet;
- Whether the direction of printhead movement is correct;
- Whether there are any foreign objects or structural interference around the latch.
Do not continue removing or installing the nozzle without confirming that the latch is fully open.
¶ 6.3 The Printhead Cannot Connect to the Nozzle
Recheck the relative positions of the printhead and the nozzle.
Pay particular attention to:
- Whether the printhead and nozzle are at the same height;
- Whether the latch position is correct;
- Whether the printhead is kept level;
- Whether the nozzle is correctly positioned at the nozzle station.
Do not force the connection by pushing hard.
¶ 6.4 The Nozzle Cannot Be Returned to the Station
Check whether the alignment structures on the nozzle and backsheet are fully aligned.
For the scenario of returning the nozzle using the printhead, focus on confirming:
Printhead reference points 1 / 2 / 3 correspond one-to-one with backsheet reference points 1 / 2 / 3.
¶ 6.5 The Nozzle Is Loose After Manual Reinstallation
Please check:
- Whether the upper clasp has fully entered the upper slot;
- Whether the lower clasp has fully entered the lower slot;
- Whether the nozzle has a noticeable tilt.
Reinstall the nozzle following the order:
Install the upper clasp first → then install the lower clasp.
¶ 6.6 The Nozzle Is Tilted After Installation
Stop all further operations or printing.
Remove the nozzle again and inspect the nozzle station, clasps, and alignment structures, then reinstall.
After installation, confirm that the nozzle maintains a normal overall orientation with no noticeable tilt.
¶ Operating Precautions
- Please pay particular attention during operation:
- Do not forcibly push the printhead while it is locked;
- Do not forcibly remove or install the nozzle when the latch is not fully open;
- Do not connect the printhead to the nozzle by pushing with excessive force;
- Do not pull the nozzle directly outward with force;
- When manually reinstalling the nozzle, install the upper clasp first, then the lower clasp;
- After each operation, check whether the nozzle is fully installed in place;
- Do not handle the nozzle directly with your hands when the nozzle temperature is high.