Download Path: Creality Pika Scanner User Manual.pdf
¶ Creality Pika 3D Scanner User Manual V1.0
Foreword
Thank you for choosing the Creality Pika 3D scanner. This manual aims to help you quickly understand the basic information and scanning process of this scanner, opening up a whole new 3D scanning experience.
You can visit the Creality official Wiki: https://wiki.creality.com/3d-scanner to get the latest "Creality Pika 3D Scanner User Manual", detailed tutorials, and videos. This manual will be continuously updated; please refer to the latest version for the most up-to-date information.
¶ Table of Contents
- 1. Product Introduction
- 2. First Use
- 3. Detailed Explanation of Scanning Modes
- 4. Other Functions
- 5. Equipment Specifications
- 6. Precautions
- Community & Support
¶ 1. Product Introduction
¶ 1.1 Scanner Components
¶ Front & Side Components
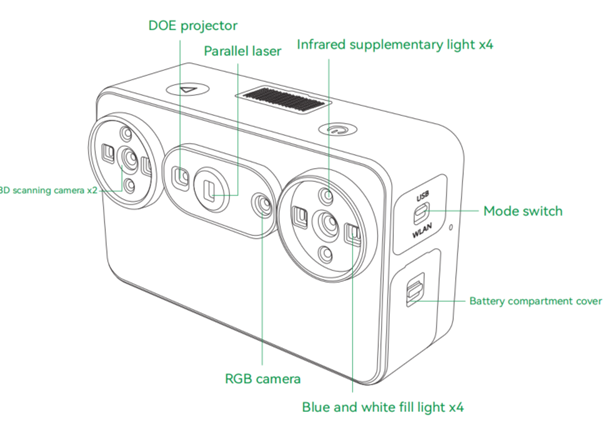
- DOE Projector
- Parallel Laser
- Infrared Supplemental Light × 4
- 3D Camera × 2
- RGB Camera
- Blue/White Supplemental Light × 4
- Mode Switch (USB / WLAN)
- Battery Compartment Cover
¶ Rear & Side Components
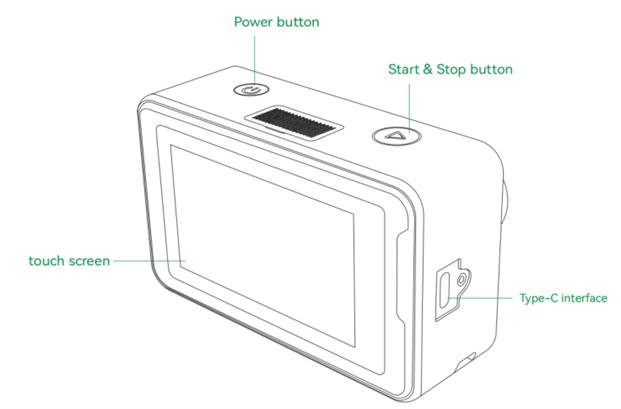
- Power Button
- Start/Stop Button
- Touchscreen
- Type-C Interface
¶ 1.2 Part List
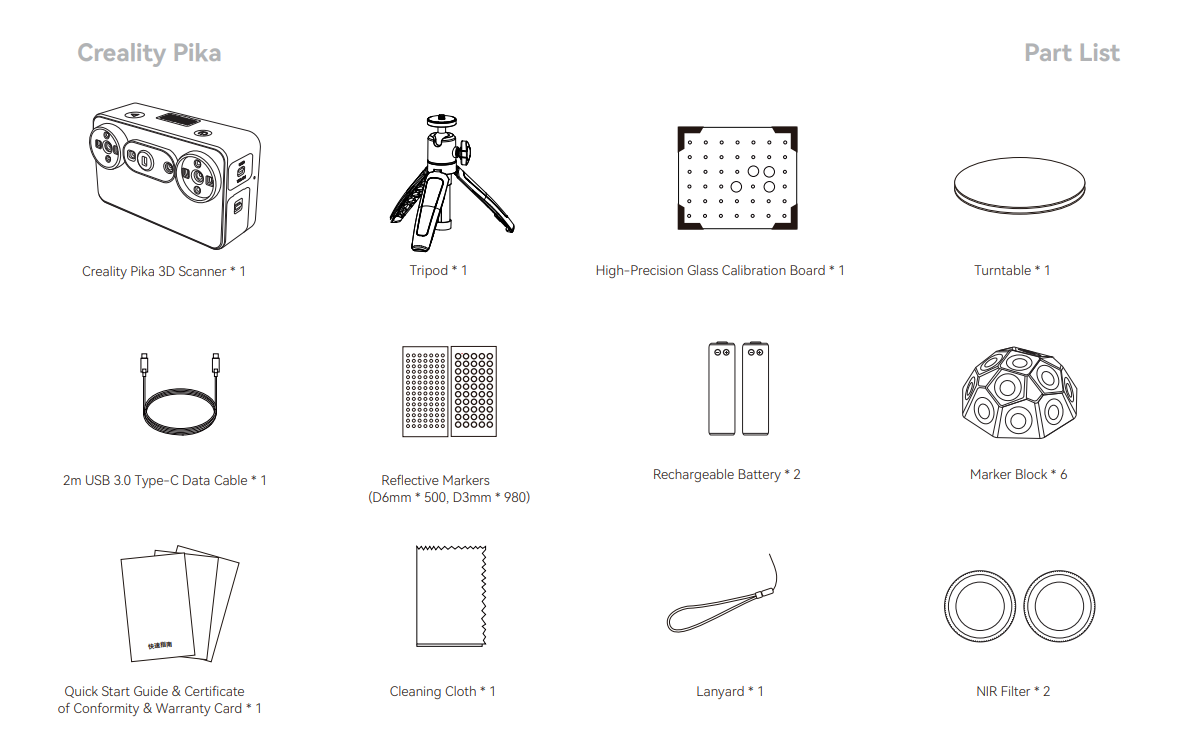
| Item Name | Quantity | Item Name | Quantity |
|---|---|---|---|
| Creality Pika 3D Scanner | 1 | Rechargeable Battery | 2 |
| Tripod | 1 | Marker Block | 6 |
| High-Precision Glass Calibration Board | 1 | NIR Filter | 2 |
| Turntable | 1 | Lanyard | 1 |
| 2m USB 3.0 Type-C Data Cable | 1 | Cleaning Cloth | 1 |
| Reflective Markers (D6mm × 500, D3mm × 980) | 1 Set | Quick Start Guide / Certificate / Warranty Card | 1 |
¶ 2. First Use
¶ System Requirements
¶ Mobile Device Configuration Requirements
Note for Samsung users: Only Qualcomm Snapdragon versions are supported. Exynos versions are not supported. Please confirm that the processor is Snapdragon before purchasing.
| Platform | Tier | Recommended / Example Models | Hardware & OS Specifications |
|---|---|---|---|
| Android | Recommended | Samsung :S26 series(Qualcomm Snapdragon version) Xiaomi : 17 series OPPO :Find X9 Ultra Honor Magic 8 Pro |
Qualcomm Snapdragon 8 Gen4+, Android 10.0+, 12GB+ RAM |
| Android | Lowest | Samsung :S23 Ultra(Qualcomm Snapdragon version) Xiaomi :15 series |
Qualcomm Snapdragon 8 Gen2+, Android 10.0+, 8GB+ RAM |
| IOS | Recommended | iPhone 16 Pro | A17 or later, iOS 15+, 8GB+ RAM |
| IOS | Lowest | iPhone 14 | A15 or later, iOS 15+, 6GB+ RAM |
¶ PC Configuration Requirements
| Platform | Tier | Operating System | Processor (CPU) | Graphics Card (GPU) | RAM | Min Software Version |
|---|---|---|---|---|---|---|
| Windows | Recommended | Win 10 / 11 (64-bit) | Intel i7 Gen13 and above | NVIDIA RTX 3060 or higher (8GB VRAM) | ≥32GB | ≥ V4.2.3 |
| Windows | Minimum | Win 10 / 11 (64-bit) | Intel i7 Gen7 | NVIDIA Dedicated GPU (6GB VRAM) | ≥16GB | ≥ V4.2.3 |
| macOS | Recommended | macOS 14 and above | Apple M3 and above | Integrated | ≥32GB | ≥ V4.2.3 |
| macOS | Minimum | macOS 14 and above | Apple M2 | Integrated | ≥16GB | ≥ V4.2.3 |
⚠️ Important Pre-use Note:
Before using the Creality Pika to scan, you must connect it to your phone or computer and launch the accompanying software.
Be sure to remove all protective films from the scanner lenses, filters, lasers, and touchscreen before first use to ensure optimal scanning accuracy and display quality.
¶ 2.1 Mobile Phone Connection Mode (Recommended)
¶ (1) Preparation
-
Software:
- Connect your phone to the internet (4G/5G/Wi-Fi).
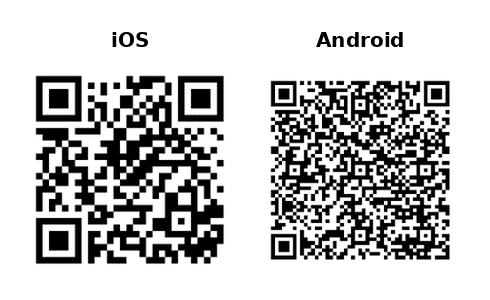
- Download and install CrealityScan App (Version ≥ V3.1.0) from the App Store / Google Play.
-
Hardware:
⚠️ First Use Battery Activation: Due to transportation safety regulations, the battery ships at low charge. Charge the battery for at least 30 minutes before first use to activate it.
💡The battery can be charged separately via its port or while installed in the device.- Insert the charged battery into the Pika body following the "INSERT / 此端推入" direction arrow.
-new.png)
💡 Beginner Tip: It is recommended to use the turntable and marker blocks. Place the object on the turntable to scan. It is recommended to scan small to medium-sized objects (about 10 cm) with matte or complex surface textures, such as mice, remote controls, and figurines. It is not recommended to scan objects that are too small (≤10 mm) or have a glossy or reflective surface.
- Insert the charged battery into the Pika body following the "INSERT / 此端推入" direction arrow.
¶ (2) Establish Connection (Wi-Fi connection)
-
Switch Mode & Power On
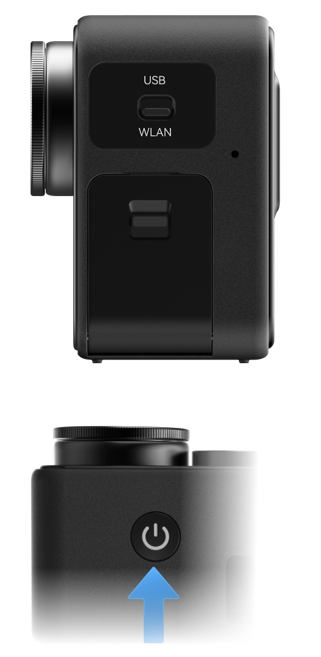
Switch the mode switch on the side of the Pika to the corresponding wireless WLAN position, then press and hold the Power Button for 5 seconds until the screen lights up.
-
View Hotspot Credentials
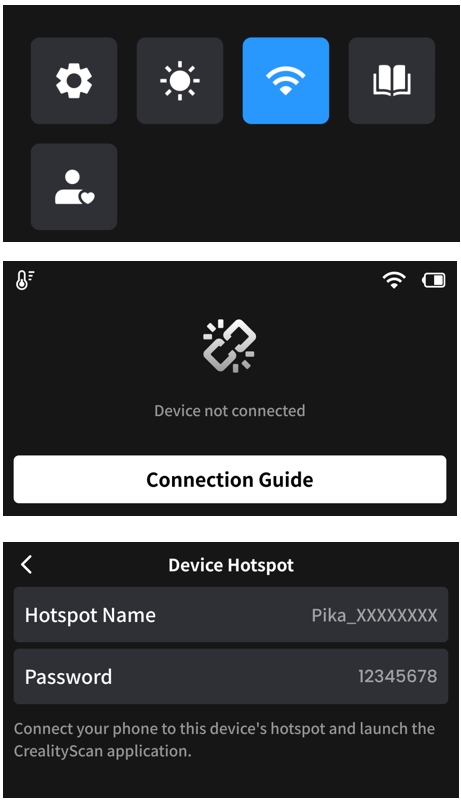
Swipe down on the Pika screen to open the status bar and view the hotspot name and password in the menu.💡 Tip: You can also follow the "Connection Guide" instructions on the homepage to view the hotspot credentials.
-
Connect Mobile Phone to Wi-Fi
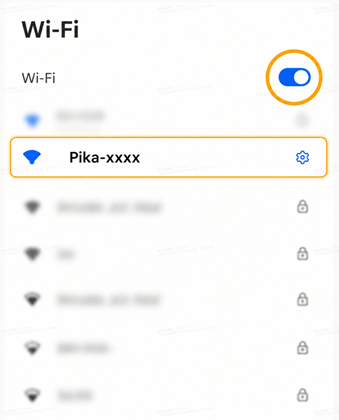
Open your phone's Wi-Fi settings list, locate Pika's hotspot name, and enter the password to complete the connection.
-
Launch CrealityScan App
After a successful connection, open the downloaded CrealityScan APP on your phone and wait for the device to come online.
¶ (3) Start Scanning
-
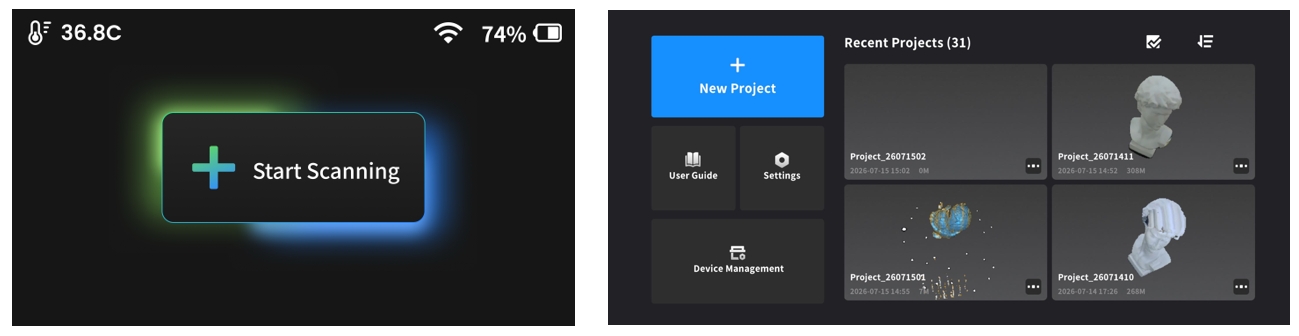
Tap Start Scanning on Pika's screen or tap New Project in the CrealityScan App.
-
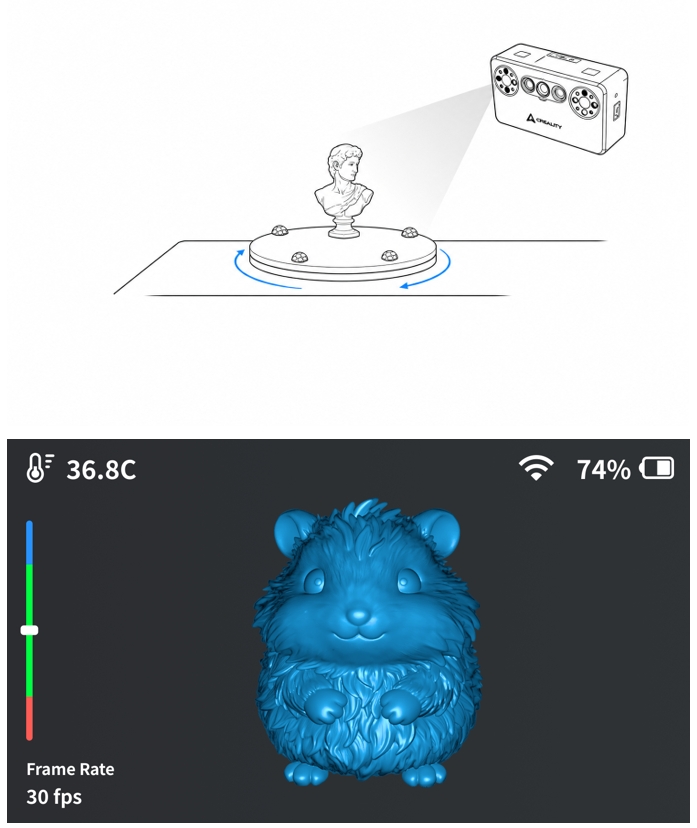
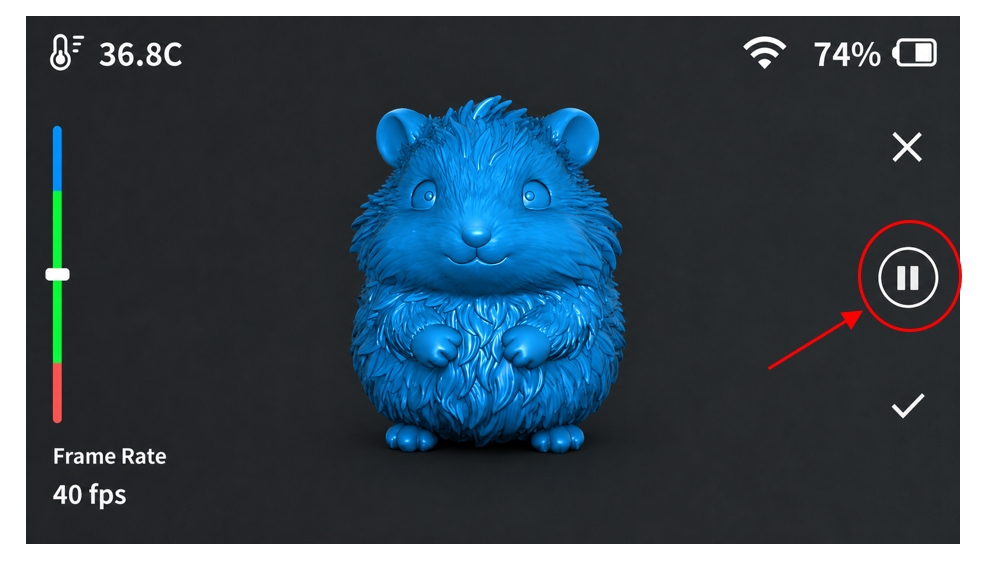
When scanning, focus your gaze on the object being scanned and the screen on the Pika scanner itself..Position the scanner so the distance indicator bar on screen stays within the green zone (optimal scanning distance).
-
Scanning Controls:
- Press the top mechanical Start/Stop button to quickly start, pause, or resume scanning.
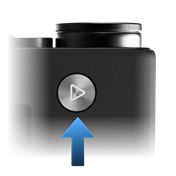
- Touchscreen gestures and on-screen control buttons can also be used.
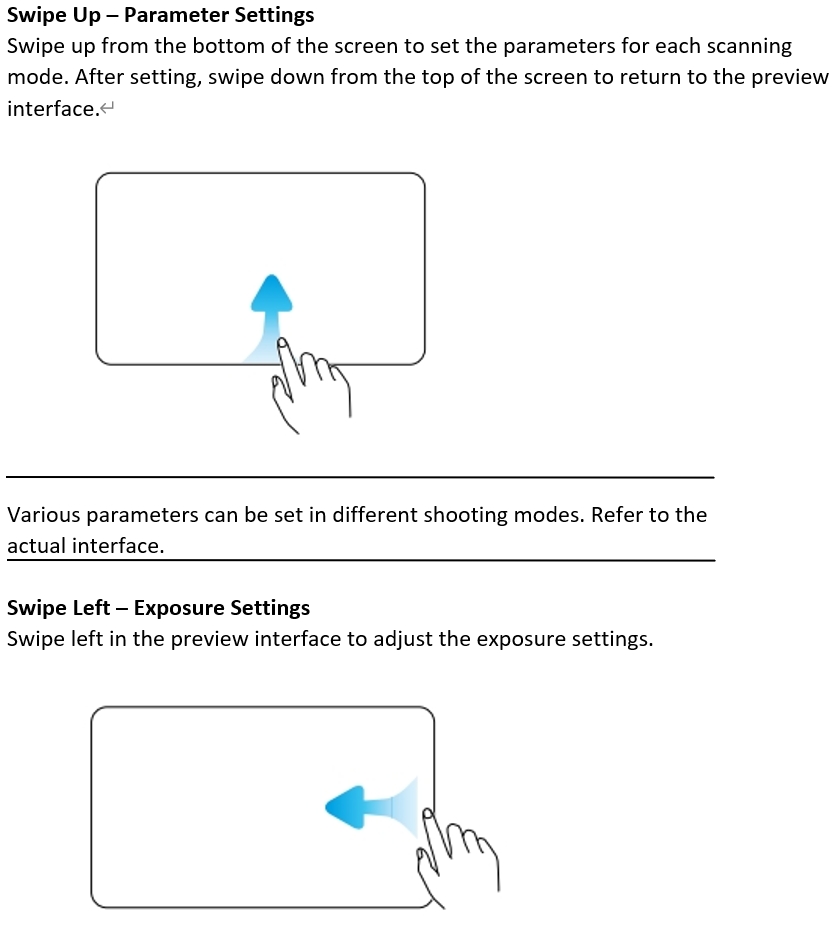
- Press the top mechanical Start/Stop button to quickly start, pause, or resume scanning.
¶ (4) USB Connection (Android Devices Only)
-
Switch Mode & Power On
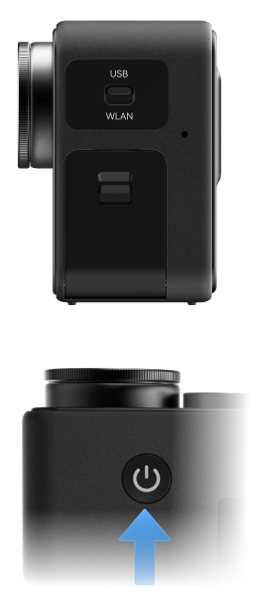
Switch the mode switch on the side of the Pika to the corresponding wired USB position, then press and hold the Power Button for 5 seconds until the screen lights up.
-
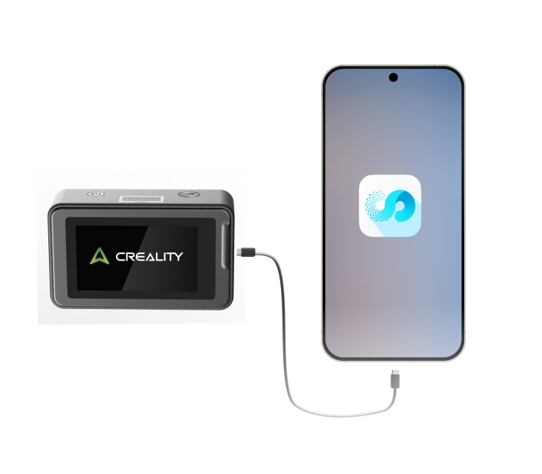
Connect Pika to your Android phone via the Type-C cable and launch the CrealityScan App.
-
On-Screen Control Buttons in USB Mode:
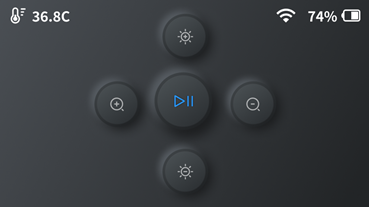
- Start/Pause Button:
Tap once to start/pause; press and hold for 2 seconds to stop/finish. - Exposure Button:


Tap to adjust exposure level. - Zoom Button:


Tap to adjust zoom level.
- Start/Pause Button:
¶ 2.2 PC Connection Mode
Ideal for high-speed, detailed, and large-scene scanning,and supports both wired and wireless connection methods.
¶ (1) Preparation
- Software:
Download and install CrealityScan 4 from https://wiki.creality.com/en/software/scan-software.- macOS Note: Grant full read/write permissions to the app for proper point cloud processing and model generation.

- macOS Note: Grant full read/write permissions to the app for proper point cloud processing and model generation.
- Hardware:
⚠️ First Use Battery Activation: Due to transportation safety regulations, the battery ships at low charge. Charge the battery for at least 30 minutes before first use to activate it.
💡The battery can be charged separately via its port or while installed in the device.- Insert the charged battery into the Pika body following the "INSERT / 此端推入" direction arrow.

💡 Beginner Tip: It is recommended to use the turntable and marker blocks. Place the object on the turntable to scan. It is recommended to scan small to medium-sized objects (about 10 cm) with matte or complex surface textures, such as mice, remote controls, and figurines. It is not recommended to scan objects that are too small (≤10 mm) or have a glossy or reflective surface.
- Insert the charged battery into the Pika body following the "INSERT / 此端推入" direction arrow.
¶ (2) Establish Connection
¶ Method 1: Wired Connection
-
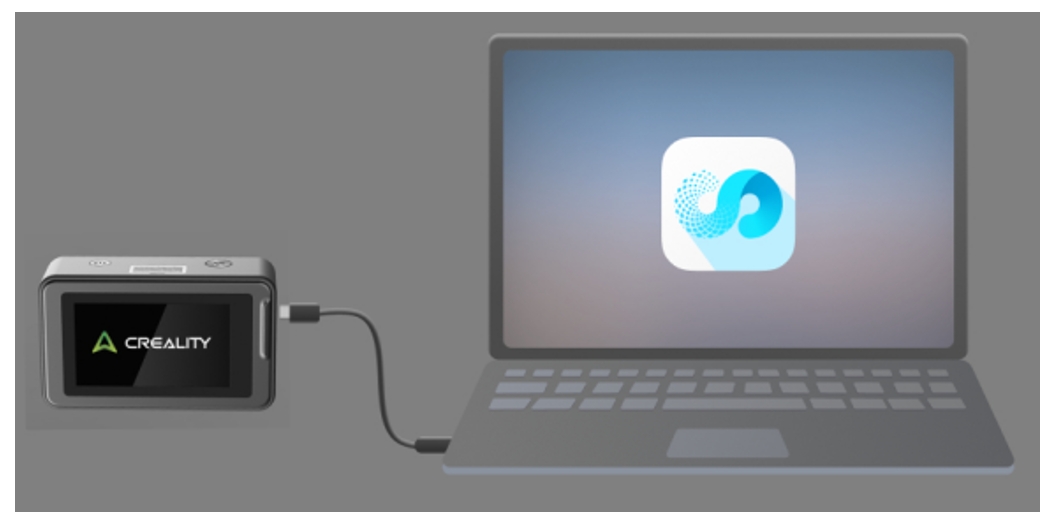
Switch Mode & Power On
Switch the mode switch on the side of the Pika to the corresponding wired USB position, then press and hold the Power Button for 5 seconds until the screen lights up.
-
Connect Pika to your PC using the included 2m USB 3.0 Type-C cable (plug into a USB 3.0 blue port or higher).
-
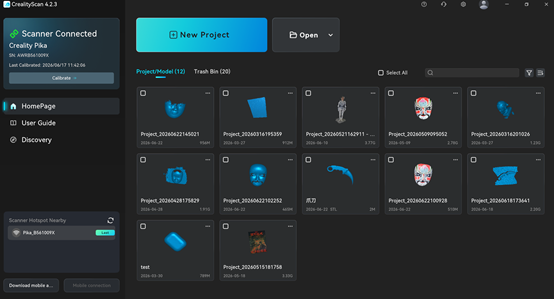
Launch CrealityScan. The device will auto-detect.
-
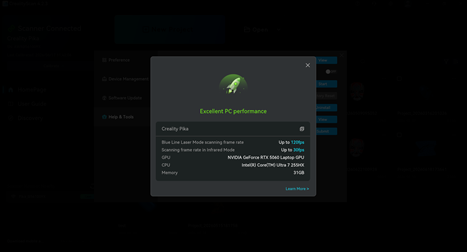
After connecting the scanner for the first time, the software will automatically pop up a performance test panel. It is recommended to complete the performance test before starting to scan.
¶ Method 2: Wireless Connection
-
Switch Mode & Power On
Switch the mode switch on the side of the Pika to the corresponding wireless WLAN position, then press and hold the Power Button for 5 seconds until the screen lights up.
-
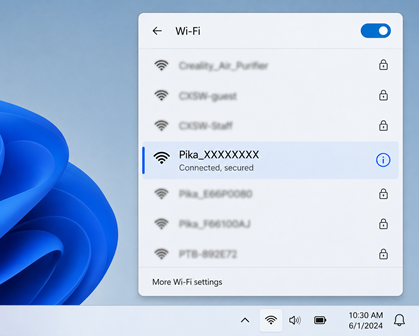
View Hotspot Credentials
Swipe down on the Pika screen to open the status bar and view the hotspot name and password in the menu.💡 Tip: You can also follow the "Connection Guide" instructions on the homepage to view the hotspot credentials.
-
Open your pc's Wi-Fi settings list, locate Pika's hotspot name, and enter the password to complete the connection.
-
Launch CrealityScan. The device will auto-detect.
-
After connecting the scanner for the first time, the software will automatically pop up a performance test panel. It is recommended to complete the performance test before starting to scan.
¶ (3) Start Scanning
-
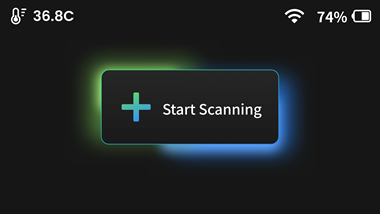
Tap Start Scanning on Pika's screen or tap New Project in the CrealityScan.

-
When scanning, focus your gaze on the object being scanned and the screen on the Pika scanner itself..Position the scanner so the distance indicator bar on screen stays within the green zone (optimal scanning distance).
-
Scanning Controls:
- Press the top mechanical Start/Stop button to quickly start, pause, or resume scanning.
- Press the top mechanical Start/Stop button to quickly start, pause, or resume scanning.
¶ 3. Detailed Explanation of Scanning Modes
¶ 3.1 Blue Laser Mode
Designed for high-accuracy and high-detail scanning. Typically used with reflective markers.
-
Parallel Line Mode:
- Features: Ultra-high accuracy and fine detail.
- Best For: Fine-detailed objects. Place markers on the surrounding table or turntable if the object is small.
💡 Tip1: Resolution Setting:- Higher resolution yields finer details but consumes more system memory/RAM. Select resolution based on PC/phone performance.
💡 Tip2: Multi-angle Alignment: - Scan the object from multiple orientations (e.g., top and bottom) and use the software's Alignment feature to merge scans into a complete 3D model.
¶ 3.2 Infrared Mode
Designed for markerless scanning of human faces, bodies, sculptures, and feature-rich objects.
-
Features: Safe, fast, invisible infrared light (eye-safe).
-
Applicable Scenarios: Body scanning, cultural heritage preservation, medical rehabilitation, etc.
-
Texture Capture: Supports full-color texture scanning.
-
Outdoor Scanning Tip (NIR Filter):
- When scanning outdoors or under bright ambient light, install the 2 NIR Filters onto the front 3D camera lenses.
- This blocks sunlight interference and prevents overexposure.
¶ 4. Other Functions
¶ 4.1 Calibration
If scanning accuracy degrades or the device hasn't been used for a long time, perform calibration:
- Take out the High-Precision Glass Calibration Board.
- Connect Pika to the mobile App or PC software.
- Select Calibration and follow the step-by-step on-screen instructions.
¶ 4.2 System Upgrade
Creality periodically releases software and firmware updates to enhance performance. Keep both the Pika scanner firmware and CrealityScan software up to date.
¶ 5. Equipment Specifications
¶ 5.1 Hardware Parameters
| |Model|Model |
| Parameter | 7 Parallel Blue Laser | NIR Structured Light |
|---|---|---|
| Accuracy | Up to 0.03 mm | Up to 0.1 mm |
| 3D Resolution | 0.1 – 2.0 mm | 0.15 – 2.0 mm |
| Scanning Speed (Phone) | Up to 40 FPS | Up to 20 FPS |
| Scanning Speed (PC) |
Up to 110 FPS | Up to 30 FPS |
| Min. Scan Volume | 10 × 10 × 10 mm | 50 × 50 × 50 mm |
| Single Capture Range | 101×107 mm@ 160mm 344×268 mm@ 400mm |
144×134 mm@ 200mm 764×670 mm@1000mm |
| Working Distance | 160 – 400 mm | 140 – 1,000 mm |
| Color Texture | Supported | Supported |
| Alignment Mode | Marker / Global Marker / Marker-Free | Geometry / Texture |
| Outdoor Light Resistance | ≤ 110,000 lux | ≤ 80,000 lux (with NIR filter) |
| NIR Filter | / | Supported |
| Supplemental Light | 4 × Blue/White LEDs + 4 × Infrared LEDs | |
| Laser Safety Class | Class I (Eye-Safe) | |
| Input Power | 5V 3A | |
| Processor & Screen | 8-core CPU (2.0 GHz), 3.0-inch Touchscreen | |
| Battery & Interface | 3350 mAh (Includes 2nd backup battery), Type-C USB 3.0, Wi-Fi 6 | |
| Dimensions & Weight | 100 × 60 × 35 mm, 260 g (battery included) | |
| Operating Temp / Humidity | -10°C to 40°C, 10–90% RH | |
| Wired Connection | Supported on Android, Windows, and macOS (iOS is not supported) | |
| Wi-Fi / Wi-Fi 6 Connection | Supported on Android, Windows, macOS, and iOS |
- Accuracy is evaluated in laboratory conditions and actual results may be affected by operating environments such as vibration, temperature, and other factors.
¶ 6. Precautions
About the Creality Pika 3D Scanner
● Please do not disassemble or assemble the equipment yourself.
● Please use the dedicated accessories included with the product, such as charger and calibration board.
¶ 6.1 Usage Notes
Please note the following points, otherwise it may cause equipment damage or machine malfunction.
● Please avoid significant vibrations and impacts when using this product. The Creality Pika 3D scanner is a high-precision device with a delicate internal structure; severe vibrations or impacts may damage the structure and cause damage to the optical components.
● Please use this device at the recommended temperature and humidity.
● Please ensure the usage environment is suitable, and when using a wired connection, ensure the cable connector is intact.
¶ 6.2 Maintenance Notes
● To clean the equipment, please use a cotton cloth dampened with diluted neutral detergent, wring it out, and wipe it. Do not use a damp cloth, volatile oil, thinner, or other liquids to wipe the equipment, as this may damage the equipment's exterior or, in severe cases, damage the equipment parts.
● Store the equipment in its instrument case in a cool, dry place with a relatively stable temperature. Avoid storing it in the following places:
- Places with excessively high or low temperature and humidity
- Places with a lot of dust
- Places containing corrosive or flammable gases
- Places containing corrosive or flammable liquids
Shenzhen Creality 3D Technology Co., Ltd.
Official website: www.creality.com
Tel: +86 755 3396 5666 Customer Service : cs@creality.com
Company Address: 18F, JinXiuHongDu Building, Meilong Blvd., Longhua Dist. Shenzhen, 518131 China

Your device has been certified by the relevant countries and regions. You can view this electronic certification information on your device: Go to the device's "Settings" menu, select "My Device", tap "Certification Information" to find all applicable electronic certification marks and details.